To integrate the DualShield with a VPN appliance, you need to complete the following steps:
Set up DualShield RADIUS Server
Enable Agent Registration
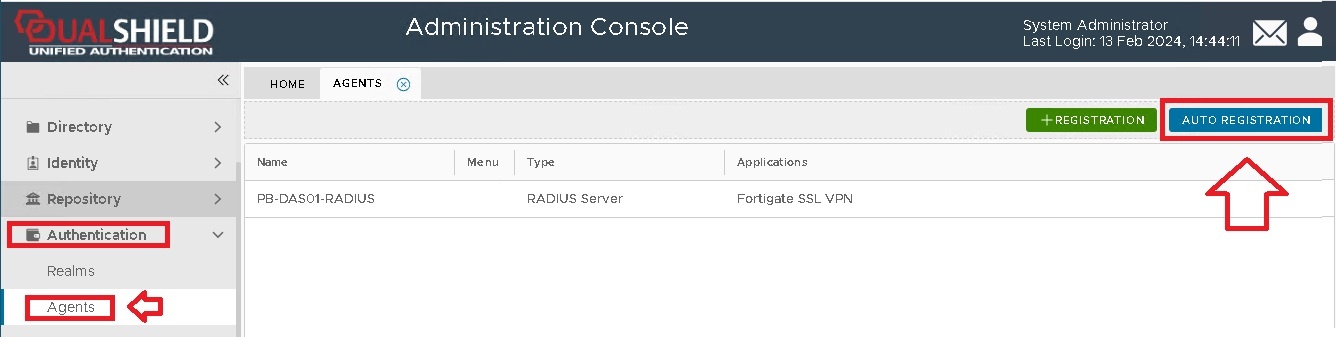
From the point of view of the DualShield authentication server, the DualShield RADIUS server is treated as an Authentication Agent. Therefore, in order to install a DualShield RADIUS server, we need to first enable the Agent Registration option.
For security purposes, the agent registration function is disabled by default. You need to enable the Agent Auto Registration function in your DualShield authentication server.
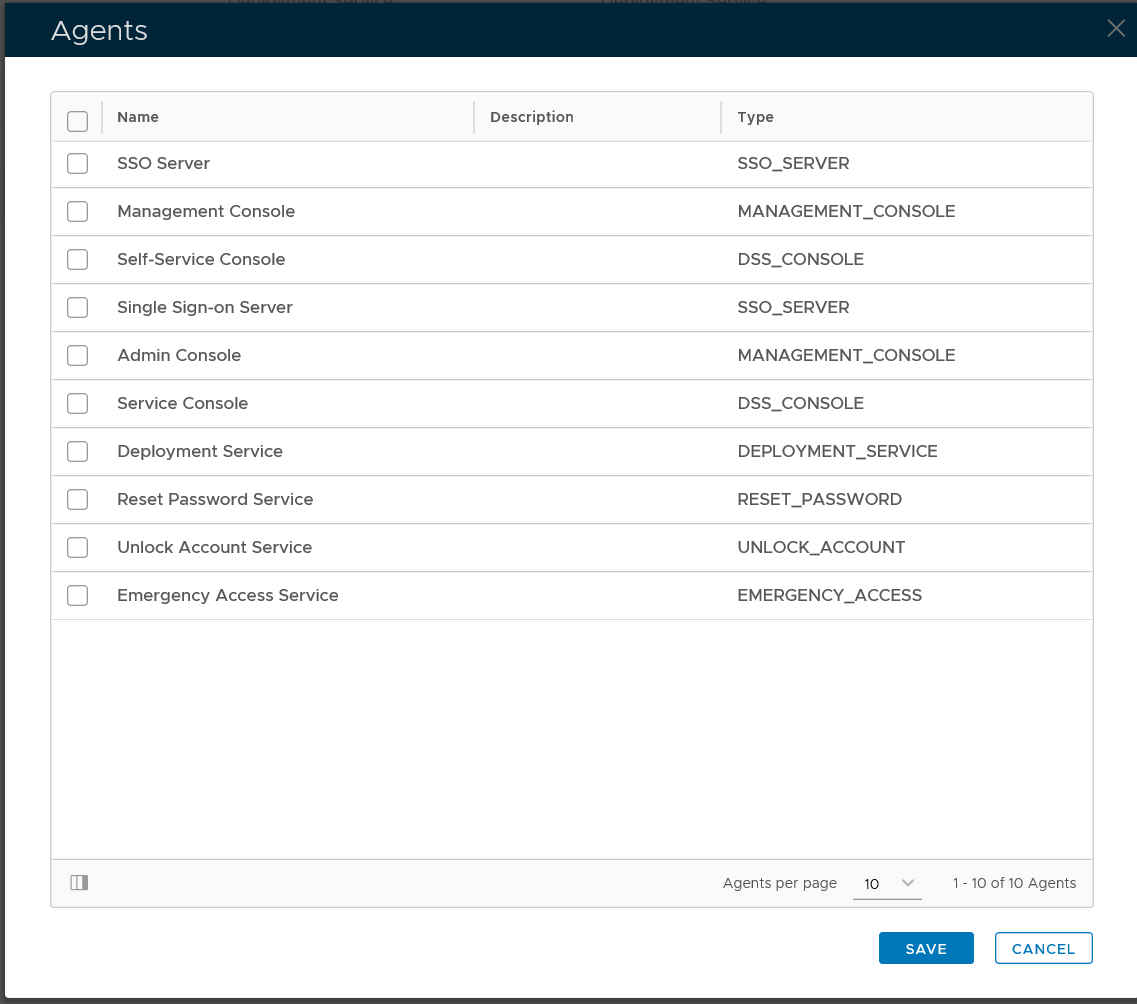
From the management console, navigate to "Authentication | Agents", then click 
A new window will now open titled "Auto Registration", ensure the "Enabled" option is selected, then click ;
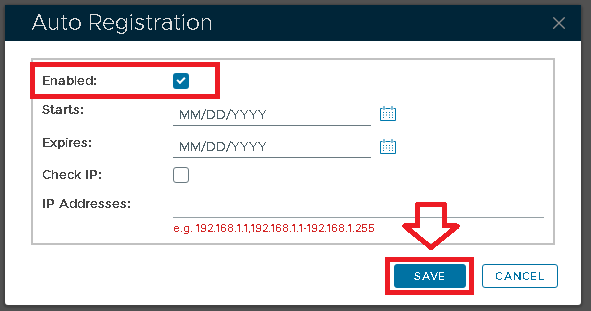
Tick the "Enabled" option first, then fill in the Starts and Expires date.
You may want to enable the "Check IP" option for extra security. If this option is enabled, then in the "IP Addresses" field you must enter the IP address of the machine where the authentication agent is being installed.
Click on the  button, and Auto-Registration will now take place during the installation of the RADIUS server.
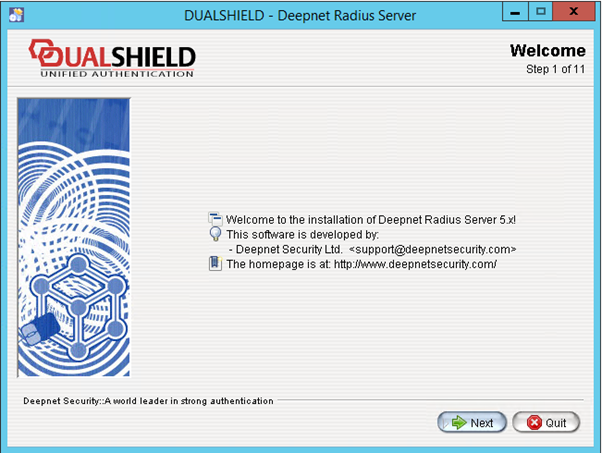
Install RADIUS Server
Like the DualShield server itself, the DualShield RADIUS server is typically installed on a Windows server. However, if desired then the DualShield RADIUS server can also be installed on a Linux server.
- Step 1: Welcome
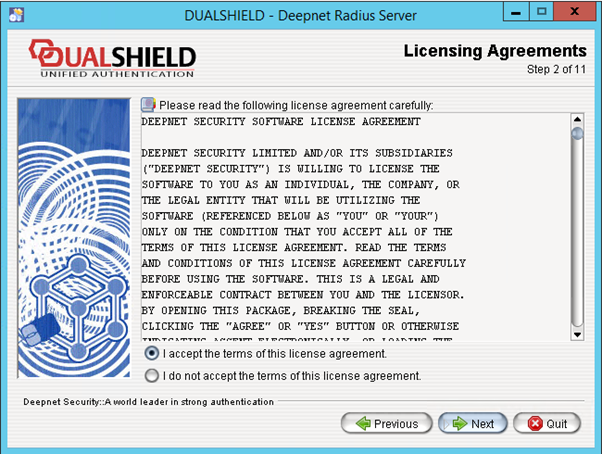
- Step 2: Licensing Agreements
- Step 3: Installation Path
- Step 4: Server Selection
- Step 5: Select Installation Packages
- Step 6: Server Configuration
- Step 7: Agent Registration
- Step 8: Configuration Summary
- Step 9: Installing
- Step 10: Perform External Processes
- Step 11: Installation Finished
Step 1: Welcome
Step 2: Licensing Agreements
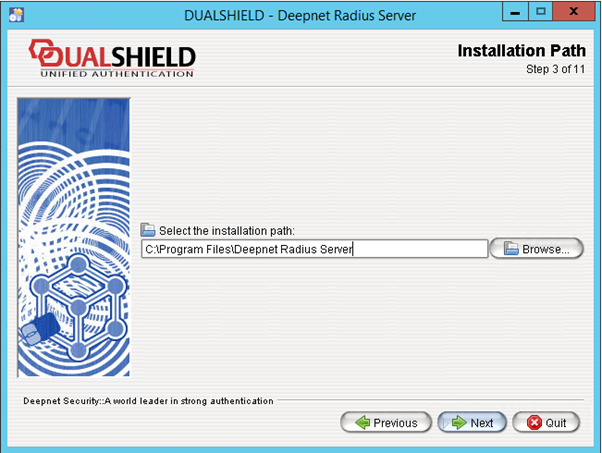
Step 3: Installation Path
Step 4: Server Selection

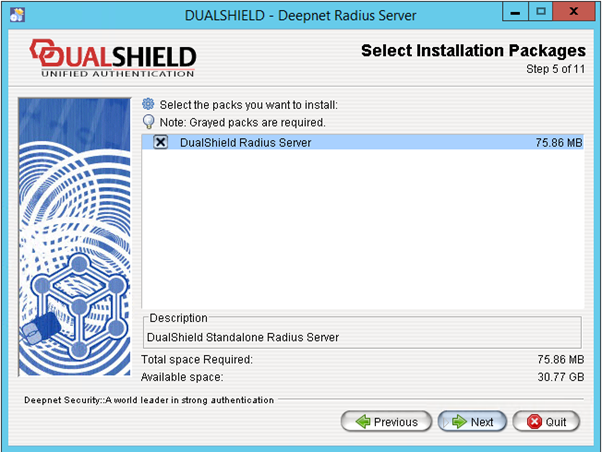
Step 5: Select Installation Packages
Step 6: Server Configuration
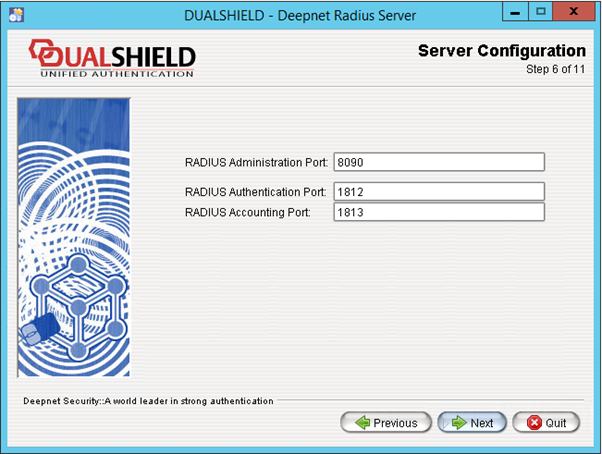
Administration Port:
The Administration port is the port accessed by the DualShield Authentication Server for the purpose of managing the DualShield Radius Server.
Authentication Port:
The Authentication Port is the standard Radius authentication port.
Accounting Port:
The Accounting Port is the standard Radius accounting port.
Step 7: Agent Registration
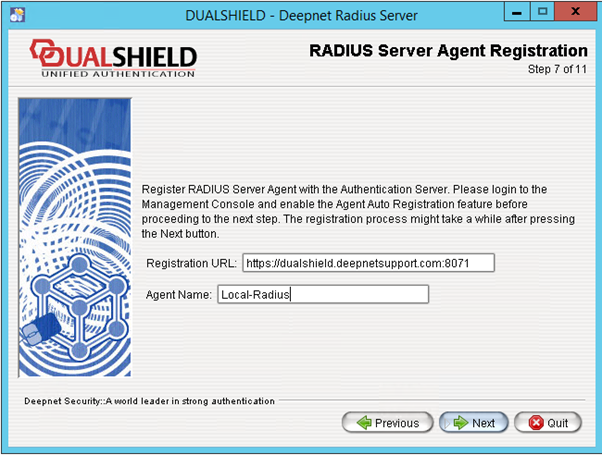
Change the Registration URL to the URL of your DualShield server.
Please note that the protocol of the connection to the DualShield server must be set to HTTPS. The default port of DualShield server is 8071.
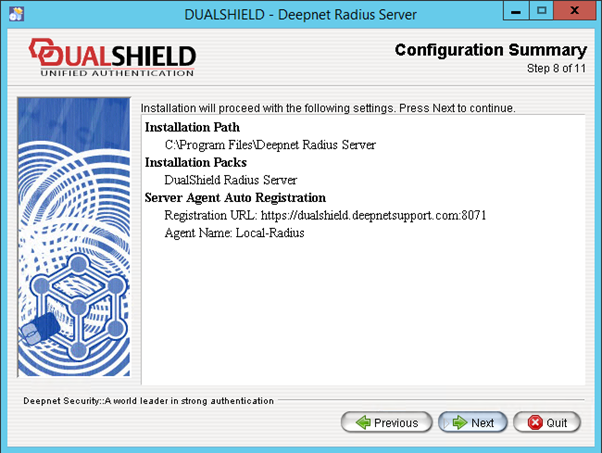
Step 8: Configuration Summary
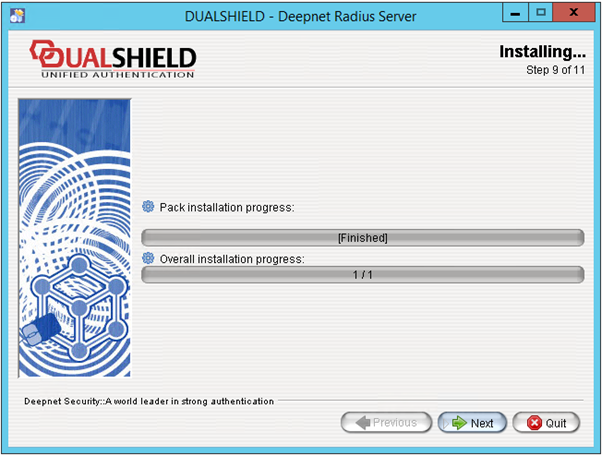
Step 9: Installing
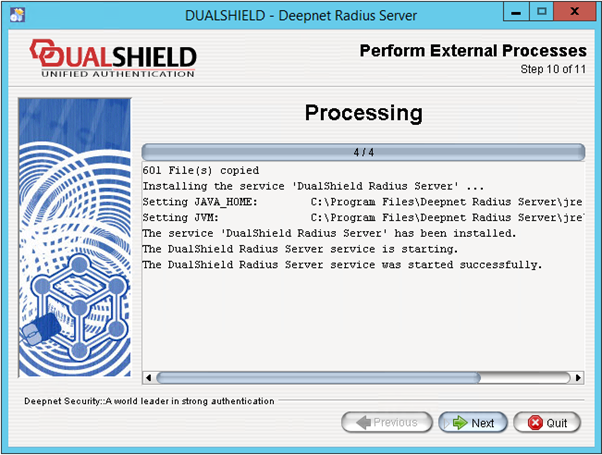
Step 10: Perform External Processes
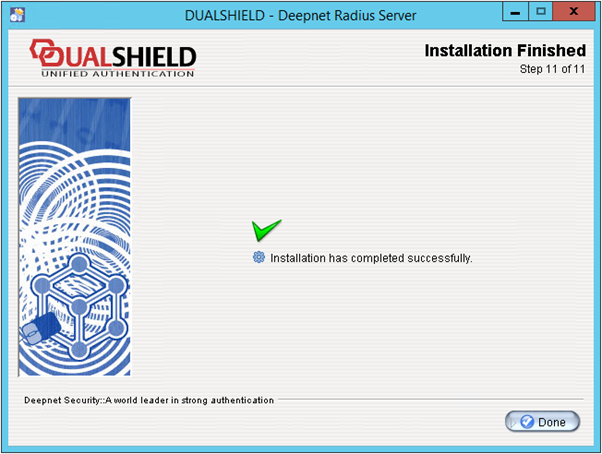
Step 11: Installation Finished
Change the IP Address

If this is the only RADIUS server that you will have in your DualShield platform, then it is OK to use the local loopback IP address.
However, if you will have more than one RADIUS servers in your DualShield platform, then you must change the IP address of the RADIUS server to the network IP address.
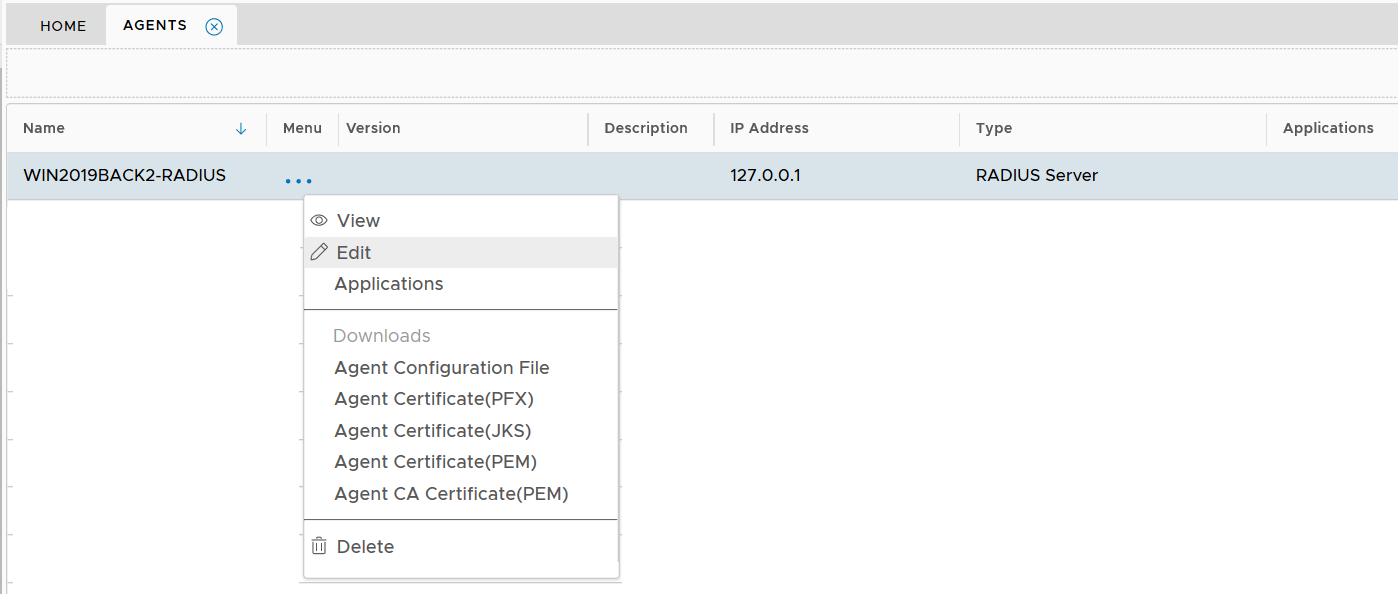
Select "Edit" from the context menu
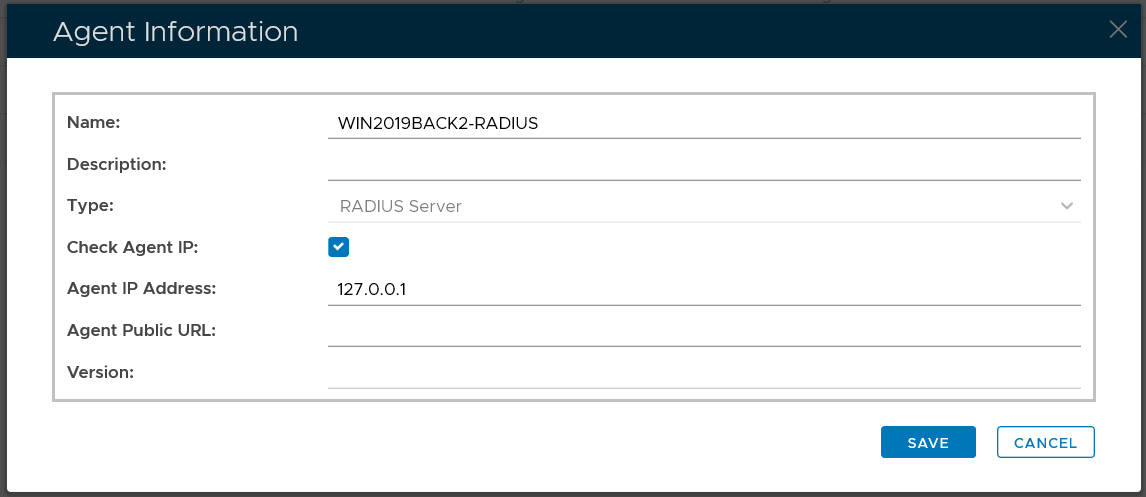
Change the "Agent IP Address"
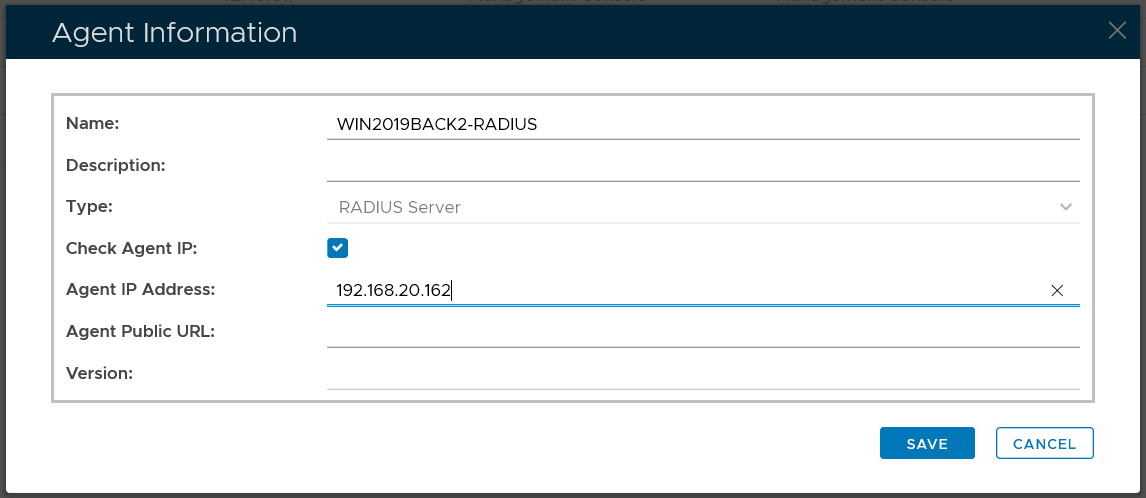
Click "Save"

Quick Test
Find the RADIUS server, open the context menu of the RADIUS server
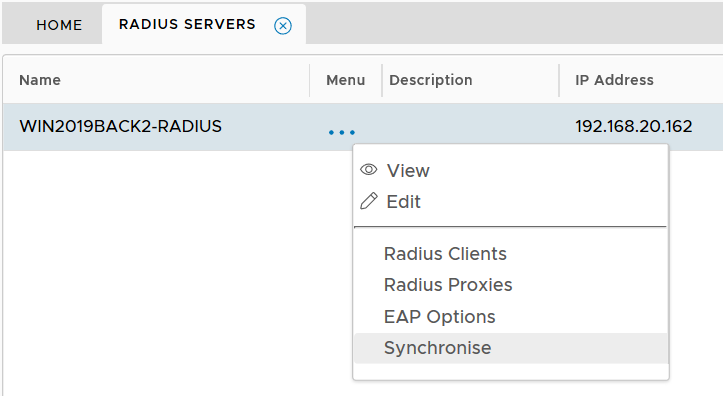
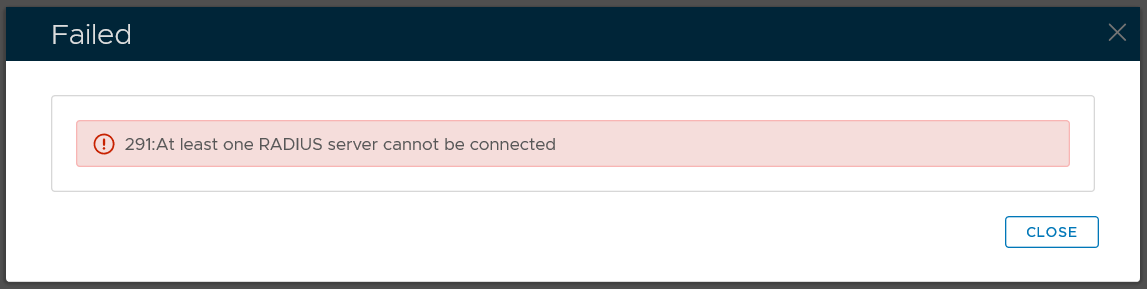
select "Synchronise"
If there is no error message displayed on the screen, then it means that the connection between the RADIUS server and the authentication server is OK and the RADIUS server is operating. Otherwise, you will get the error message below:
Related Articles
Configure firewalls for VPN integration
Deployment 1: Compact

In this compact deployment, both the DualShield Authentication Server (DAS) and the DualShield RADIUS Server (DRS) are installed and operating on one single server machine that resides in the corporate network.
Deployment 2: Extended

In this extended deployment, the DualShield Authentication Server (DAS) is installed on a server machine that resides in the corporate network, and the DualShield RADIUS Server (DRS) is installed on a server machine that resides in the DMZ.
Ports & Protocols
| Port | Protocol | Function | Comment |
|---|---|---|---|
| 1812 | UDP | RADIUS authentication | |
| 1813 | UDP | RADIUS accounting | Optional in most cases |
| 8090 | TCP | RADIUS management | Used by the DualShield Authentication Server to manage the RADIUS server |
| 389 | LDAP | Used in communication between DualShield Authentication Server and AD server | |
| 636 | LDAPS | Used in communication between DualShield Authentication Server and AD server |
You will need to configure the local Windows firewall and network firewall to allow connections to these ports.
Windows Firewall Configuration
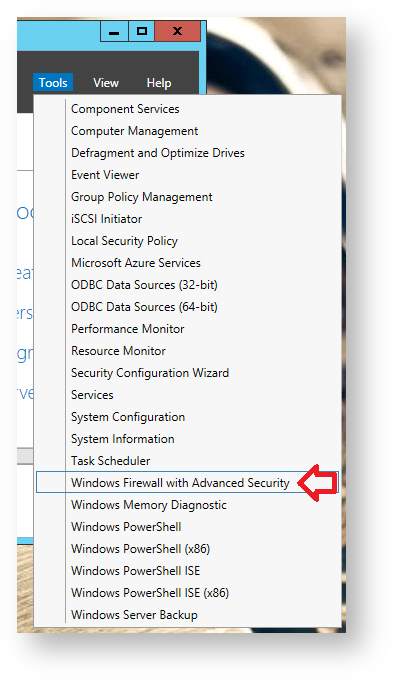
From the Server Manager window select "Tools | Windows Firewall with Advanced Security";
A window will now open titled "Windows Firewall with Advanced Security" that will show the firewall overview for each profile (Domain, Private and Public);
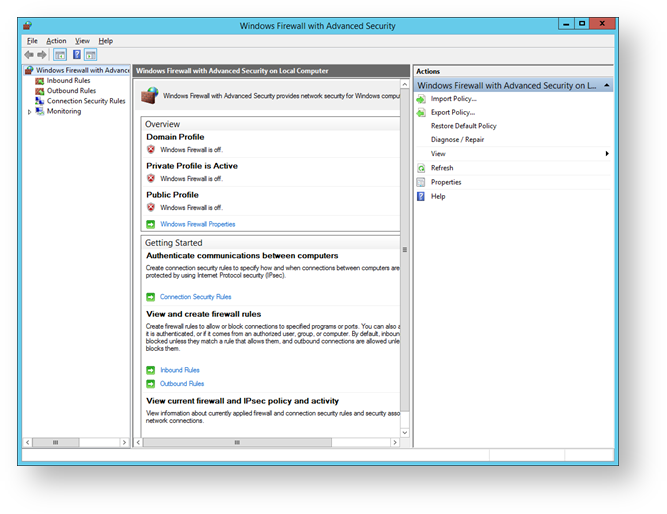
Domain - Traffic to and from a network on which it can detect a domain controller of the domain to which the computer is joined.
Private - Traffic to and from the local server or the local network to which it is attached.
Public - Traffic to and from non-local sources such as the World Wide Web.
Adding Firewall Rules for the Inbound Ports
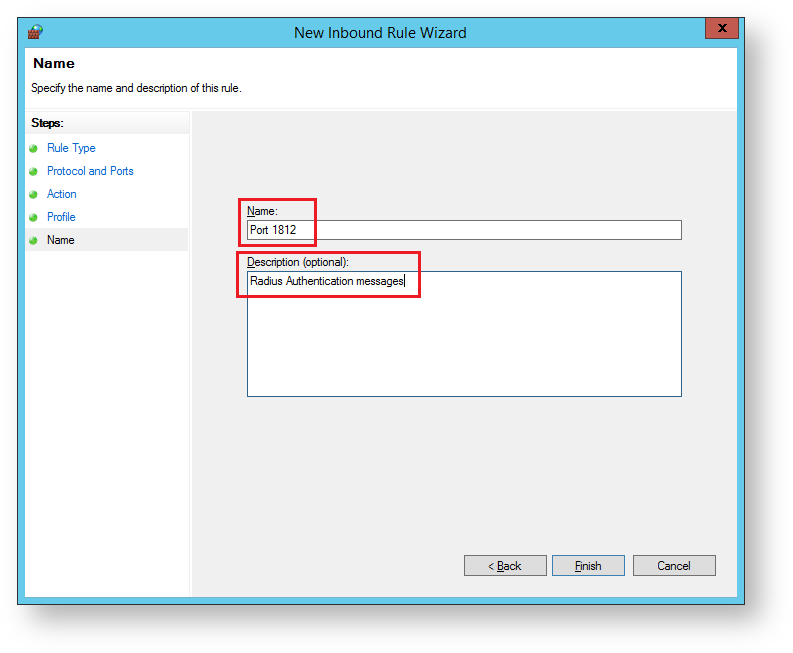
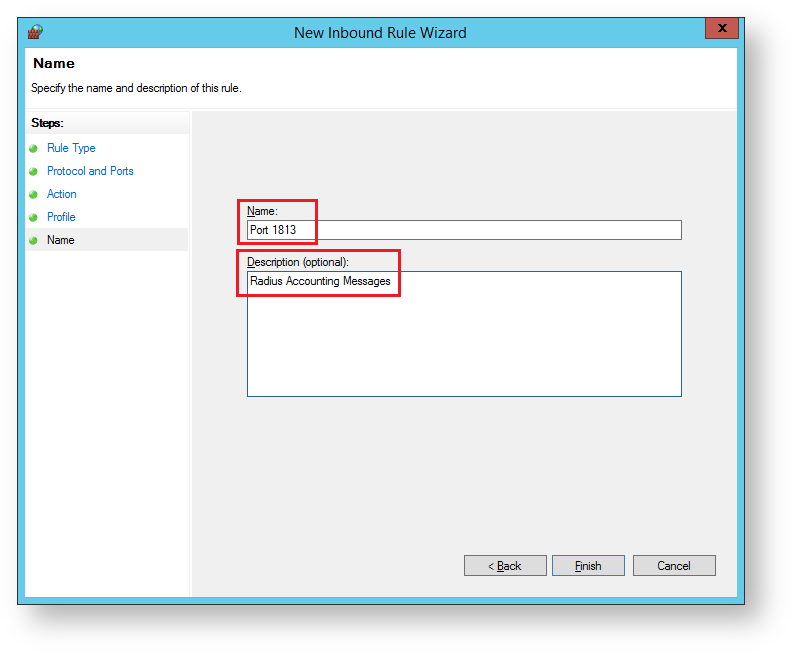
The default RADIUS server listens on ports 1812 (UDP), 1813 (UDP) and 8090 (TCP), these ports need to be opened for inbound traffic.
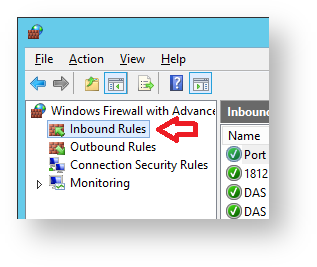
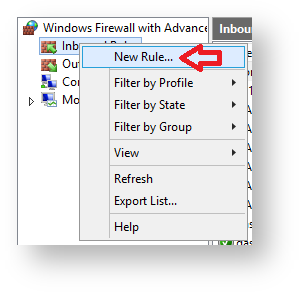
To select ports for inbound traffic select "Inbound Rules" as indicated below;
You will now need to add firewall rules for the 3 required inbound ports using the following procedures;
From the window titled "Windows Fiurewall with Advanced Security", Right click "Inbound Rules", then select "New Rule...";
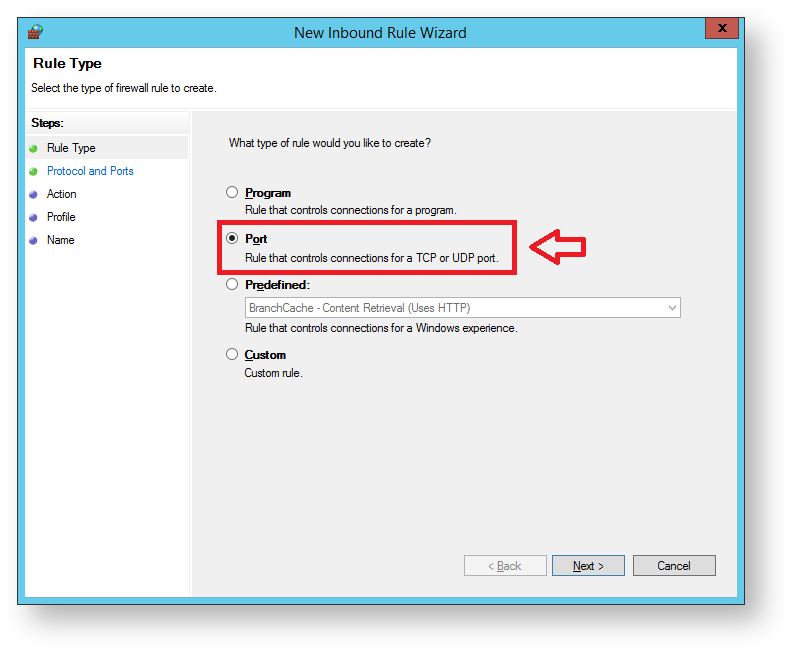
A new window will open titled "New Inbound Rule Wizard" with subheading "Rule Type", we need to define inbound rules for all three of the ports, select "Port", then click "Next";
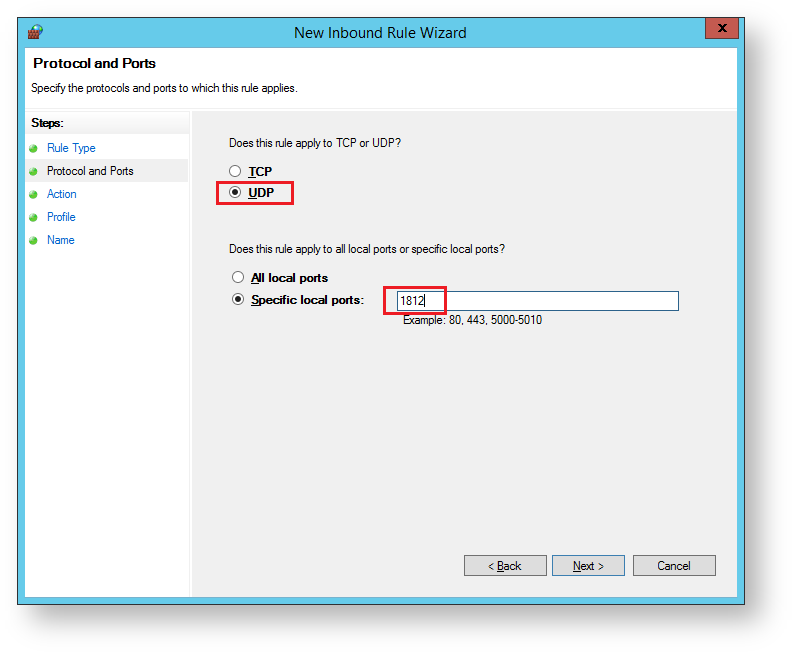
The sub-heading will now be updated to "Protocol and Ports", select "UDP".
Select "Specfic local port", and enter a port value of "1812", then click "Next";.
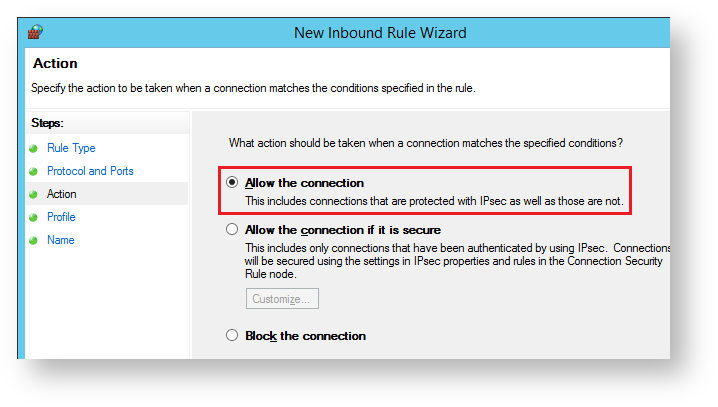
The sub-heading will now be updated to "Action", select "Allow the connection" then click "Next";
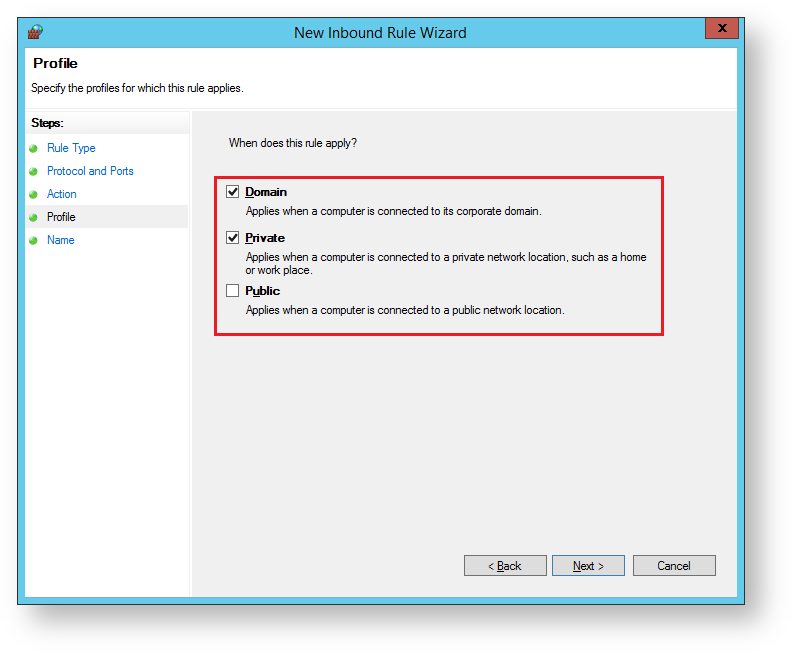
The sub-heading will now be updated to "Profile", select which profiles the rule applies to then click "Next";
The sub-heading will now be updated to "Name", provide a meaningful name and descriptions for the port that is being defined then click "Finish";
From the window titled "Windows Fiurewall with Advanced Security", Right click "Inbound Rules", then select "New Rule...";
A new window will open titled "New Inbound Rule Wizard" with subheading "Rule Type", we need to define inbound rules for all three of the ports, select "Port", then click "Next";
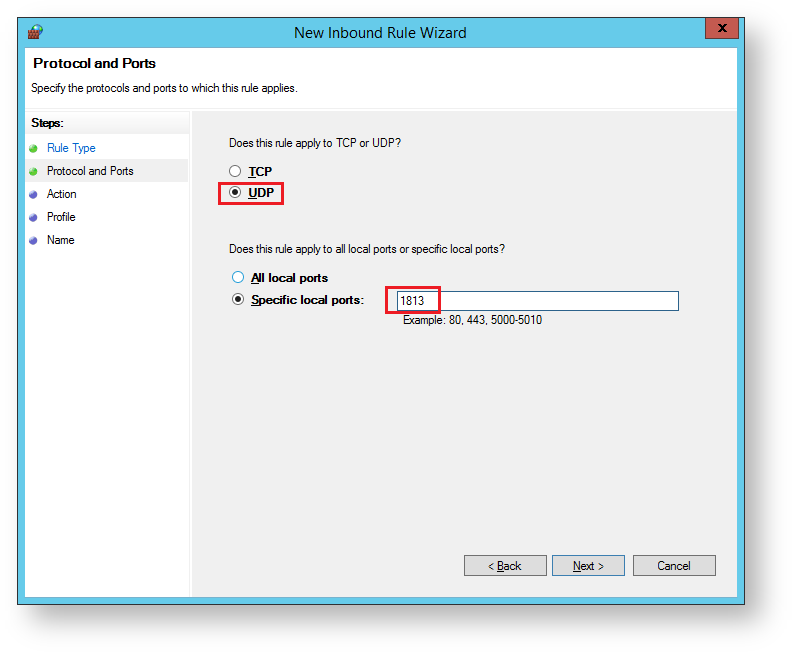
The sub-heading will now be updated to "Protocol and Ports", select "UDP".
Select "Specfic local port", and enter a port value of "1813", then click "Next";.
The sub-heading will now be updated to "Action", select "Allow the connection" then click "Next";
The sub-heading will now be updated to "Profile", select which profiles the rule applies to then click "Next";
The sub-heading will now be updated to "Name", provide a meaningful name and descriptions for the port that is being defined then click "Finish";
From the window titled "Windows Fiurewall with Advanced Security", Right click "Inbound Rules", then select "New Rule...";
A new window will open titled "New Inbound Rule Wizard" with subheading "Rule Type", we need to define inbound rules for all three of the ports, select "Port", then click "Next";
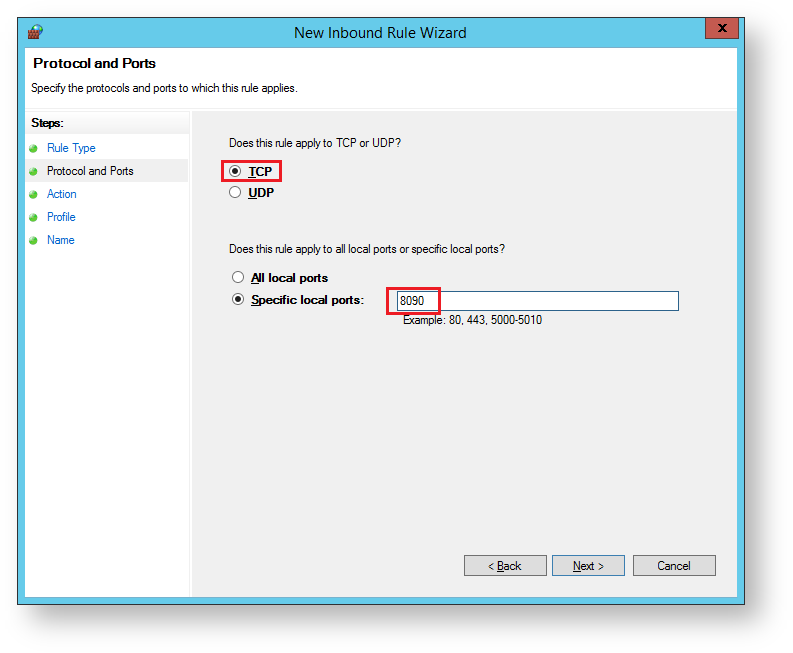
The sub-heading will now be updated to "Protocol and Ports", select "TCP".
Select "Specfic local port", and enter a port value of "8090", then click "Next";.
The sub-heading will now be updated to "Action", select "Allow the connection" then click "Next";
The sub-heading will now be updated to "Profile", select which profiles the rule applies to then click "Next";
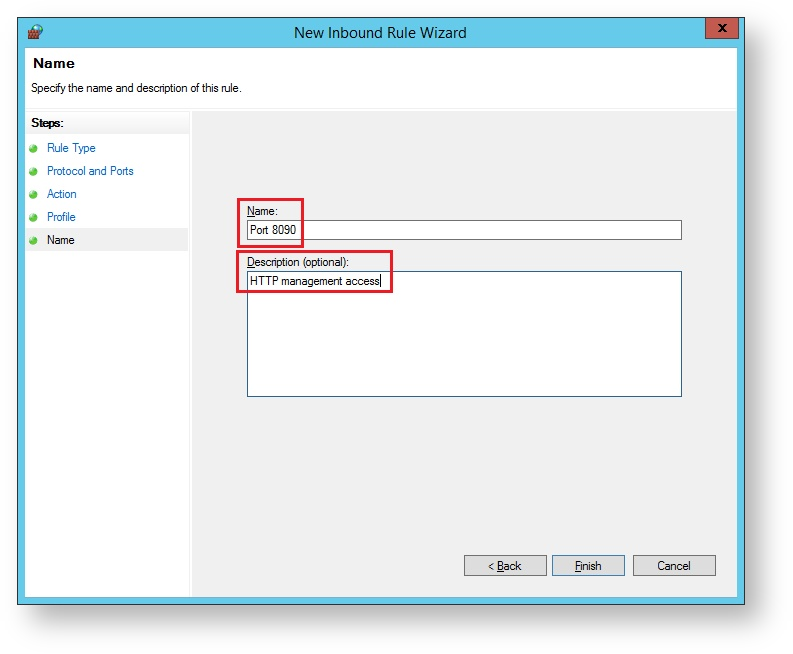
The sub-heading will now be updated to "Name", provide a meaningful name and descriptions for the port that is being defined then click "Finish";
Once you have created all three inbound rules the firewall will be configured to allow the Radius server to listen for external connections.
Build RADIUS Application
If you are new to DualShield, then you might want to first refer to the general instruction on how to build an application in DualShield.
Complete the following steps to build an application for VPN integration.
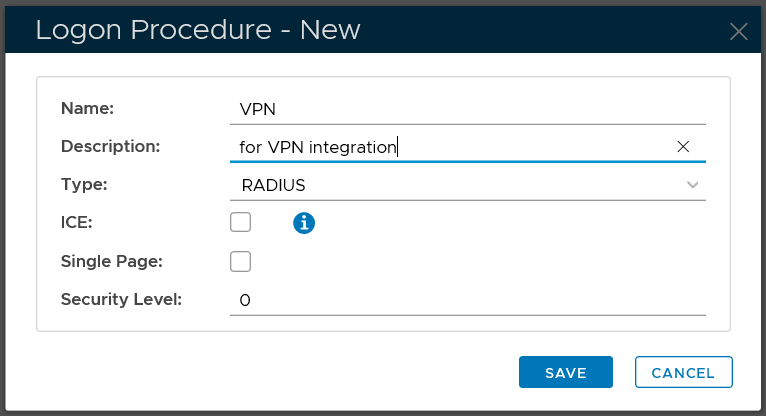
Create RADIUS logon procedure
Click the "CREATE" button on the toolbar
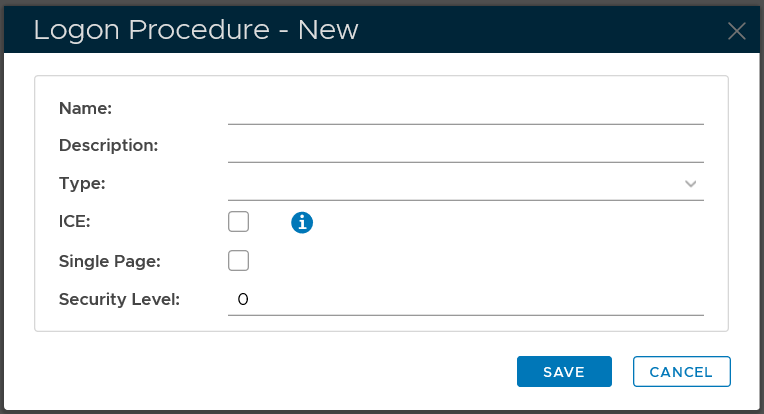
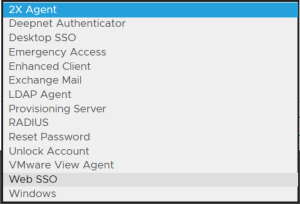
In the "Name" field, enter a name for this new logon procedure, e.g. "Office 365"
In the "Type" field, select the type of the logon procedure from the drop list, e.g. "Web SSO"

Click the "SAVE" button to save it.
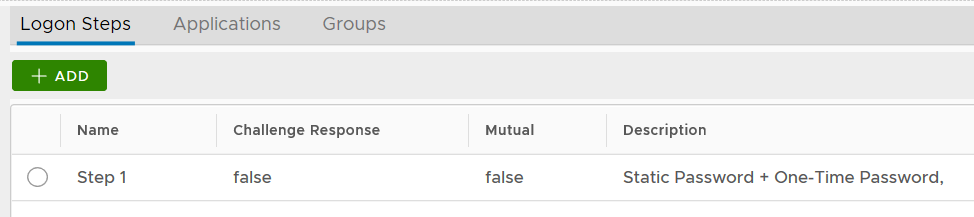
Now that a new logon procedure is created, you want to add logon steps.
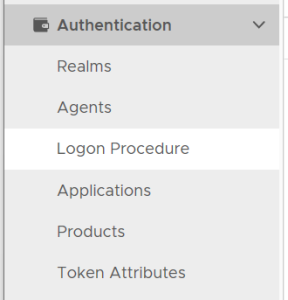
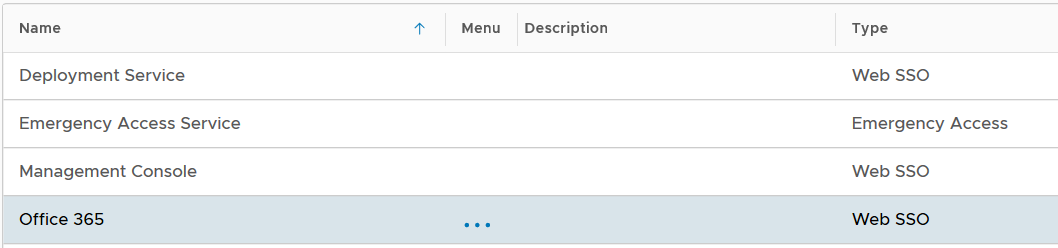
Navigate to Authentication | Logon Procedures
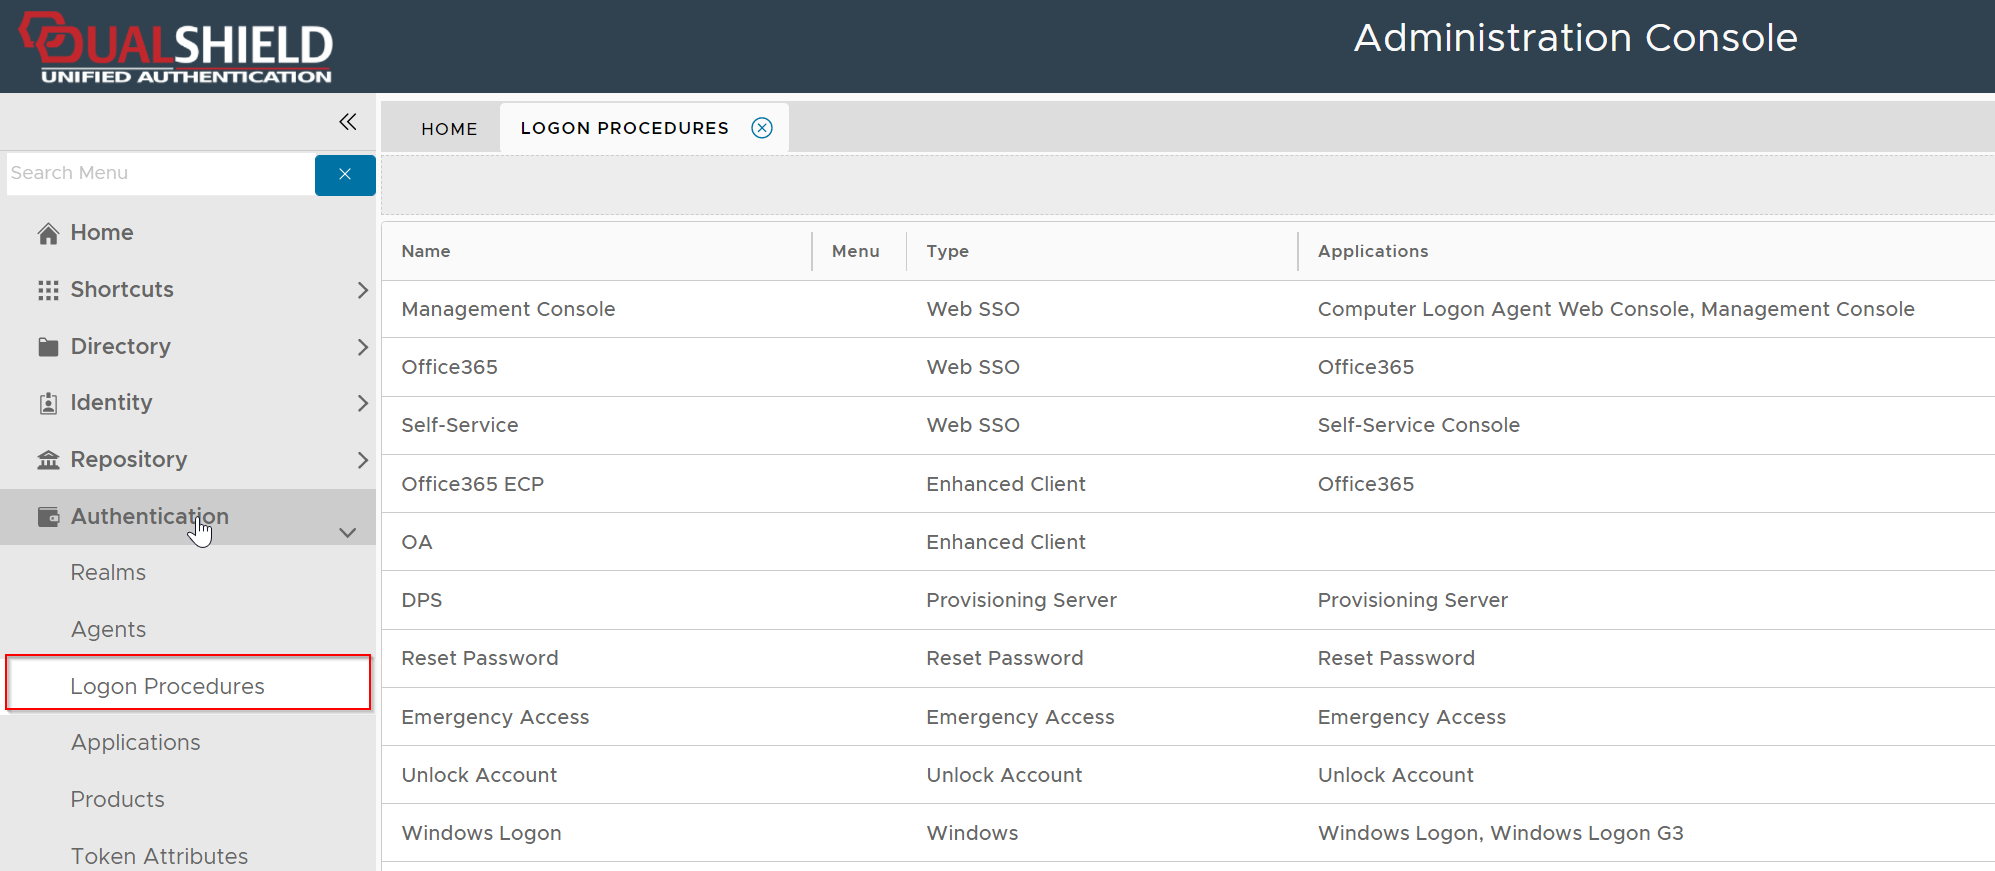
Click the context menu icon "..." of the application to be edited, e.g. "Office 365"
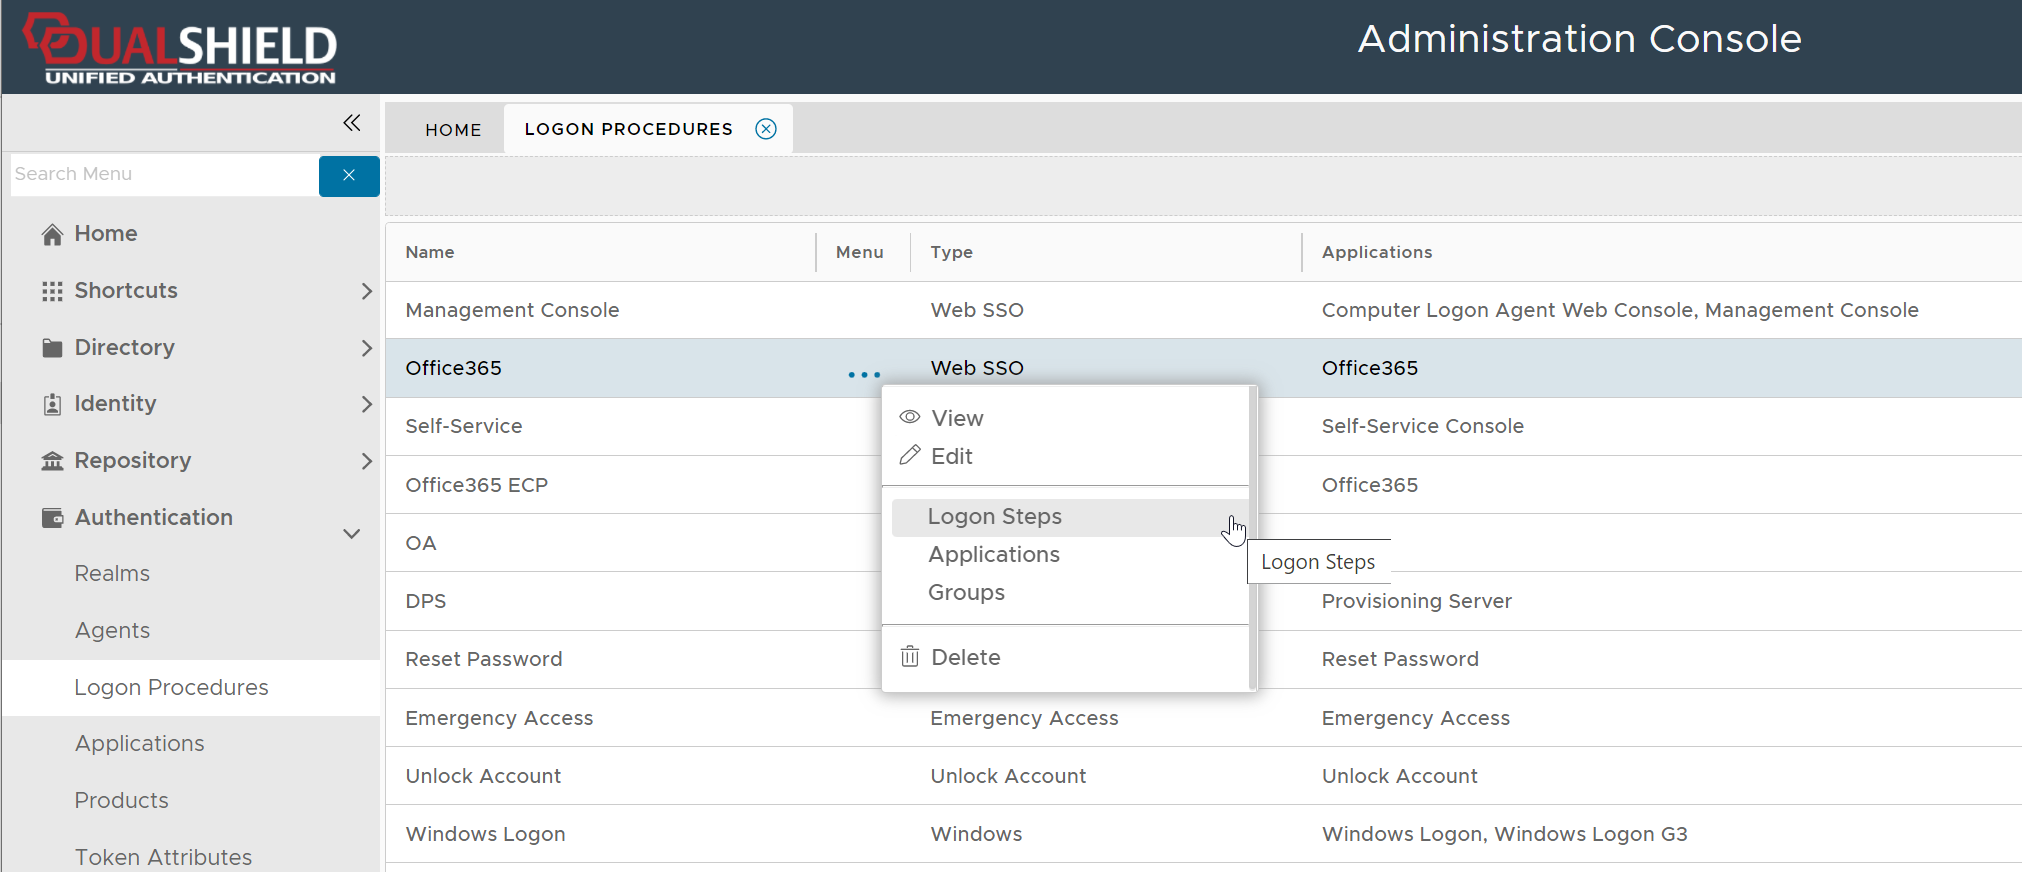
select "Logon Steps" to bring up the logon steps editor

To add a logon step, click the "ADD" button
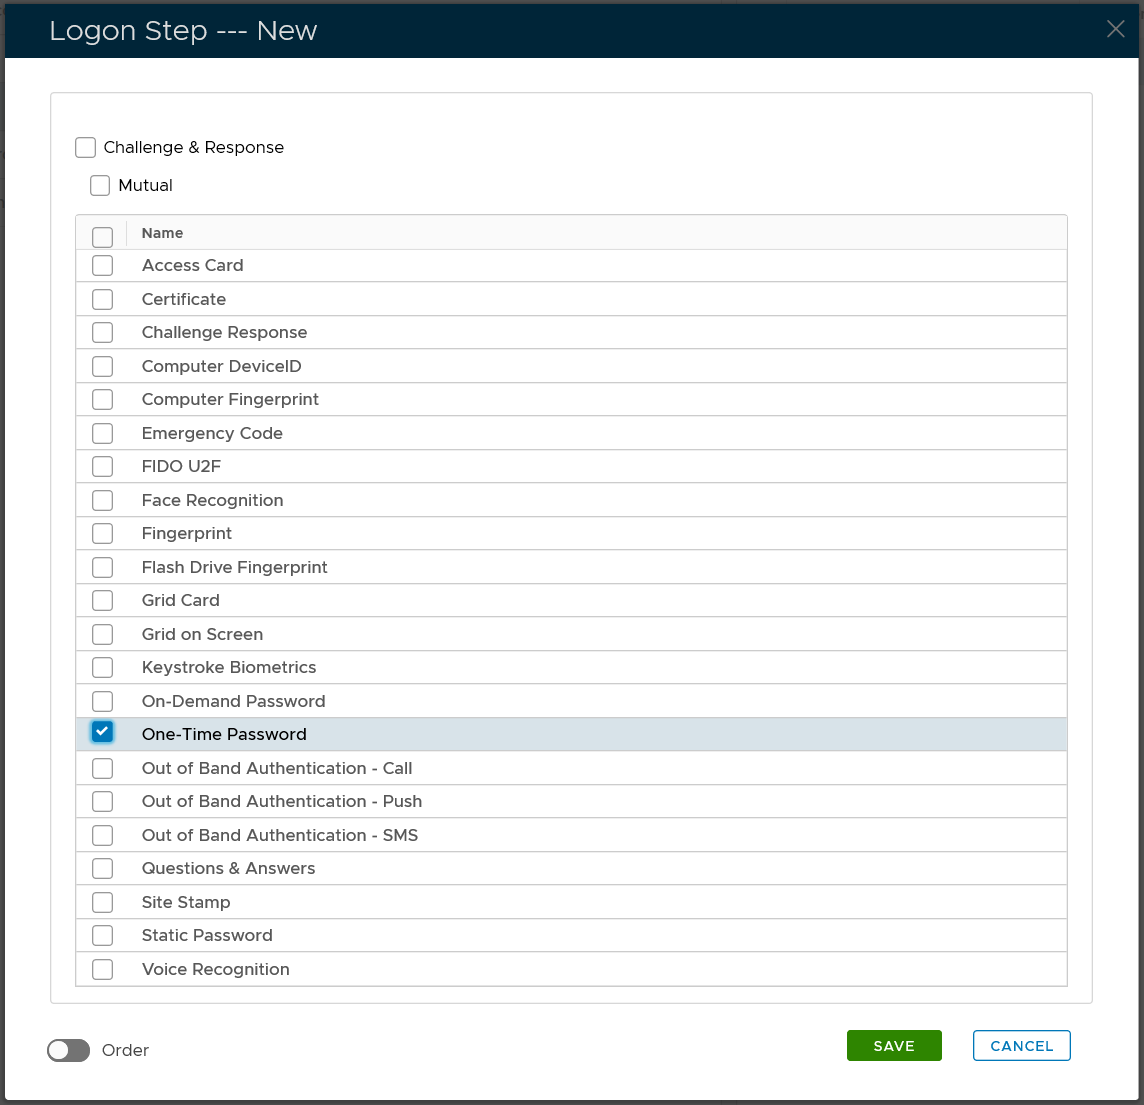
Select the one or multiple authentication methods that you want to add to this step, e.g. "One-Time Password"
Click the "SAVE" button to save it

You can change the order of the steps by clicking the "UP" and "DOWN" buttons.
The type of logon procedure for VPN integration must be RADIUS.
Once a logon procedure has been created, you need to add logon steps into the newly created logon procedure. Depending on the VPN system and the authenticators to be used, you have two options: one-step logon and two-step logon.
- Static Password
- One-Time Password
- One-Time Password + Static Password
- Static Password + One-Time Password
For instances, if the user’s Static Password is “mypass” and the One-Time Password is “123456” then the passcode entered into the VPN client can be one of the following:
- mypass
- 123456
- 123456mypass
- mypass123456
To provide One-Step Logon you will create a logon procedure with only one logon step.
If you are planning to use on-demand password, e.g. Deepnet T-Pass, then you should consider deploying a Two-Step logon procedure. However, if you must use the on-demand password in a One-Step logon procedure because your VPN system does not support Challenge/Response then please refers to Appendix A.
NOTES
CHAP and MS-CHAP.v2 is not supported when the passcode consists of the AD password (Static Password). In other words, if the User Directory or Identity Source of a VPN application is an external AD or LDAP server, and the passcode is “Static Password”, “One-Time Password + Static Password” or “Static Password + One-Time Password”, then CHAP and MS-CHAP.v2 cannot be supported.
If you have to use CHAP or MS-CHAP v2, then the passcode should not include AD password, or the User Directory or Identity Source of the VPN application is created in the internal SQL server.
The 2-step logon process will be as below:
- Step 1: The VPN client will ask the user to enter their 1st credential, e.g. static password
- Step 1: The users enters their 1st credential.
- The server checks the validity of the user’s 1st credential.
- Step 2: If the server successfully verified the user's static password, then it will prompt the user to enter the 2nd credential, e.g. one-time password.
- Step 2: The user enters their 2nd credential.
- The server checks the validity of the user’s 2nd credential.
To provide Two-Step Logon, you will need to create a logon procedure with two logon steps.

NOTES
If you have a logon procedure with two or more logon steps, and you place more than one authenticator (including an on-demand password in a logon step), then the order of the authenticators is significant.
As soon as the server has successfully completed one step (the user has passed the step), the server will go through the authenticator list to the next step, one by one according to their order in the list. On each authenticator, it will check if the user has a token for this type of authenticator. If the user does not have a token of this type, then the authenticator is removed from the list.
If the first authenticator is an on-demand password, then the server will generate a password and send it out. If the first authenticator is an out of band anthentication, then the server will push out a logon request to the user's mobile phone.
Example:
A logon step has the following authenticators:
- One-Time Password
- On-Demand Password
User "A" has the following tokens
- MobileID
- T-Pass
User "B" has the following tokens:
- MobileID
User "C" has the following tokens:
- T-Pass
For User "A", the server will NOT send on-demand password, as the user has a MobileID which is listed to be preferred over T-Pass.
For User "B", the server will NOT send on-demand password, as there is no such token at all.
For User "C", the server WILL send on-demand password, as the user does not have MobileID but has the T-Pass.
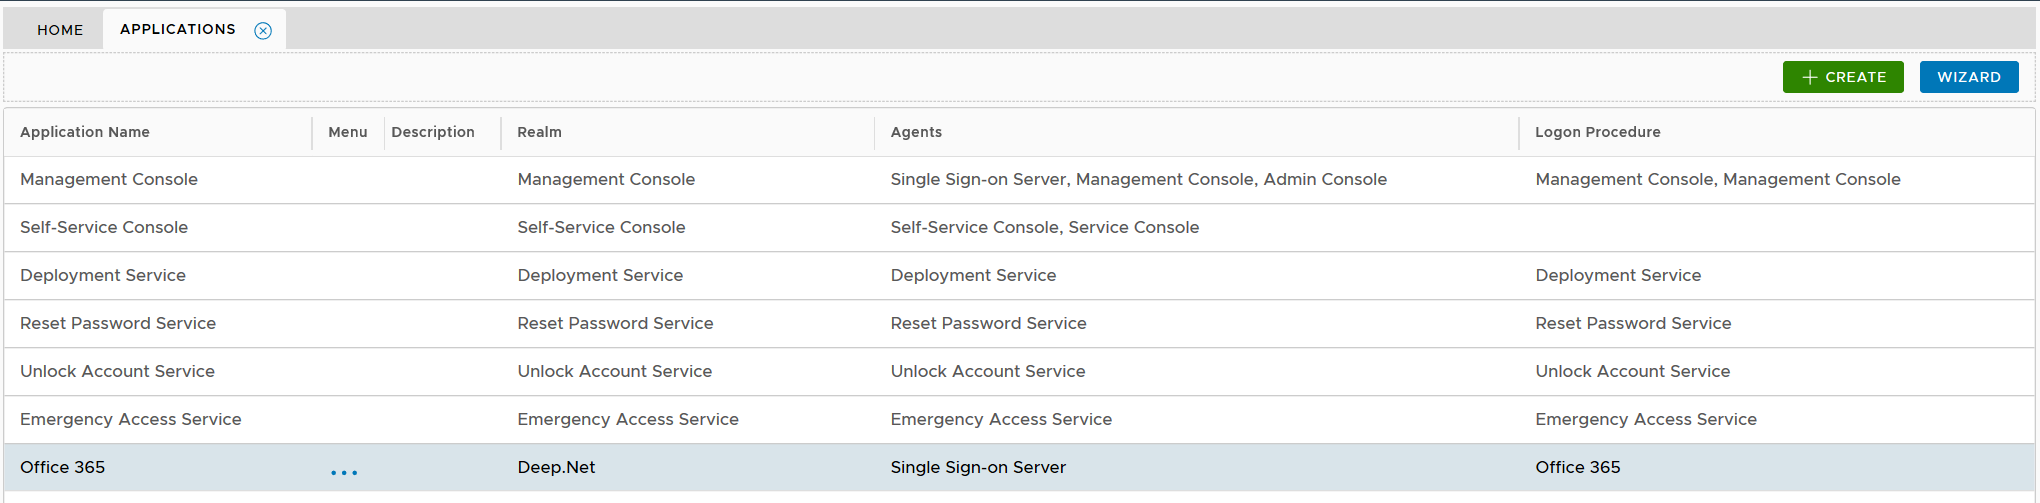
Create RADIUS application

Select "CREATE" on the toolbar

Select the Realm to be linked to this application, e.g. Deep.Net
Select the Logon Procedure to be used by this application, e.g.. Office 365
Click "SAVE" to save the application.

However, you must select a Logon Procedure that is of the type of RADIUS. In the example below, "VPN" is a RADIUS logon procedure.

Publish RADIUS application
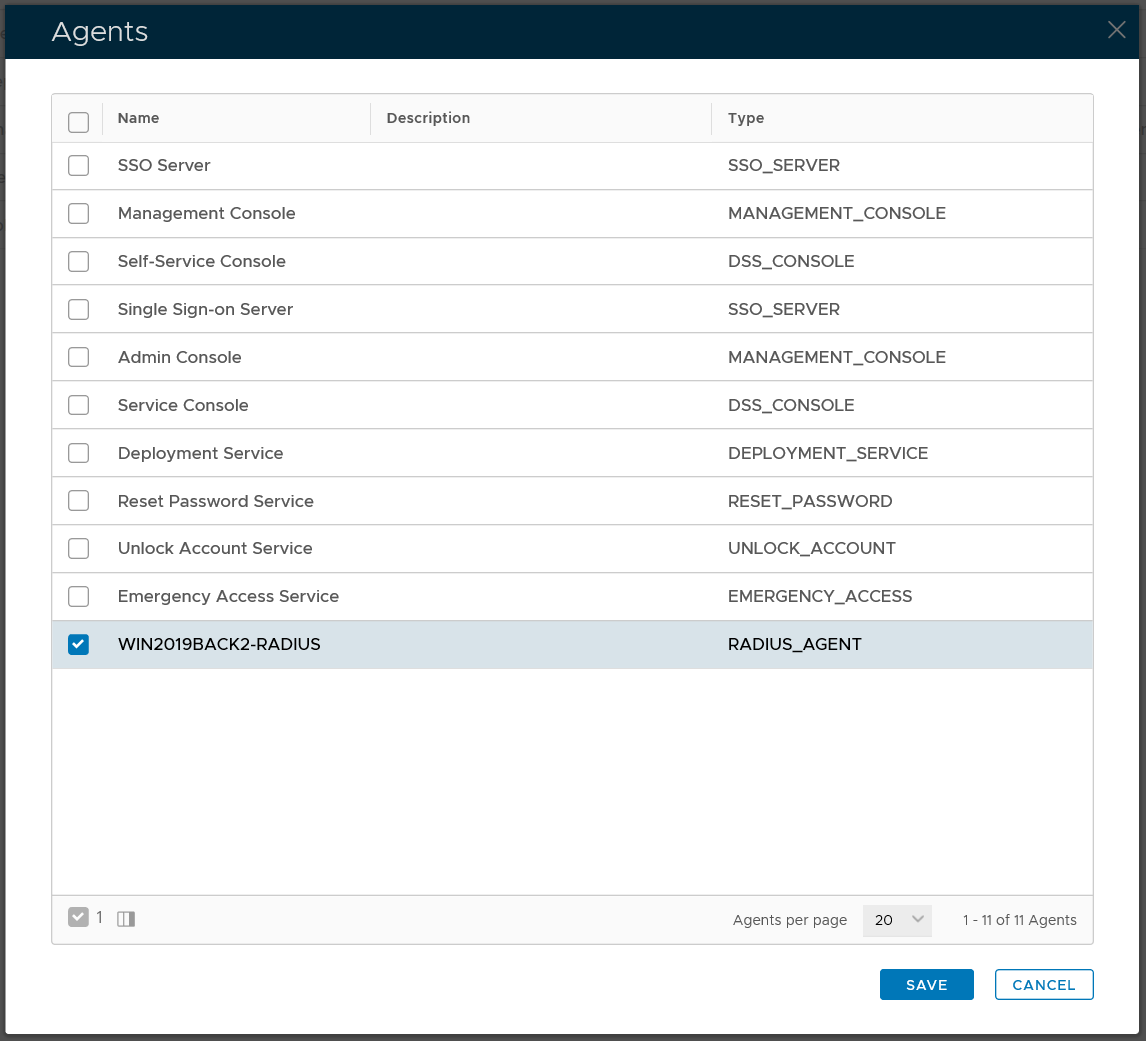
Click the context menu icon "..." of the application, e.g. "Office 365" to access its context menu

select "Agents" in the context menu
select the authentication agent on which the application is to be published, e.g. "Single-Sign-on Server"

Click "SAVE" button to save the settings
A RADIUS application has to be published on one or many RADIUS agents/servers.

Setup Policies for VPN Application
The strategy is that MFA will only be enforced on users who are a member of the DualShield MFA group. All other domain users will be able to continue to login into the domain with password only.
The first step is to create the DualShield MFA group in your AD server.
Then, create 2 logon policies in your DualShield server. A domain policy and a group policy.
The domain policy is bound to the entire domain, and multi-factor authentication is not required on all users.
The group policy is bound to the DualShield MFA user group, and multi-factor authentication is required on all users.
Below is an example.

Domain Logon Policy
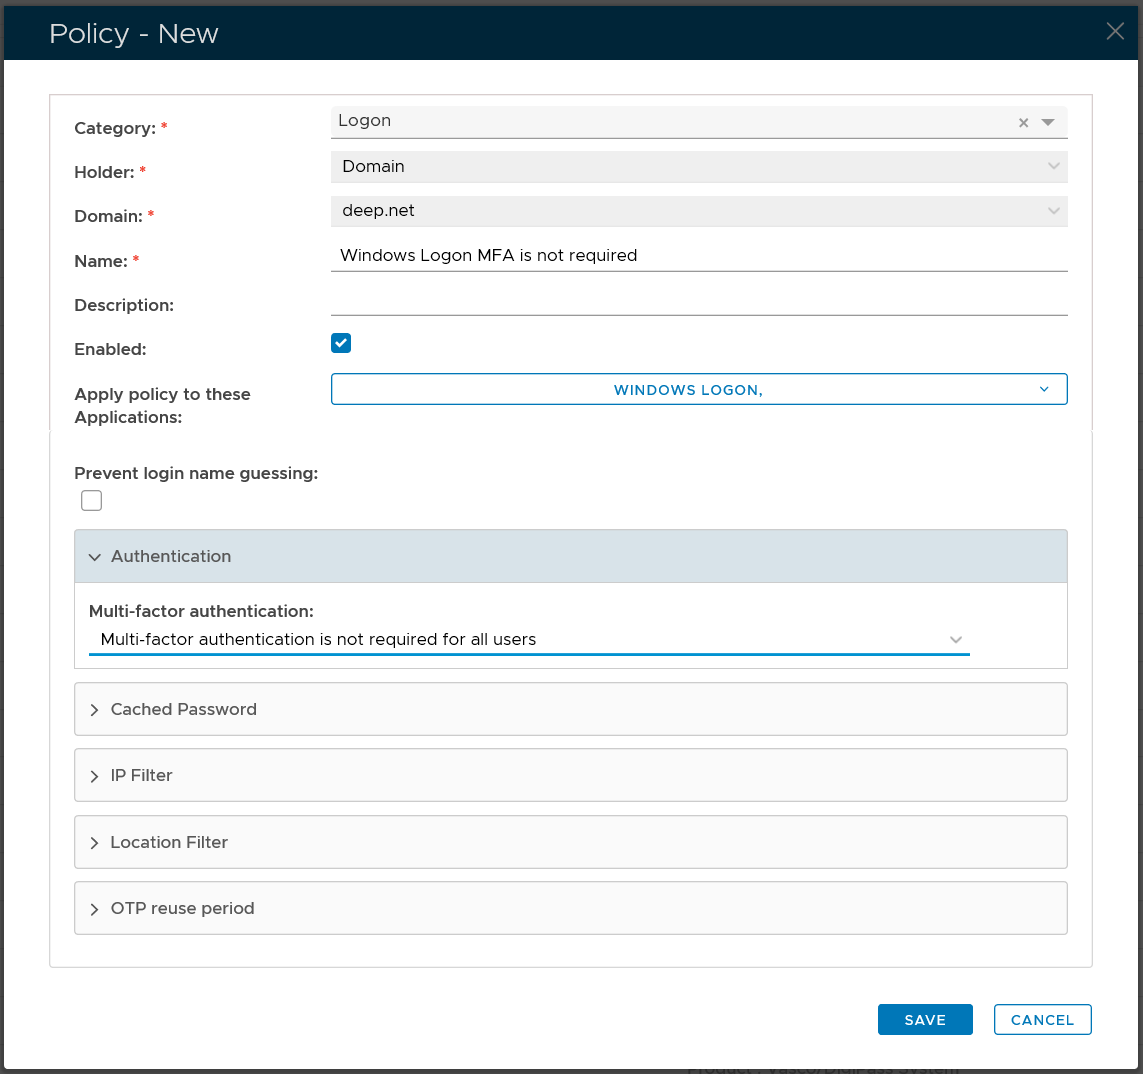
| Option | Value |
|---|---|
| Category: | Logon |
| Holder: | Domain |
| Domain: | Select your AD domain |
| Name: | Describe the purpose of this policy |
| Apply policy to these applications: | Select the application that this policy will be applied to |
| Authentication: | Select "Multi-factor authentication is not required for all users" |
Group Logon Policy
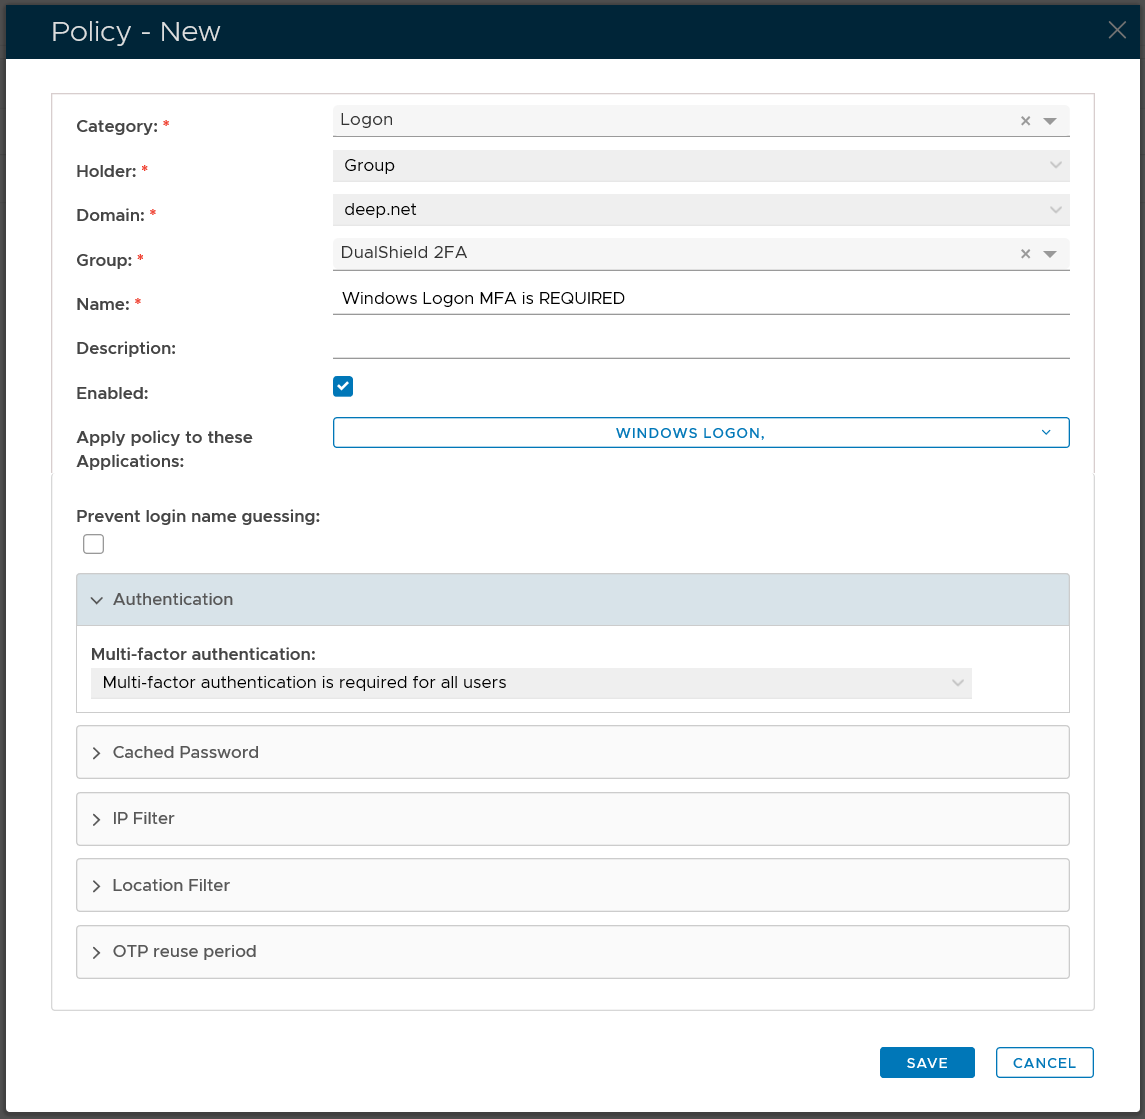
| Option | Value |
|---|---|
| Category: | Logon |
| Holder: | Group |
| Domain: | Select your AD domain |
| Group | Select the DualShield MFA group |
| Name: | Describe the purpose of this policy |
| Apply policy to these applications: | Select the application that this policy will be applied to |
| Authentication: | Select "Multi-factor authentication is required for all users" |
For the general guide of creating a logon policy, expand the link below
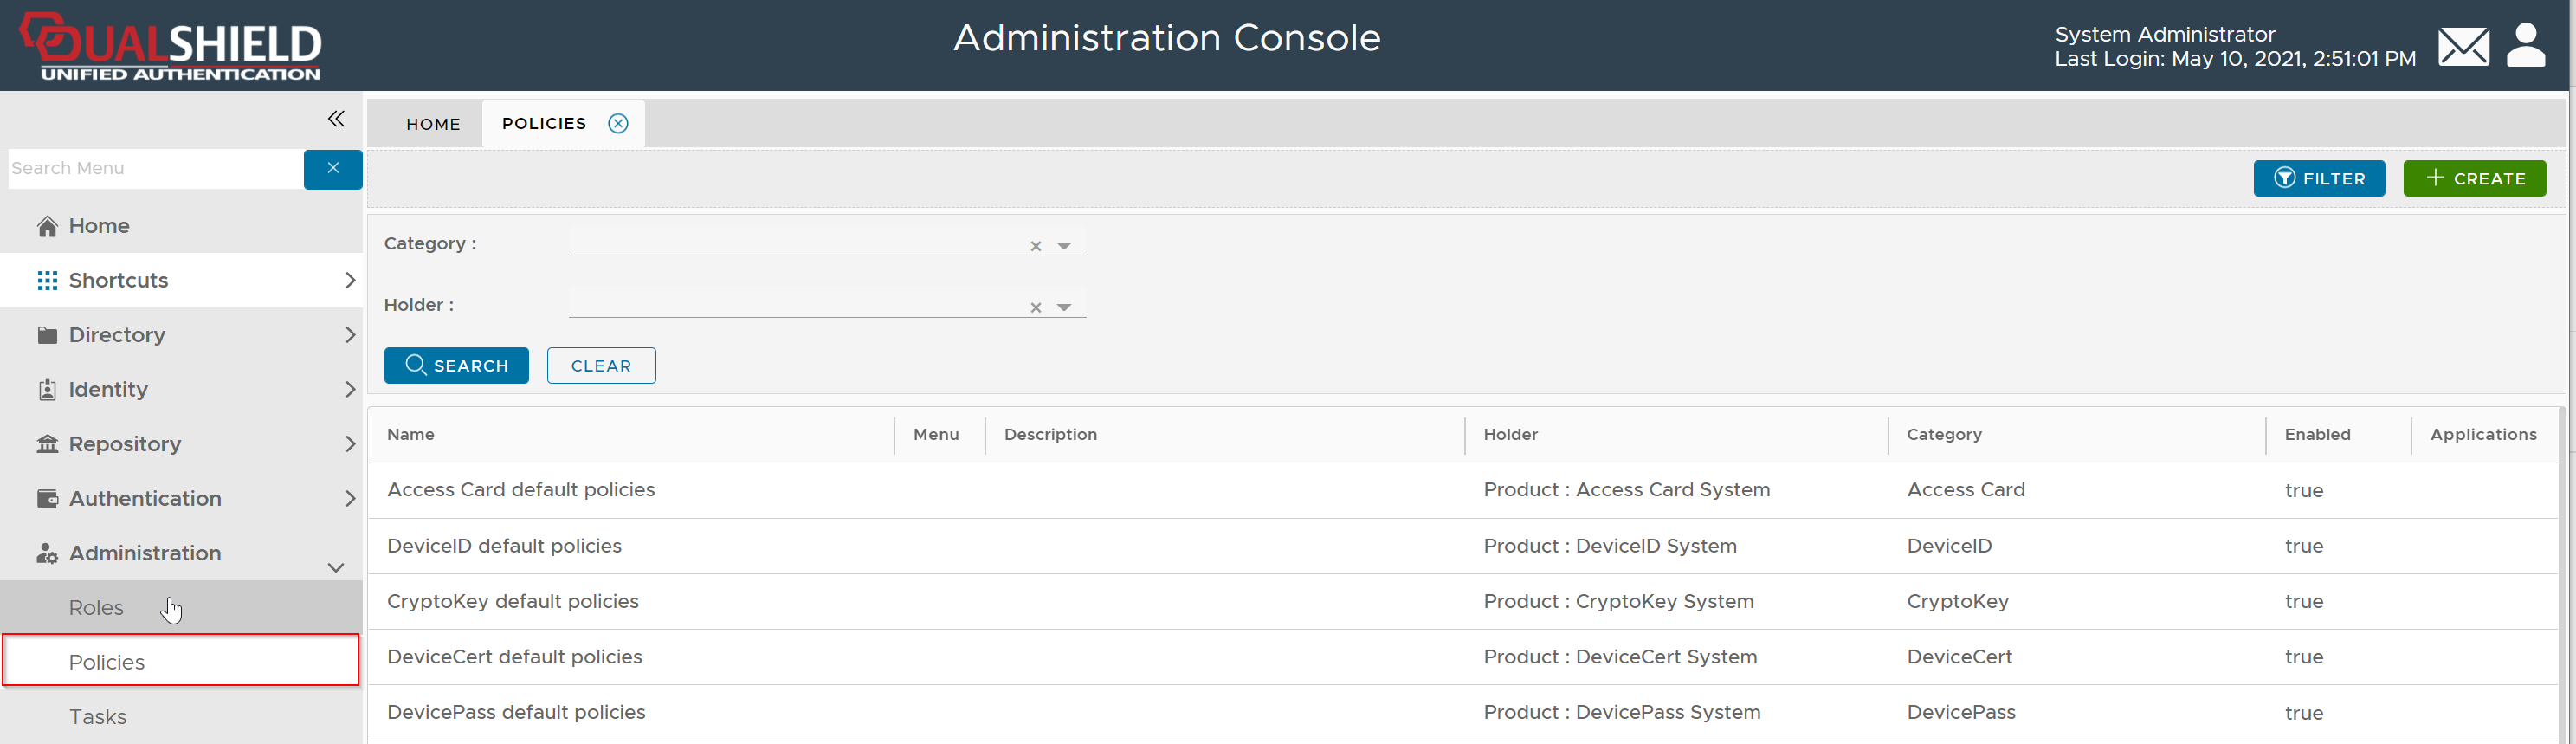
Select "Administration | Policies" on the side panel,
To create a new policy, click the "CREATE" button on the toolbar to open the policy editor window.
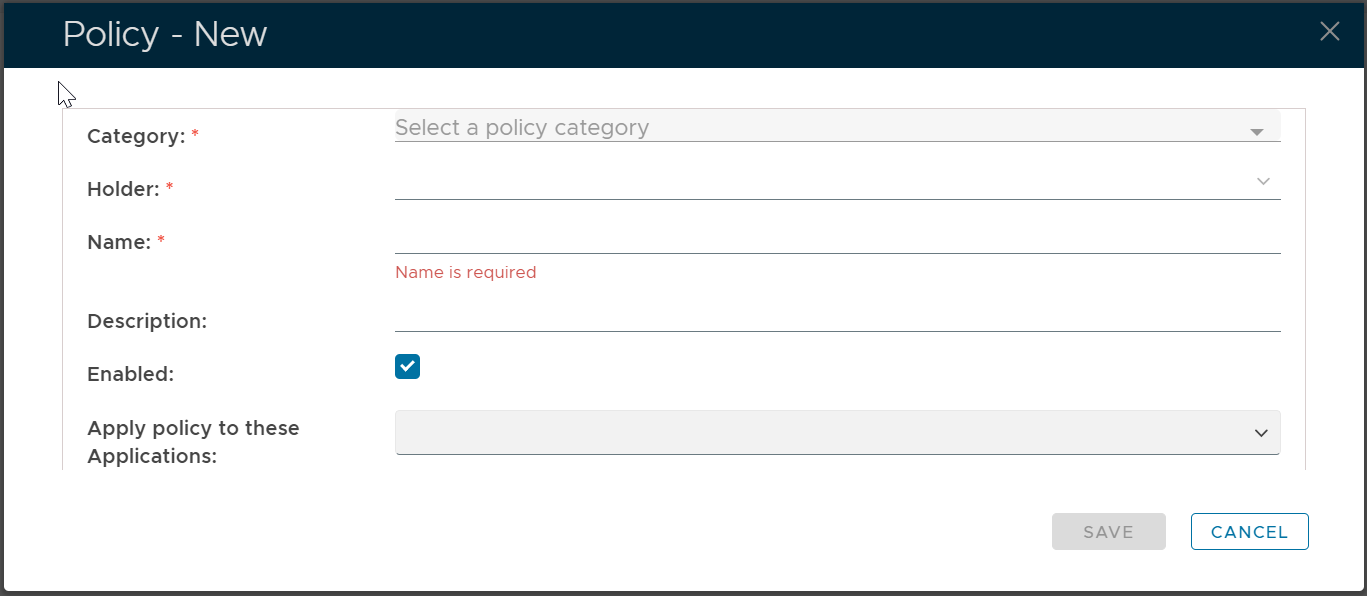
In the policy editor, firstly select Logon from the Category drop-down list
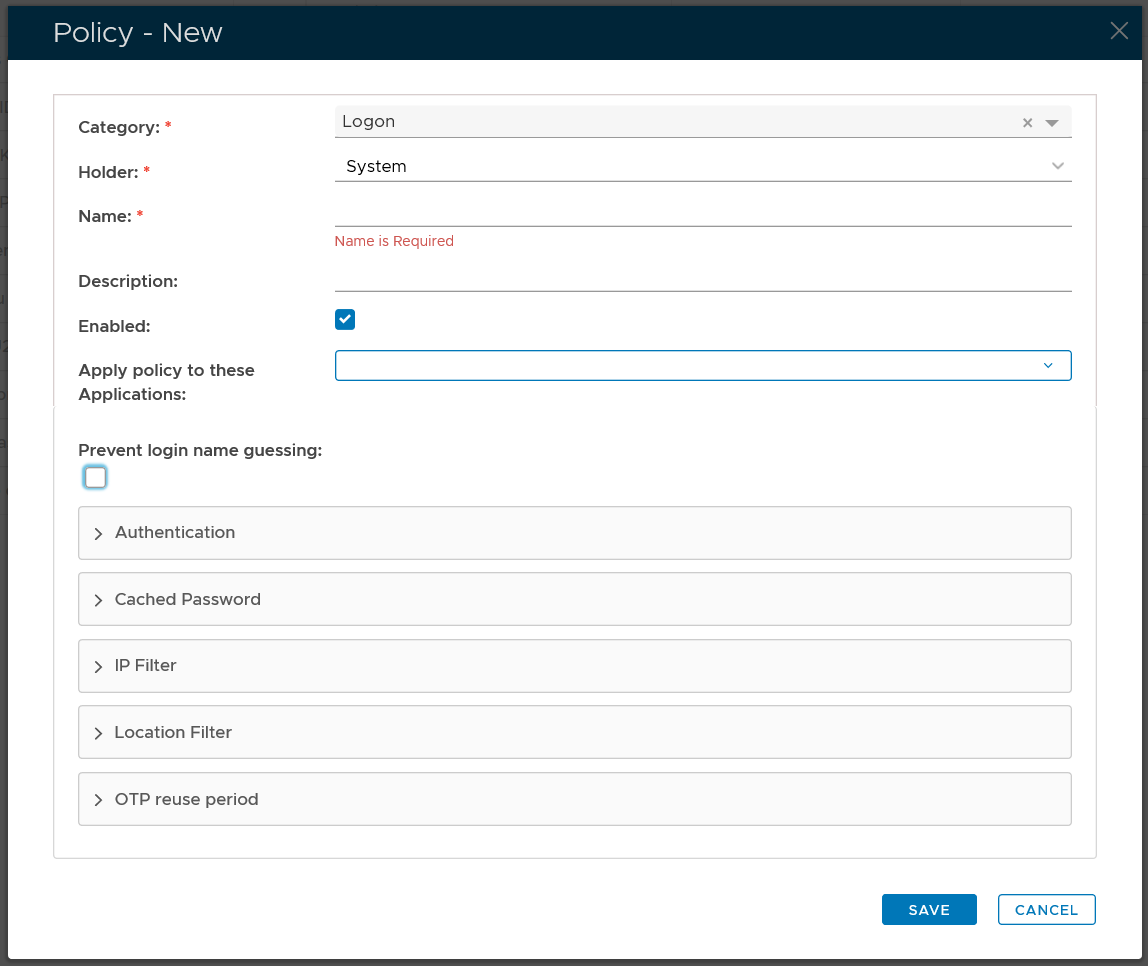
Policy Bindings
| Holder: | The policyholder defines the scope of the policy.
|
| Name: | A unique name that describes this policy |
| Applications: | Optionally, you can bind the policy to a specific application or a list of applications. To specify the application(s), select the field: Apply policy to these applications If the field Apply policy to these applications is left empty, then the policy will be applied to all applications. |

Policy Options
Editing the Logon Policy
Logon policy settings can be edited using the following procedure;
- From the Home page of the Management Console, left click on the menu item "Administration", select "Policies", then in the new tab "POLICIES", select the category "Logon", then click the
 button;.
The Logon policy settings can now be viewed (or edited) by left clicking on the context menu of the Logon policy, then selecting either "View" or "Edit";

After editing the policy setting, a new window titled "Policy - Edit" will open that can be used to edit the policy settings;

Expandable Sections
The remaining policy settings are grouped into the following expandable sections;
- The purpose of the section "Authentication" is to provide the system administrator with with policy settings that determine when multi-factor authentication is required.


This setting determines if user authentication is required when logging in;
- Multi-factor authentication is not required for all users
This option means that all users will be exempted from 2FA or MFA. This option is typically used to exempt a group of users from 2FA or MFA. - Multi-factor authentication is required for users with tokens only
This option means that users who have a 2FA/MFA token in their account will be enforced to login with 2FA/MFA, while those users who do not have a token 2FA/MFA token will be exempted from 2FA/MFA in the logon process. .
- Multi-factor authentication is required for all users
This option means that all users will be enforced to login with 2FA/MFA
Please note that users in the context of a policy include users in the scope of the policy only, i.e. the policy holder.

If authentication skipping is enabled, this setting will determine if the password is kept (and the second factor skipped), or if all factors are skipped;
- Skip the second factor and keep the password
The second factor is skipped, but the password is kept. - Skip Al factors including the password
All factors are skipped.
- Multi-factor authentication is not required for all users
- The purpose of the section "IP Filter" is to specify when to allow or deny logon based on the users' IP address.


This setting determines if user authentication is required when logon attempts are made from the specified IP address;
- required
If this option is selected, then the user will be asked to provide multi-factor authentication prior to logging on. - not required
f this option is selected, then the user will not be asked to provide multi-factor authentication prior to logging on..
- required
- The purpose of the section "User Agent Filter" is to specify when to allow or deny logon based on the agent used by the user agent.


This setting determines if user authentication is required when logon attempts are made the matching agent;
- required
If this option is selected, then the user will be asked to provide multi-factor authentication prior to logging on. - not required
f this option is selected, then the user will not be asked to provide multi-factor authentication prior to logging on..
This setting allows you to list the agents that this policy will apply to;;

The user agent are listed ass a text string (regular expressions are supported).
e.g. (MacOutlook|Apple-iPhone6C) will match both "MacOutlook" and "Apple-iPhone6C"
- required
- The purpose of the section "Geo Location Filter" is to specify when to allow or deny logon based on the geographic location of the user.


This setting determines if user authentication is required when logon attempts are made from the specified IP address;
- required
If this option is selected, then the user will be asked to provide multi-factor authentication prior to logging on. - not required
f this option is selected, then the user will not be asked to provide multi-factor authentication prior to logging on..

After clicking on the
 icon the following window will open;
Location details are then supplied that identify the which geographic locations the policy will apply to during logon. (based up IP addresses).
- required
- The purpose of the section "Geo Location Filter" is to specify when to allow or deny logon based on the geographic location of the user.
This setting determines if user authentication is required when logon attempts are made from the specified IP address;
- required
If this option is selected, then the user will be asked to provide multi-factor authentication prior to logging on. - not required
f this option is selected, then the user will not be asked to provide multi-factor authentication prior to logging on..
After clicking on the
icon the following window will open;Location details are then supplied that identify the which geographic locations the policy will apply to during logon. (based up IP addresses).
- required
- The purpose of the section "Others" is to provide logon policy settings that don't fit into the other main sections.

Register VPN Appliance
To register a Radius client, select “RADIUS | Radius Client” in the main menu and click “Register” button in the tool bar.
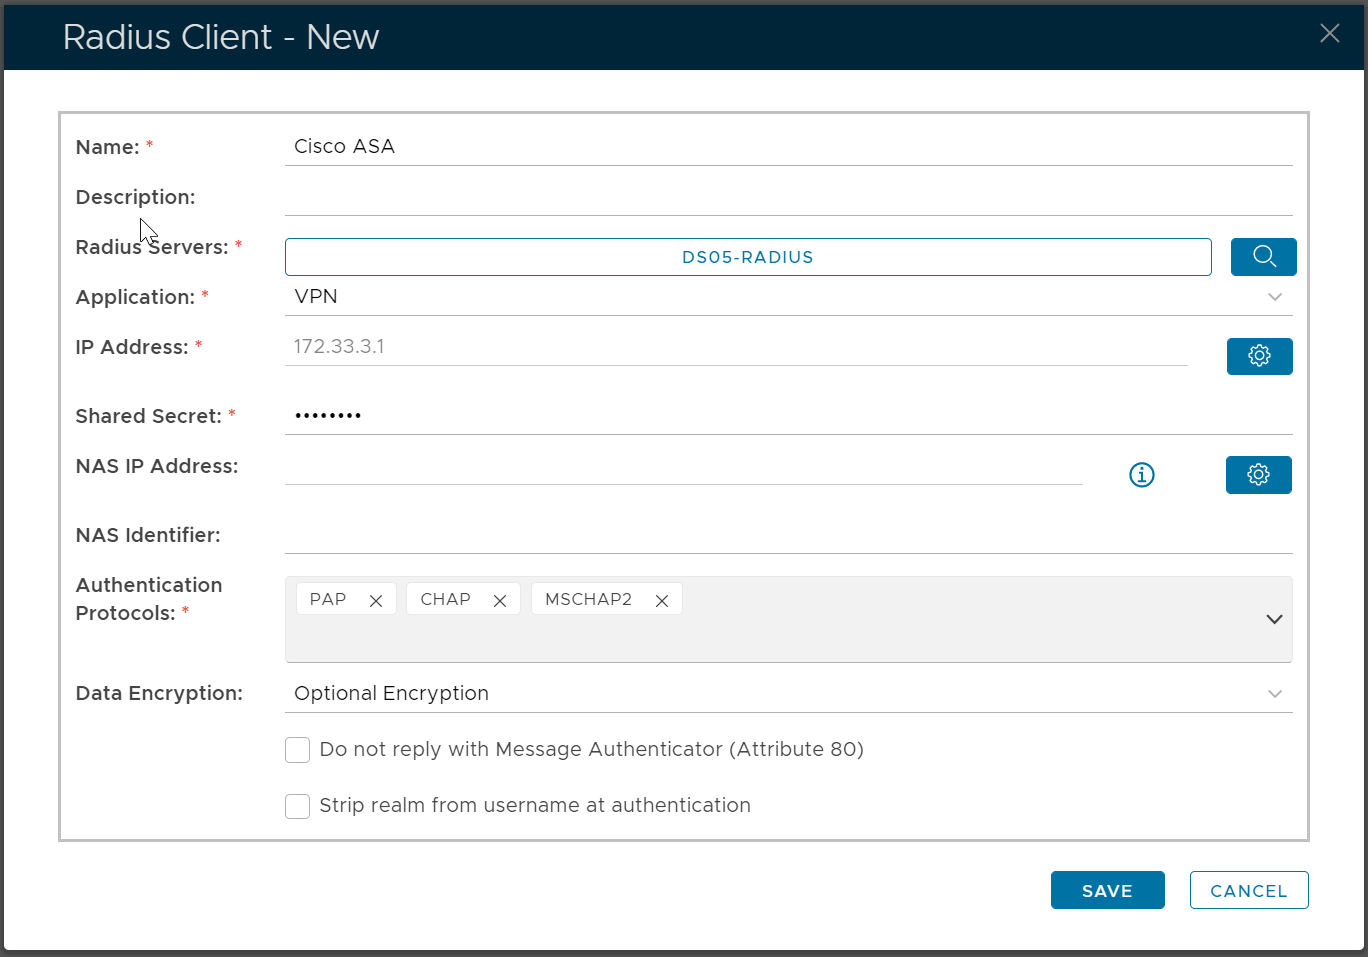
IP Address
The address of the radius client (NAS device) connected to this entry.
Shared Secret
A shared secret is a case-sensitive password used to validate communications between the RADIUS server and the RADIUS client (NAS device). The shared secret must be configured to match on both devices.
DualShield supports shared secrets of up to 127 alphanumeric characters, including spaces and the following special characters:
~!@#$%^&*()_+|\=-`{}[]:"';<>?/.,
Authentication Protocols
Many different authentication protocols can be used during RADIUS authentication. Common examples are PAP, CHAP, MS-CHAP.v2 and EAP. This setting lists the authentication protocols the RADIUS server will allow from a given RADIUS client. Currently PAP, CHAP and MS-CHAP.v2 are the only available authentication protocols supported by the system.
Encryption Data Policy
Data encryption protects the data sent between the remote access client (VPN client) and the remote access server (NAS). The remote access server can be configured to require data encryption. The remote access client can be configured to request the following levels of data encryption:
- Optional encryption (connect even if there is no encryption).
- No encryption allowed (the server disconnects if it requires encryption).
- Require encryption (disconnect if the server declines).
If the remote access client cannot perform the required encryption, the connection attempt is rejected.
Do not Reply with Message Authenticator
Some VPN gateway appliance, such as CheckPoint, requires that the “Message Authenticator” should not be returned from the Radius Server. If your VPN gateway has this requirement, tick the option.
Strip the realm from username at authentication
If the username received is prefixed by a realm or domain (e.g. realm\name), then the realm/domain part is removed from the username.
Configure VPN Appliance
The process of configuring Radius settings in a VPN or firewall appliance varies according to its manufacturer. You need to refer to the operators manual of the appliance itself. Below is an example:

We have instructions for some of the popular ones, such as Cisco, Citrix, SonicWall, F5, Juniper, NetMotion etc.
- Absolute Secure Access
- Amazon Web Service
- Apache HTTPd
- Apache Tomcat
- Box.com
- CAS Apereo
- Check Point
- Cisco ASA
- Citrix Netscaler
- Citrix ADC
- Citrix Cloud Workspace
- Citrix Sharefile
- CompleteFTP
- ConsoleWorks
- Ctera
- Delinea Thycotic Secret Server
- F5 BIG-IP APM
- Fortinet FortiGate IPSec VPN
- Fortinet FortiGate SSL VPN
- Fortinet FortiGate Firewall Admin Console
- Google Apps
- GoToMeeting
- IBM WebSEAL
- iManage Share
- JIRA
- Juniper Pulse Secure SA SSL VPN
- Microsoft Office 365 and Entra ID
- Microsoft Power Apps
- Microsoft Remote Desktop Gateway
- Microsoft Remote Desktop Web Access and Web Client
- Microsoft RRAS
- Microsoft SharePoint
- NetMotion Mobility - Absolute Secure Access
- Palo Alto
- Parallels Remote Application Server
- PowerDMS
- Quest Rapid Recovery
- Salesforce
- SonicWall Global VPN
- Sophos Astaro Security Gateway UTM
- Sophos XG Firewall
- Splunk
- VMware Horizon View
- VMware Identity Manager
- VMWare Workspace One AirWatch
- WatchGuard
- Oracle E-Business Suite EBS