Configure Oracle Access Manager for SAML Integration
Create a New Identity Provider
This section assumes that Oracle Access Manager federation services have been enabled.
- Sign to the Oracle Access Manager console as an Administrator.
- Click the Federation tab at the top of the console.
- In the Federation area of the Launch Pad tab, click Service Provider Management. For an explanation of why you select this option when creating an identity provider, see the OAM Federation: Identity Provider & Service Provider Management blog post.

On the Service Provider Administration tab, click Create Identity Provider Partner.
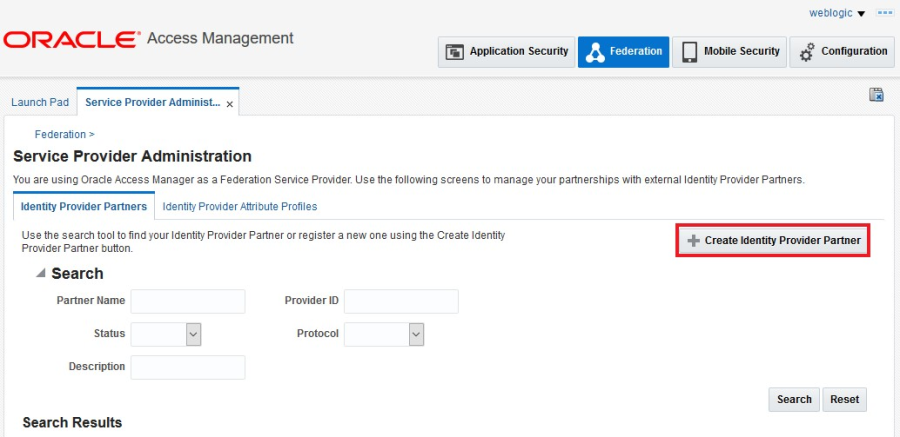
In the General area, enter a name for the Identity Provider partner and select both the Enable Partner and Default Identity Provider Partner check boxes. Go to the next step before saving.

In the Service Information area:
- Select SAML2.0 as the protocol.
- Select the Load from provider metadata option.
- Click Browse (for Windows) or Choose File (for Mac) and select the Azure AD SAML metadata file that you saved previously.
Go to the next step before saving. 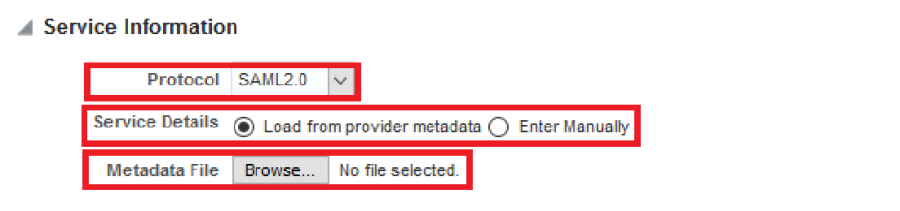
- In the Mapping Options area:
- Select the User Identity Store option that will be used as the Oracle Access Manager LDAP identity store that is checked for E-Business Suite users. Typically, this is already configured as the Oracle Access Manager identity store.
- Leave the User Search Base DN field blank. The search base is automatically picked from the identity store configuration.
- Select the Map assertion Name ID to User ID Store attribute option and enter mail in the text box.

Important: This configuration defines the user mapping between Azure AD and Oracle Access Manager. Oracle Access Manager will take the value of the NameID element in the incoming SAML assertion and try to look up that value against the mail attribute across all user entries in the configured identity store. Therefore, it's imperative that the Azure AD user principal name (in the Azure AD configuration shown previously) is synchronized with the mail attribute in Oracle Access Manager's identity store.
- Click Save to save the identity provider partner.
- After the partner is saved, come back to the Advanced area at the bottom of the tab.
Ensure that the options are configured as follows:
- Enable global logout is selected.
- HTTP POST SSO Response Binding is selected.
This is an instruction that Oracle Access Manager sends in the authentication request telling Azure AD how it should transmit the SAML assertion back. If you inspect the authentication request that Oracle Access Manager sends, you would see something like the following example. Note the bold ProtocolBinding attribute of AuthnRequest element in the example.
<?xml version="1.0"?> |
- Enable HTTP Basic Authentication (SSO artifact binding) is not selected.
This setting asks Azure AD to send the assertion via an HTTP POST request. When receiving a request like this, identity providers typically create an HTML form with the assertion as a hidden form element that is automatically posted to the service provider's Assertion Consumer Service (ACS). 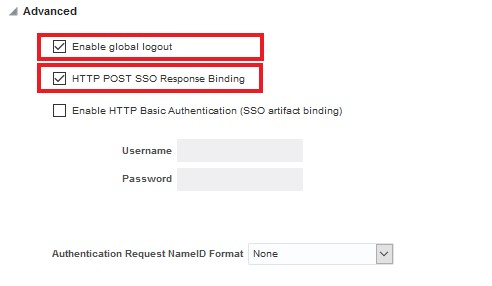
- In the General area, click the Create Authentication Scheme and Module button.
An authentication scheme and module are created with the partner name. The only configuration left is attaching the authentication scheme to the E-Business Suite resources that require Azure AD credentials for authentication, which you will do in the next section.
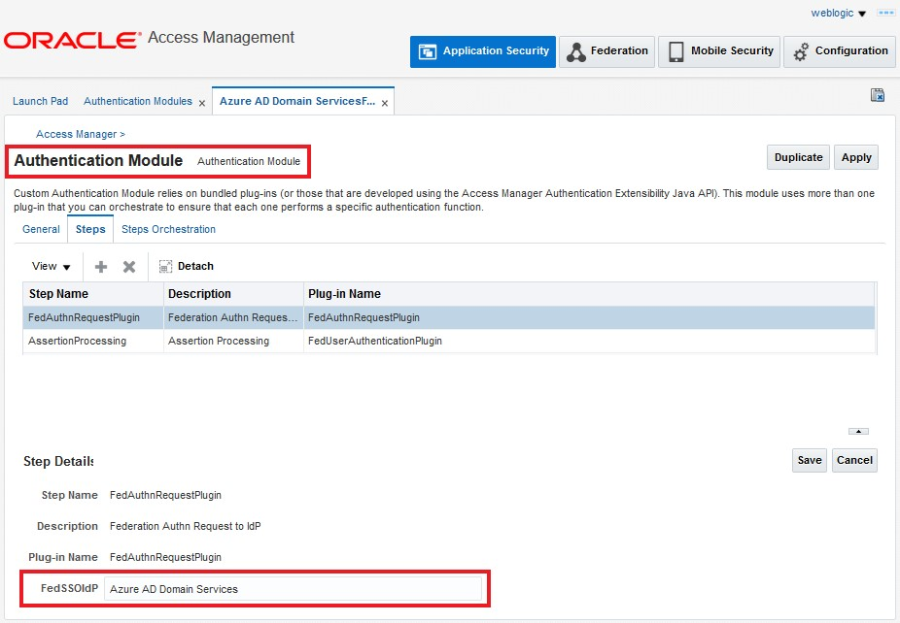
- You can check the authentication module that was created by following these steps: A. Click the Application Security tab at the top of the console.
- Under Plug-ins, select Authentication Modules, click Search, and find your federation module.
- Select the module, and then click the Steps tab.
- Note that the value in the FedSSOIdP property is the identity provider partner.
Associate the E-Business Suite Resources with the Authentication Scheme Perform these steps while logged in to the Oracle Access Manager console as an Administrator.
- At the top of the console, click Application Security.
- Under Access Manager, select Application Domain, click Search, and select the application domain that was created during E-Business Suite script execution for the integration that would have registered the E-Business Suite WebGate.
- Click the Authentication Policies tab, and then click Protected Resources Policy.
Change the Authentication Scheme by changing the previously created authentication scheme with the new federation authentication scheme. This is how Oracle Access Manager ties a protected resource to an identity provider. 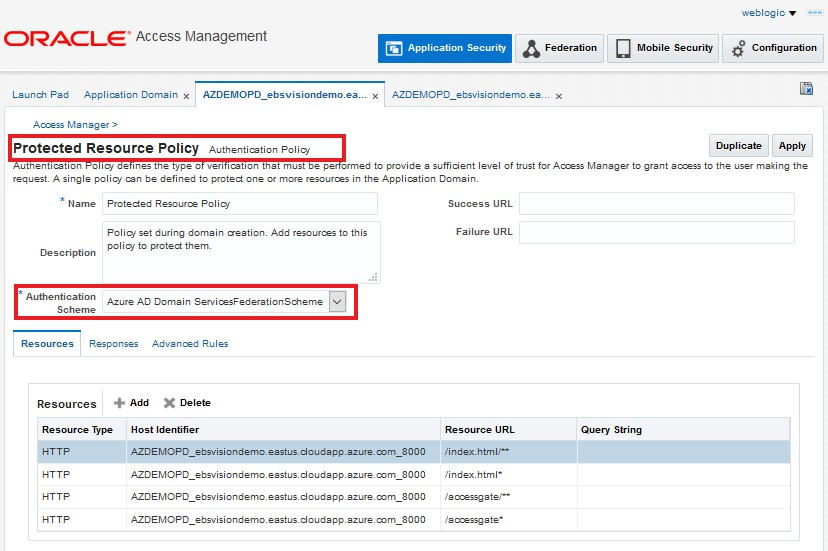
- Click Apply to save the change.