Introduction
A commonly used authentication method that can be used as a factor of the type "something you have" is authenticating using one-time passwords (OTP). This type of authentication method is added to the authentication options available during authentication by adding the method "One-Time Password" to the logon procedure.
There are three requirements for using One-Time Password authentication in DualShield;
- A suitable OTP token needs to have been assigned to the authenticating user's account (either time based or event based).
- The authentication method "one-time password" must have been added to the logon procedure of the protected application.
- The user must have received a copy of the token that was sent to them (either by email or SMS) so that it can either be added to an authentication app or programmed onto a programmable token.
DualShield supports the following possible authentication products that can produce one-time passwords;
- MobileID Time/Based tokens
- MobileID Event/Based tokens
- Google Authentiicator Time/Based tokens
- Google Authenticator Event/Basesd tokens
- Microsoft Authenticator Time/Based tokens
- SafeID hardware token
This guide explains how to use Google Authenticator Time/Based tokens, however if a user is logging in to a protected application and has any of the other OTP tokens assigned to them, then they can supply an OTP code from any of the alternative sources.
Policy Setting Options
Before we create and assign the Google Authenticator Tokens to users we should first select the product's policy settings;
From the Management Console navigate to "Administrator | Policies", select the category "GoogleAuthenticator/Time-Based", then click
 ;
;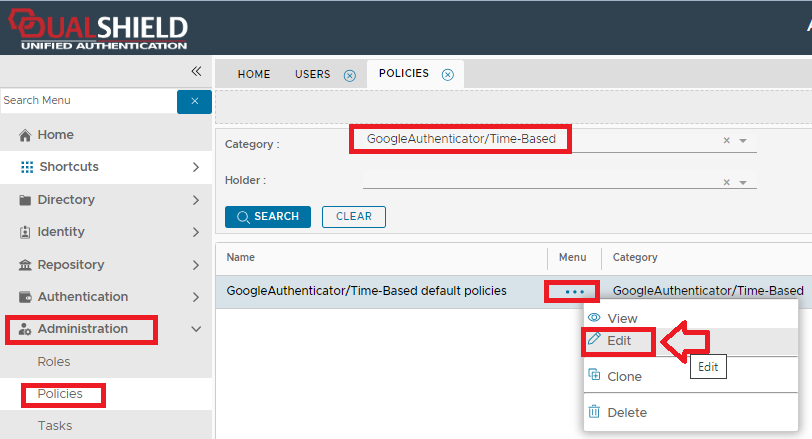
A new window will open titled "Policy - Edit", please use the following policy settings;
Policy Setting
Set the settings to the following
Token Provisioning
"Manual"
Client Provisioning
"Manual"
Token Activation
"Automatically activate the token when created or assigned"
Authorisation
"Authorisation Code not required"
Authentication
"Authentication not required"
Adding the authentication method to a protected application
For the purposes of testing we will protect the password reset portal using a Google Authenticator token (however this can easily be adapted to other applications).
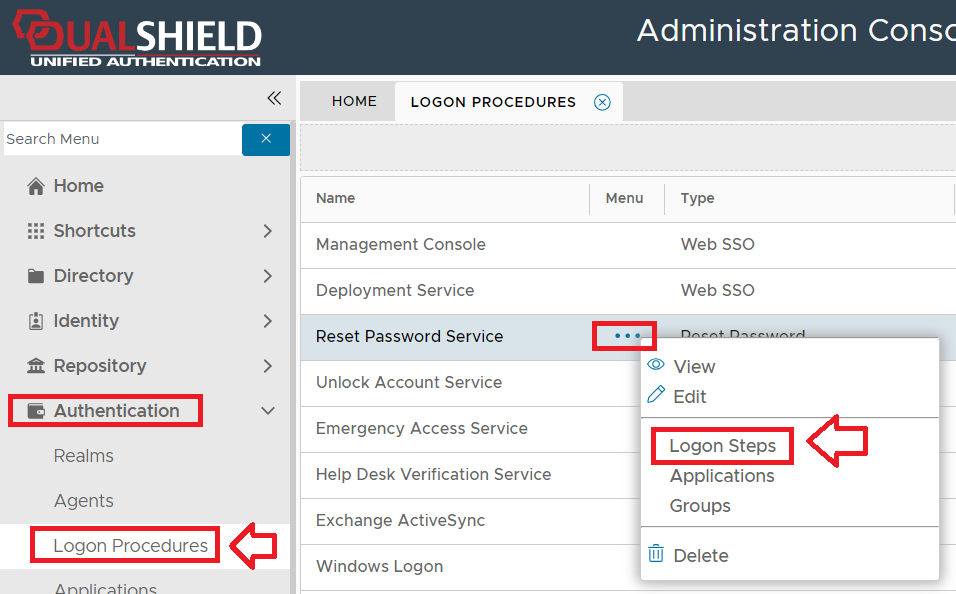
From the Management Console, navigate to "Authentication | Logon Procedures" , and use the context menu of the logon procedure that will be protected with Google Authenticator tokens (via OTP), and select "Logon Steps";
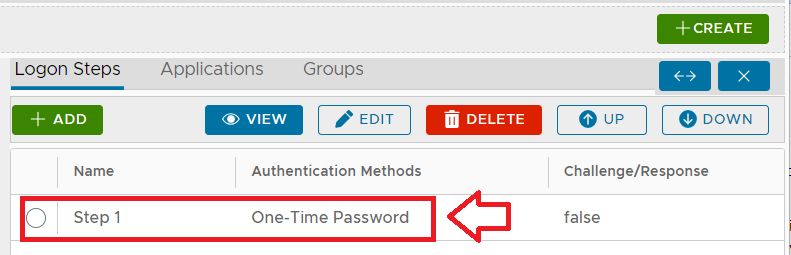
In order to be able to use Google Authenticator tokens during authentication of a protected application we should include the authentication method "One-Time Password" in our logon steps.
For this test we will just use a single step (with this method as the only authentication method being used in the step);
Using the context menu option "Applications", we must ensure that only the application "Reset Password Service" is selected.
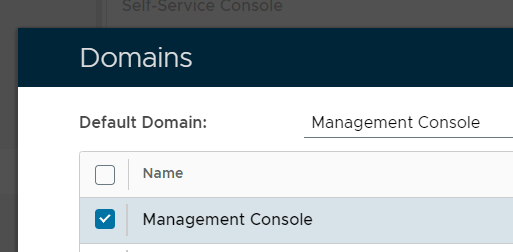
If we now navigate to "Authentication | Realms", and from the context menu of the realm "Reset Password Service", select the context menu option "Domains", then ensure that the domain "Management Console" is selected;
For a full list of options available to the policy settings available used by Google Authenticator tokens see the following wiki guide;
Creating and Assigning Google Authenticator Tokens
Once you have set the token policy options you are ready to create and assign the tokens to users.
If you are the system administrator, and you want to test this authentication solution prior to deployment to your users, then a good solution would be to create a test account (with an email address) in the management console domain, and then use this account to test that OTP authentication is operating properly prior to deploying the solution to your users.
The following procedure will create an account that can be used for testing google authenticator tokens, and will also demonstrate how google authenticator tokens can be assigned to this account;
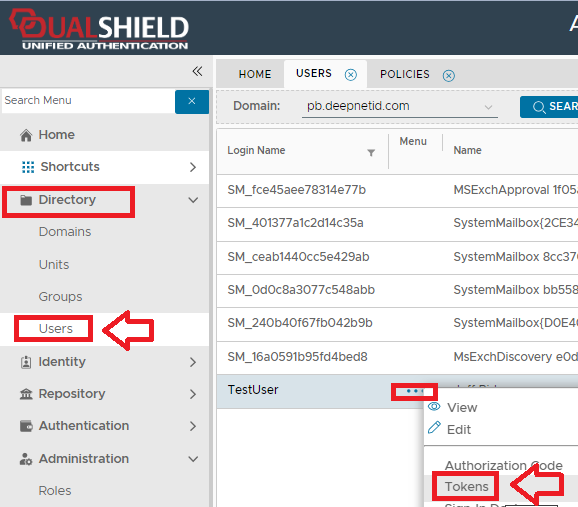
From the management console, navigate to "Directory | Users", select the domain "Management Console" and click "SEARCH";
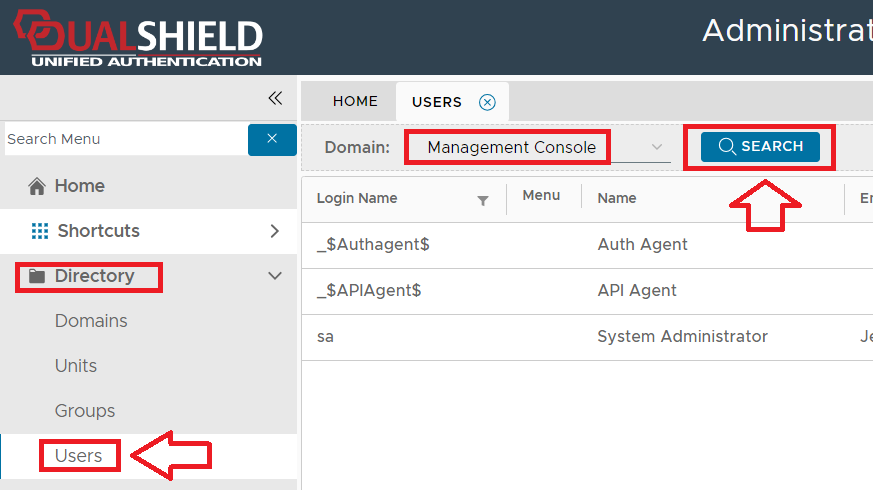
For the purposes of testing this solution we will now create a new user "GA Test" in this domain. To create the user account click
 button (found at the top right of the page).
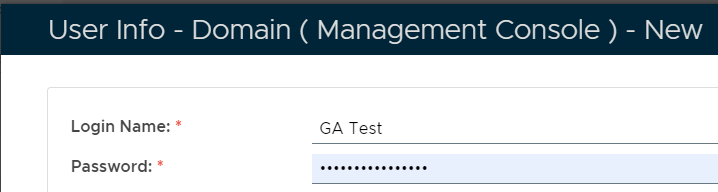
A new window will now open titled "User Info - Domain (Management Console) - New", fill in the Login Name of "GA Test", and supply a password to be used for this test account;
Now provide any name details for the "First Name" and "Last Name" fields, an email address that tokens details will be sent to (when testing), then click
 to create the account.
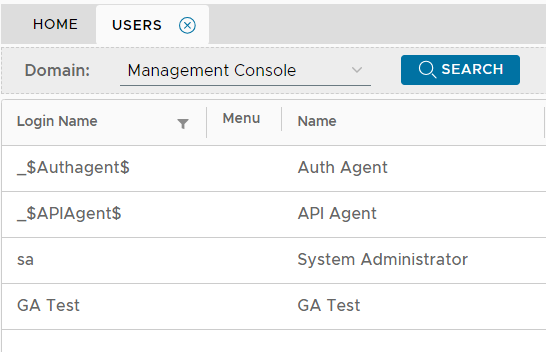
The user account will now have been added to the list of management console users (we have not assigned any role permissions so any test logins to the management console using this account will no have admin privileges).
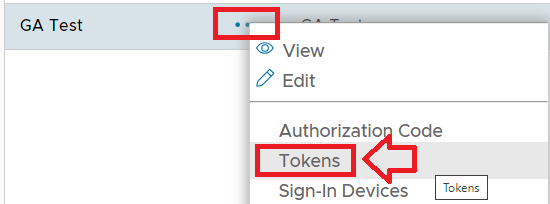
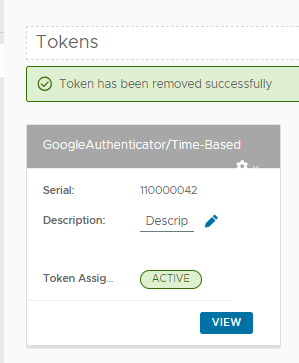
Left click on the context menu of this user and select the option "Tokens";
Now user the
 button to create and assign a new token;
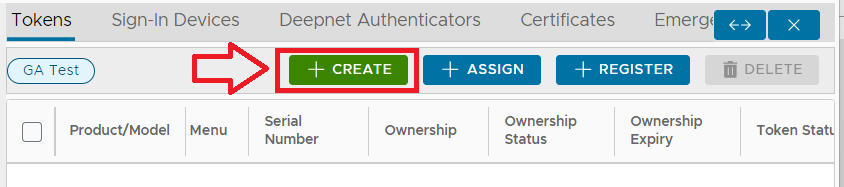
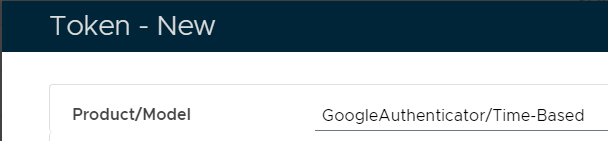
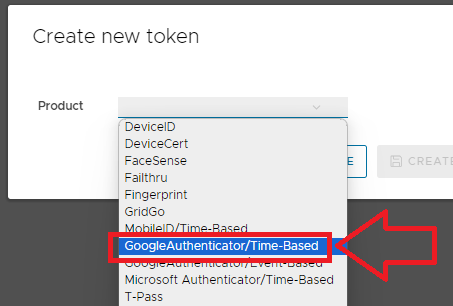
A new window titled "Token - New" will now open, at the prompt "Product/Model" select "GoogleAutheticator/Time-Based" then click
 ;
;
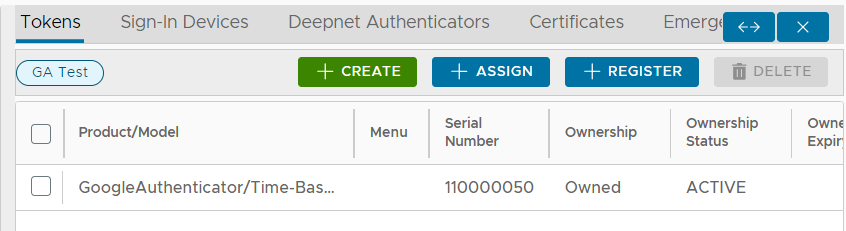
You will now have created and assigned the token to the newly created user account;
Preparing a test application
In order to test our newly assigned token we will need to prepare the Google Authenticator policy settings, then Create an application that is OTP protected that can be used to test the token.
From the Management Console, navigate to "Authentication | Logon Procedures" , and use the context menu of the logon procedure that will be protected with Google Authenticator tokens (via OTP), and select "Logon Steps";
In order to be able to use Google Authenticator tokens during authentication of a protected application we need to include the authentication method "One-Time Password" in our logon steps.
For this test we will just use one step with this method as the only authentication method used by the step;
Using the context menu option "Applications" we can also ensure that only the application "Reset Password Service" is selected.
If we now navigate to "Authentication | Realms", and from the context menu of the realm "Reset Password Service", select "Domains", and ensure that the Domains "Management Console" is selected;
Testing OTP access using the Goggle Authenticator Token
Now that we have a test application that is protected with OTP authentication, we will open a new incognito window and test logging in to our OTP protected application.
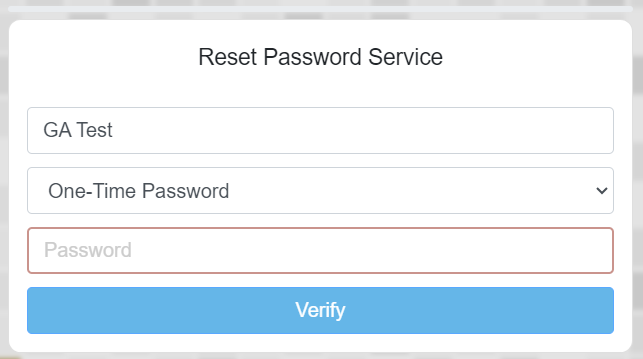
At the protected application we supply the name of our test user ("GA Test") and will then be prompted to enter our OTP code;
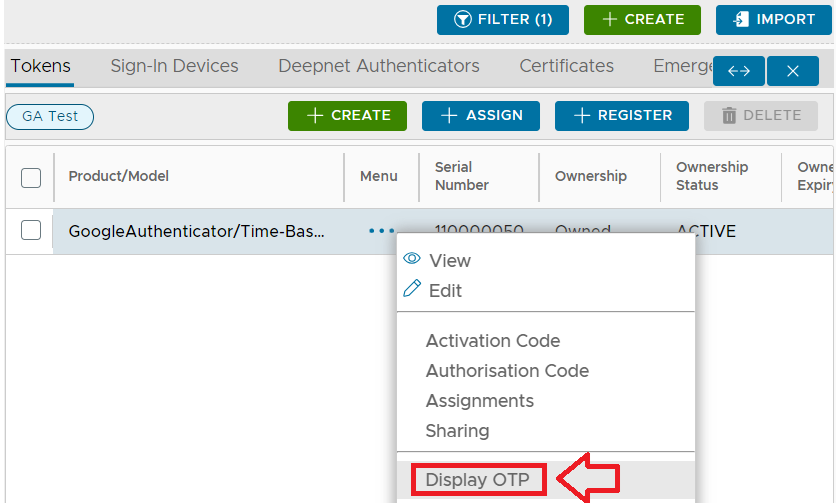
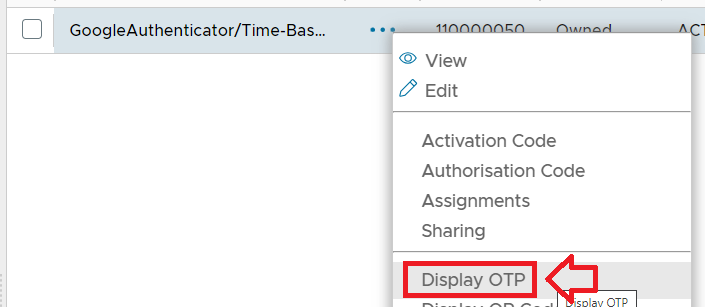
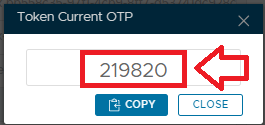
If we now switch back to our management console window and navigate back to our list of tokens assigned to the newly created user, we can use the context menu option "Display OTP";
A new window titled "Token Current OTP" will now open, click on the
 button to copy this code to you clipboard;
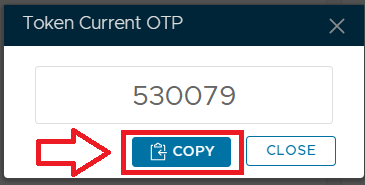
Now switch back to your test logon screen, and at the OTP prompt paste in the code, and you will be granted access to the protected application.
Testing if the server clock needs correcting
QR codes are an efficient method of sending token data to users but before we test this process it is worth checking that the authentication server's clock has been set correctly (if this is not the case then the OTP codes generated by the server will not match those produced by the client).
Whilst a simple comparison of the date and time produced by the authentication server with internet time may prove a good indication that the clock on the server is accurate, a better overall test is to compare OTP codes generated by the system with an independent source that is using the same seed data.
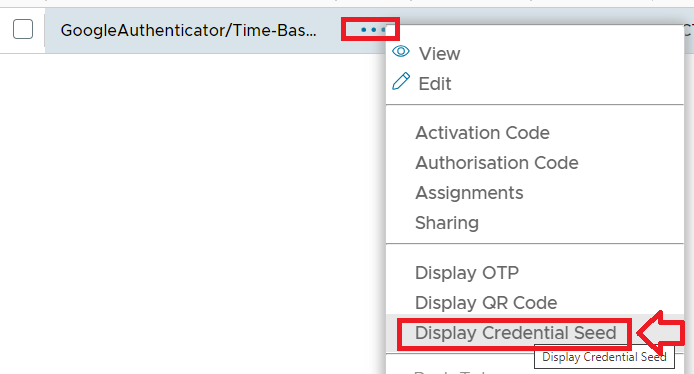
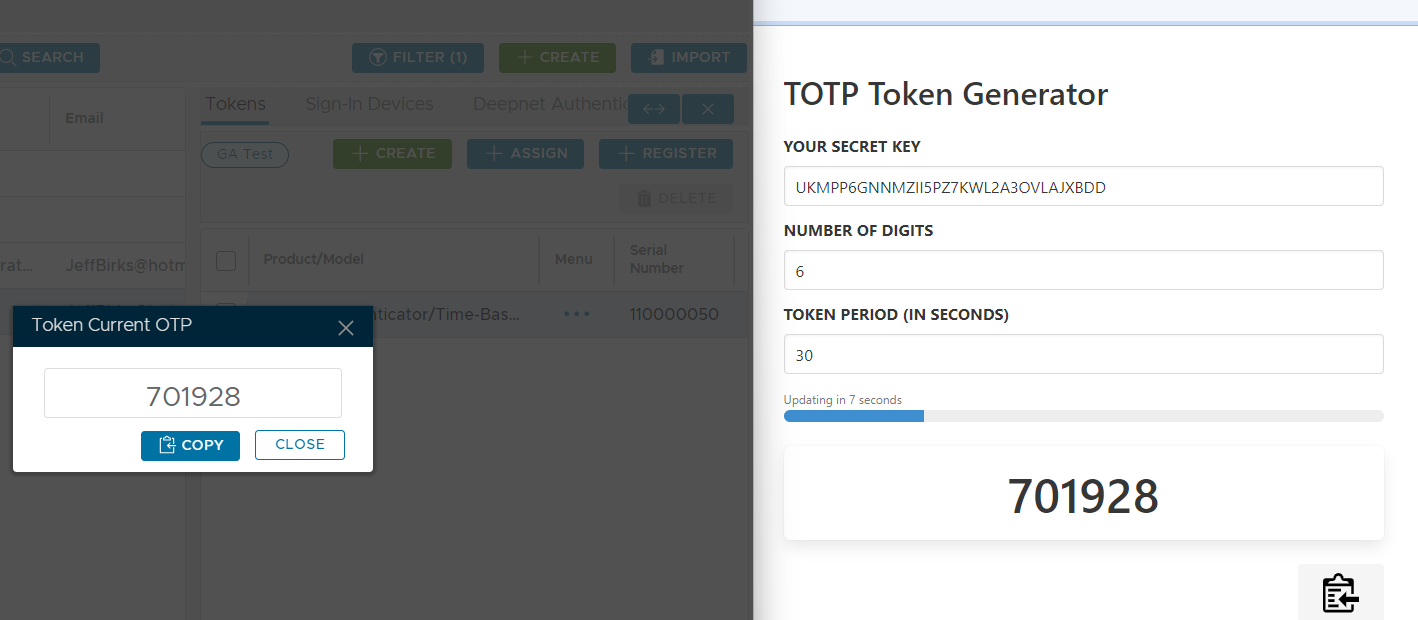
To perform this test using a google authenticator seed you will first need navigate to the user and token in question, then use the context menu option "Display Credential Seed";
A new window titled "Credential Seed" will now open that displays the base32 encoded seed for this token;
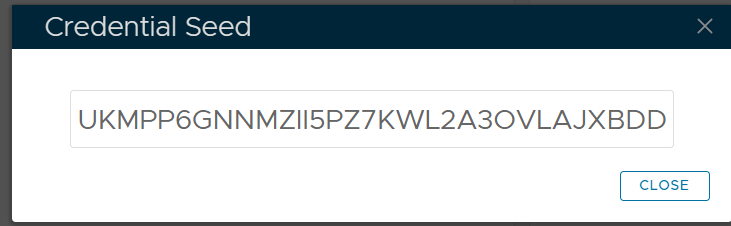
Make a copy of this seed then open a new incognito window at the URL: https://totp.danhersam.com/
At the prompt "YOUR SECRET KEY" paste in your Credential Seed, and the page will display 6 Digit OTP codes every 30 seconds (that are generated using your credential seed);
Organise your windows so that this rolling OTP display is visible whilst you access the management console, then against the token you obtained the seed from use the context menu option "Display OTP";
You should find that both sources are producing the same 6 digit OTP code
If the codes do not much you may need to correct the clock on your authentication server.
The following procedure can be used to correct the clock on your authentication server;
From the Date & Time settings window
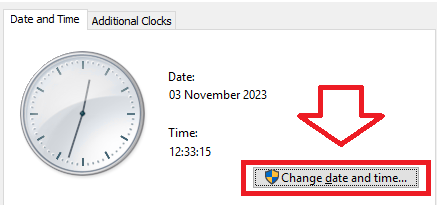
Correct the clock against internet time then click "OK"
Repeat the OTP test performed earlier, and the two OTP codes should now match.
Pushing QR Codes
To test sending the QR code by email you will need to perform some additional preparations.
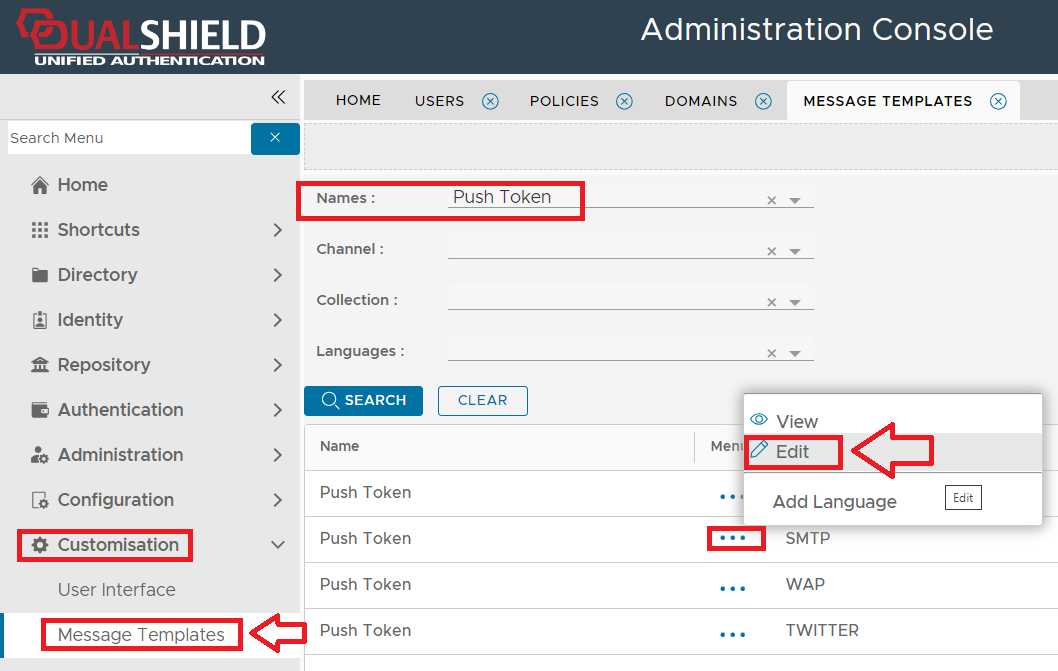
Before we can push QR codes to users we need to ensure that the template for pushed tokens is updated.
After entering the recipient email address save your changes then navigate to "Customisation | Message Templates", at the prompt "Names:", select "Push Token", then click
 .
.Left click on the context menu for the channel "SMTP" and select "Edit";
A new window titled "Push Token" will now open, at the prompt "Text:" add the text "[[QRCODE]]", at the prompt "Format:" select "HTML Format", then click
 ;
;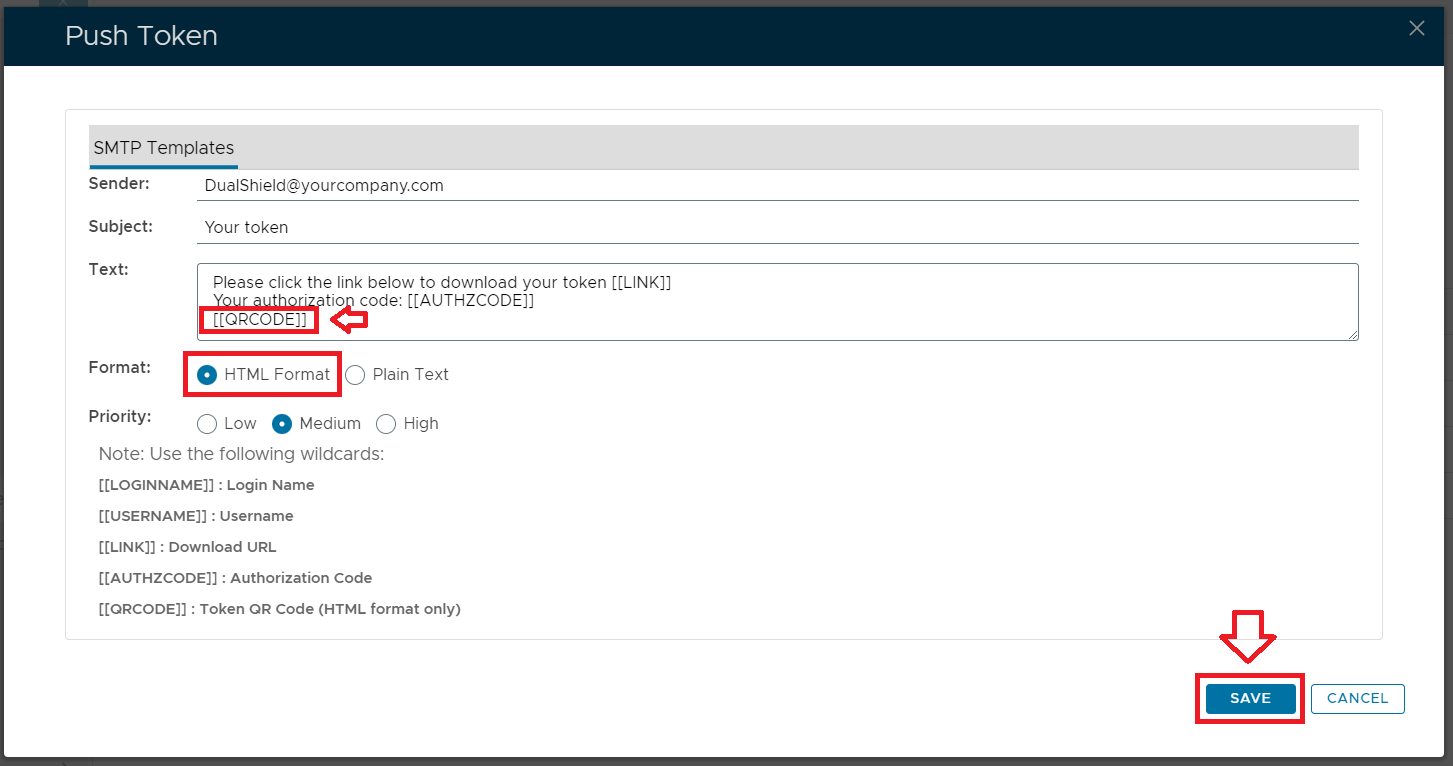
By making this change you will be ensuring that when a token is pushed to the user a QR code is included in the email.
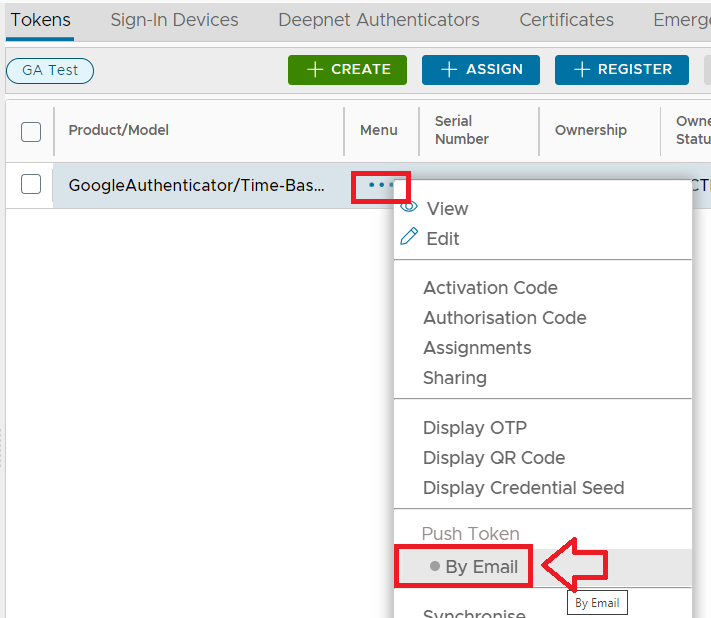
You can now test pushing a QR code to the administrator by navigating back to the administrator's token list and using the context menu option "Push Token By Email";
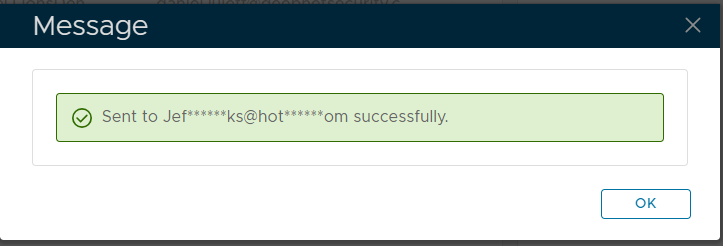
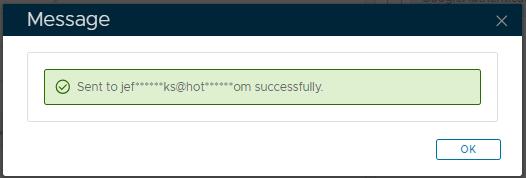
After the token has been pushed you should see a confirmation the email has been sent;
At the recipient email address an email will then arrive with a download link and a QR Code;
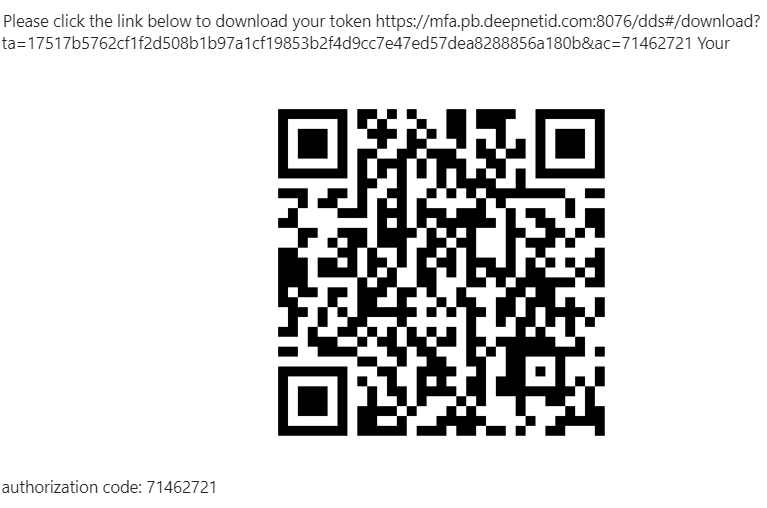
The recipient will then use the scan feature of their Google Authenticator compatible app to add the token and start generating OTP codes.
The QR Code can be used either by scanning the token into a Google Authenticator App, or by using the code to program a programmable hardware token;
Provision and deploy tokens to users
There are several methods that may be used to provision a token to the user;
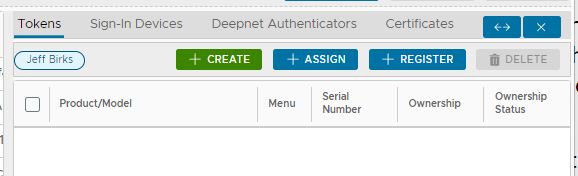
- From the management console navigate to "Directory | Users", left click on the context menu of the user you need to provision a token to then select "Tokens";
A new section of this window will now open showing all tokens currently provisioned to this user;

Click the
 button, and a new window titled "Token - New" will open, at the prompt "Product/Model" select "GoogleAuthenticator/Time-Based";
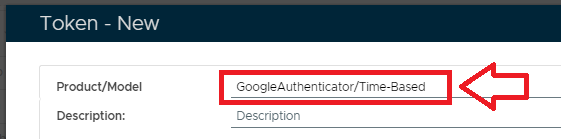
Once the product has been selected click
 and a GoogleAuthenticator token will be assigned to the user.
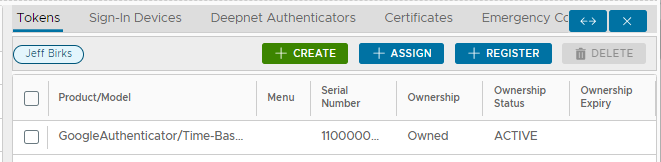
After the token has been created for the we will need to ensure that the user is able to install a copy of this token on their app.
If the token has been generated manually using the management console, then it is probable that you will want to use one of the following methods to send the token to the user;
The "Display QR Code" context menu option
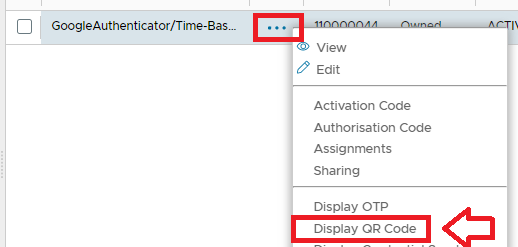
After selecting the "Display QR Code" option a new window will open titled "QR Code"";
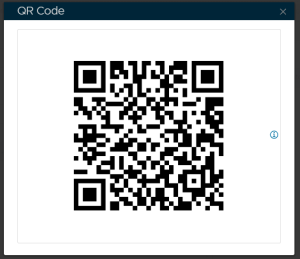
The QR code displayed contains all the data that is necessary for the user to add the google authenticator token to their app.
If the administrator is testing authentication (or is preparing a phone, or programming a programmable token), then the QR code may be used directly with the authenticating device (PC, App on a Mobile or Programmable Token).
Alternatively if the token has just been prepared manually prior to being sent to the user, it possible that the administrator may choose to manually copy a screenshot of the QR code, then manually send it to the user (via Email, screen share, fax etc).
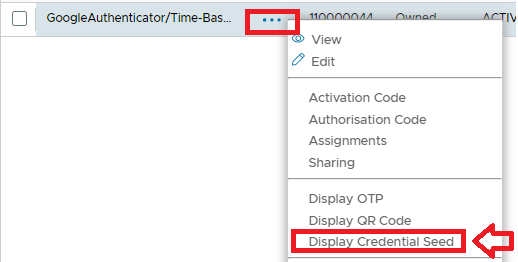
Whilst the "Display QR Code" option provided a graphical version of the token, the "Display Credential Seed" will provide a text version of the seed contained within the QR code;
After selecting this context menu option a new window will open titled "Credential Seed";

The information displayed in this window is available to the copied by the system administrator in order to test the seed.
Using the above credential seed as an example ("P4CEJA4ENYMEDHEUBTTHUAON5IWUABUD") we will confirm that the OTP code generated by the authenticator server is being generated as we would expect.
To test the token we navigate to an online TOTP Generator (a good example is https://totp.danhersam.com/) , and copy and paste in our seed into the generator.
After navigating to the online generator we see a screen similar to the screenshot below;
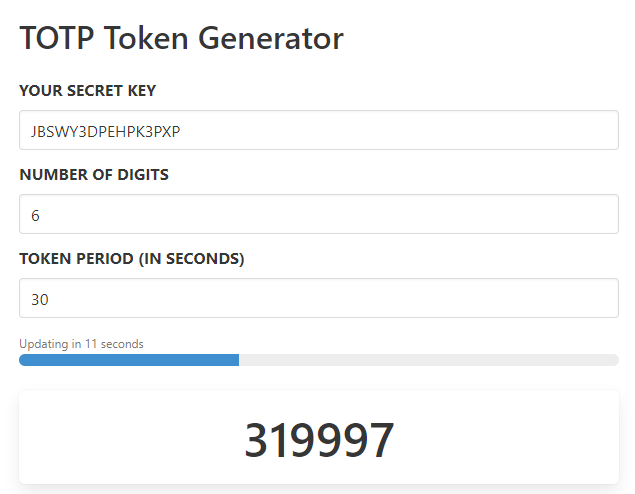
we replace the secret key with a copy of the credential with the credential displayed on the management console and we find that the online tool now displays 6 digit OTP codes that are based on this seed.

We now context menu option "Display OTP";
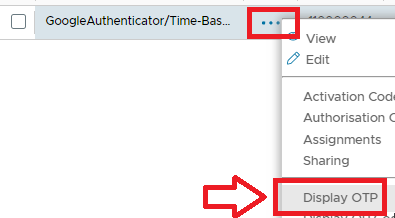
A new window will now open showing an OTP code that was generated using the credential seed generated for this token;
If we now compare the OTP code displayed in this window with the OTP code displayed on the online web page we should find the two match (if they do not match then it is advised you check that the clock on your server is set correctly, and if the time (or date) is incorrect it should be corrected.
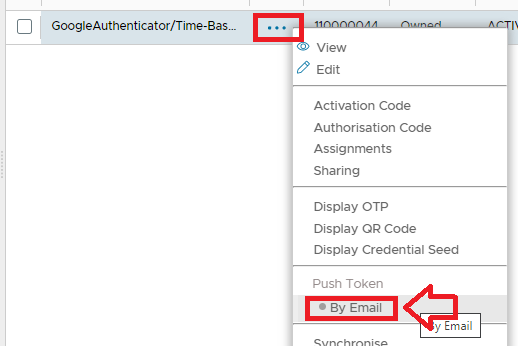
After selecting the context menu option "Push Token", you will find a list of options for deploying the token to the user that this token is assigned to.
The list will be based on two factors, the presence (or absence) of contact options in the users AD contact details ( phone number, email address etc), and the configuration of the Google Authenticator policy setting options in the sections Delivery Channel Used by the System and Delievery Channels Available to Users.
After the token has been pushed to the user a new window will open confirming delivery of the token;
- If the Self-Service Console has been enabled and made available for the user to request tokens, then after logging on to the console a user may request provisioning of a Google Authenticator token by clicking on the
 button on the portal;
After the button has been pressed a window titled "Create new token" will open;
At the prompt "Product", select "GoogleAuthenticator/Time-Based", then click

A new token will now be created for the user;
- If the Google Authenticator policy setting "Token Provisioning" is set such that when the user logs in with no google authenticator tokens assigned to them, then one will be created and assigned.
To turn on automatic token provisioning you will need to edit the "GoogleAuthenticator/Time-Based" policy setting and set the policy to "Automatically provision token";

As an example, we have turned on auto-provisioning, and currently the user has no tokens;
We now supply our username into a portal that has OTP as the selected authentication method;
As son as we supply our username a token has been created for the user (even before we supply the OTP code);

At this stage a token has been automatically generated and assigned to the user, but if want the token to be automatically sent to the user we will also need to ensure that the policy setting "Client Provision" is set to "Automatically provision client";
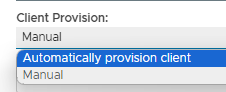
With this option set, a link will also be sent to the user.
User Experience
Once tokens have been deployed to the user, and they have been added to their authentication devices (desktop pc app, smartphone or programmable hardware token), the user is ready to use their authentication device during the logon process of a protected application.
For testing with users that are members of an external directory, you will need to ensure that the domain that they are members of, is included in the realm that the protected application is assigned to (in the following example we added the domain "pb.deepnetid.com" to the realm for the reset password service).
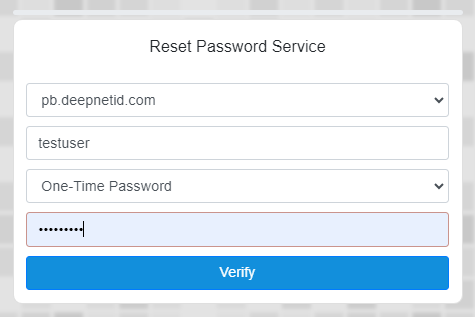
The user would first attempt to access the protected application by accessing the logon portal, then after supplying their username the user is prompted to enter their One-Time Password;
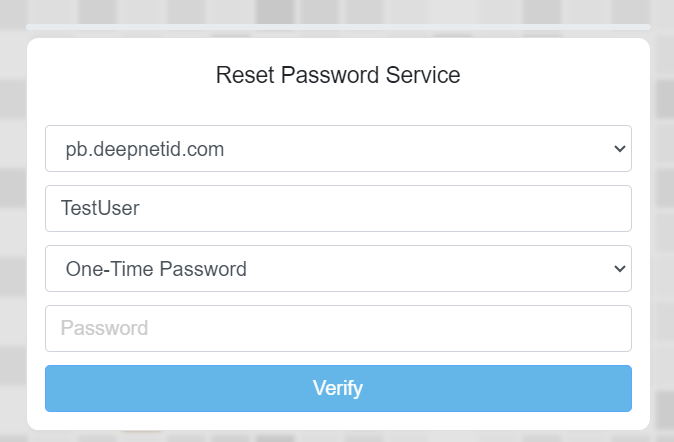
The user would then launch their Authentication App (or press the power button on their hardware token) and copy the 6 digit code into the logon screen, click "Verify", and they will be granted access to the protected service.