NOTE: The latest Linux distributions generally use Wayland protocol. In order to install DualShield in GUI mode for non-root user, you need to execute the following command before the installation.
xhost si:localuser:root
Execute the command below to start the installation:
sudo ./setupdualshieldxxx.bin
in which xxx is the version & build number.

Now, you are ready to start installing the DualShield Authentication Platform, and go through the following steps:
- Welcome
- Licensing Agreement
- Installation Path
- Select Components
- Server Configuration
- Components Registration
- JVM Configuration
- Database Encryption
- HSM Configuration
- Database Connection
- Configuration Summary
- Installing
- Perform External Processes
- Installation Complete
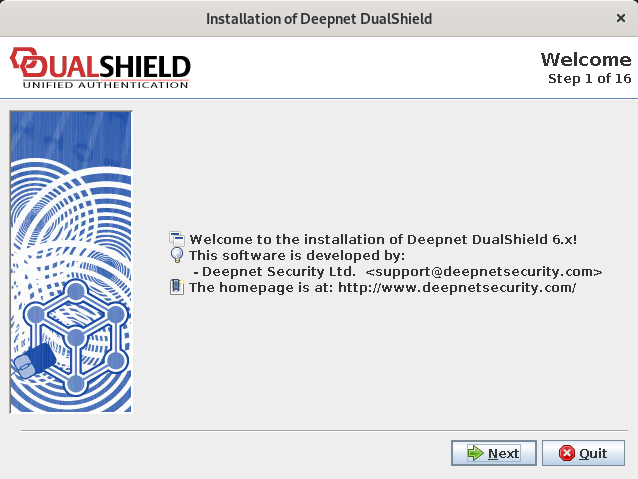
Step 1: Welcome
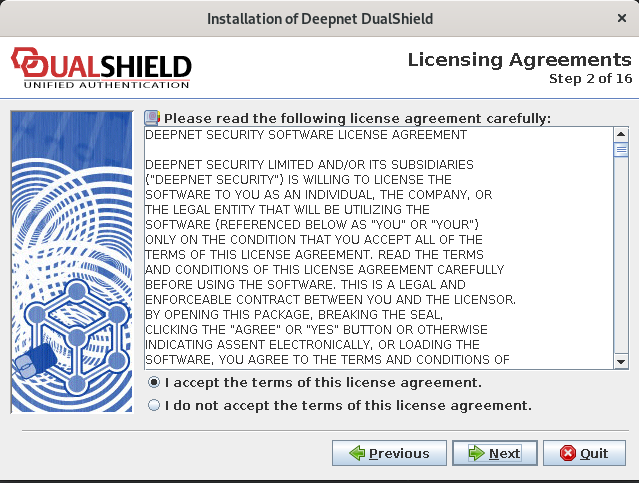
Step 2: Licensing Agreements
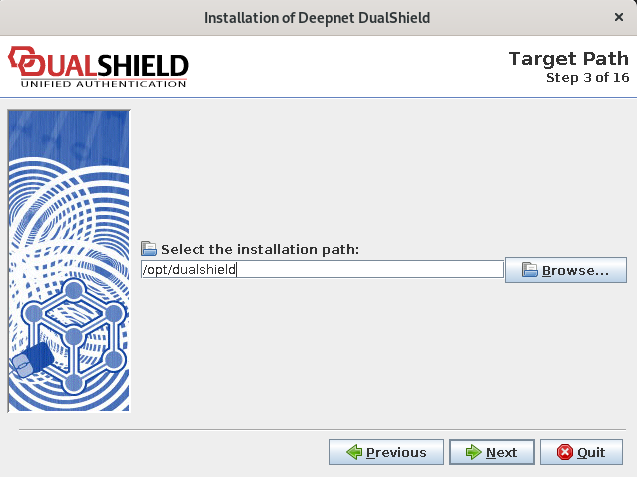
Step 3: Installation Path
Step 4: Select Components
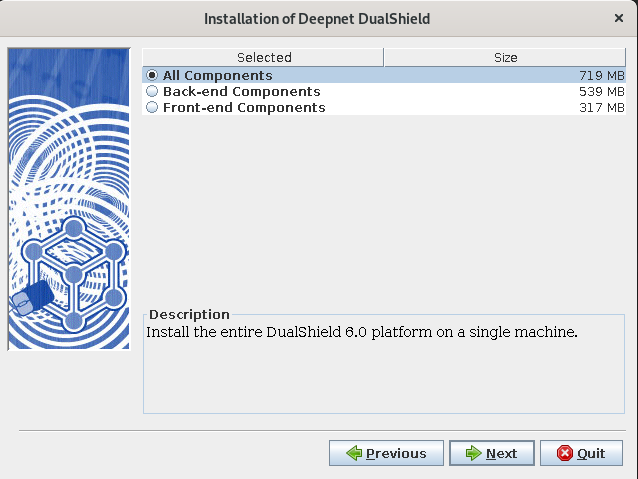
The entire DualShield platform consists of several components:
- Authentication Server
- Management Console
- Single Sign-On (SSO) Server
- Self-Service Server
- Provisioning Server
The core components are the Authentication Server and the Management Console, which should always be installed behind the inner firewall in your network. Other components such as the SSO Server, Self-Service Server and the Provisioning Server can be installed in your DMZ.
Select one of the following options:
- All
To install the entire platform on one single server machine.
- Back-end components
To install the core server components including the Authentication Server, the Management Console and the SSO Server (The Management Console always requires a SSO server)
- Front-end components
To install components such as the SSO server, Self-Service and/or Provisioning Server. This option is typically used to install front-end servers in DMZ.
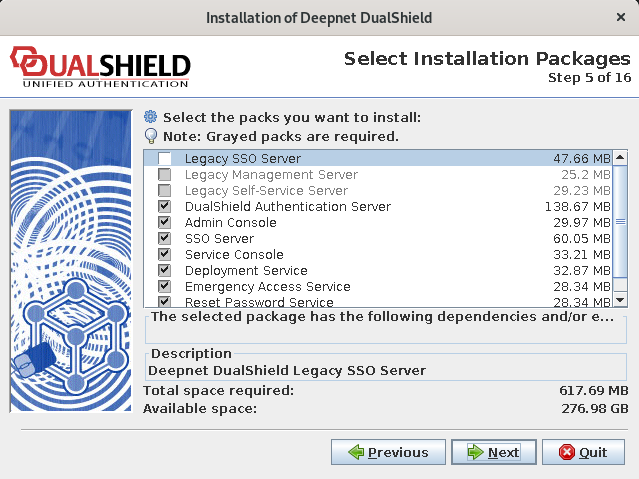
Step 5: Select Installation Packages
Step 6: Server Configuration
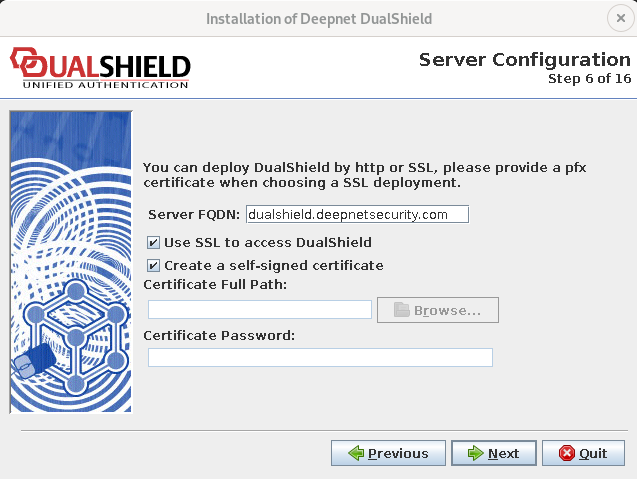
Server FQDN
You must provide a Fully Qualified Domain Name (FQDN) for the DualShield platform. This domain name will be used to access various servers and services provided by the DualShield platform, such as the Management Console, Single Sign-On server, Self-Service Console and Provisioning Service.
After the installation, you will need to add this FQDN in to your network DNS server so that the DualShield platform can be accessed from workstations and other servers in your network. Alternatively, you can add this FQDN in to the local HOSTS file in each of the workstations and servers where you need to access the DualShield platform.
Use SSL to Access DualShield
If you check this option, then access to all of DualShield’s servers and services will be via HTTPS/SSL. Otherwise, the access will be via HTTP. If you are installing DualShield for evaluation purpose, you might leave this option unchecked. If you are installing DualShield for production, then it is recommended to use SSL for better security. Please note that regardless whether this option is checked or unchecked, the communication channels between DualShield servers and agents are always via HTTPS/SSL.
Certificate Path
If you check the “Use SSL to Access DualShield” option, then you need to provide a SSL server certificate for the DualShield platform. The domain name of the certificate should be issued to the “Server FQDN” that you entered above.
The certificate provided should be in the PFX format, containing the private key.
Step 6: Components Registration
If you selected the “All” or “Back-end” option in Step 4, you will not see this step.
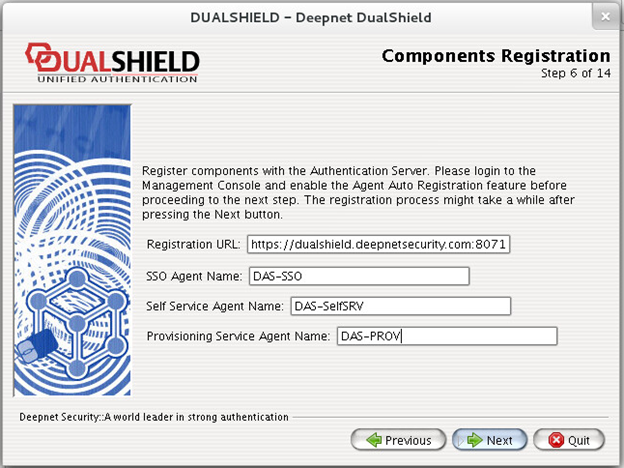
To the Authentication Server, other components such as the SSO server, Self-Service server and the Provisioning server, is an agent. If you selected the “Front-end” option in Step 4, you will need to register the agent(s) to be installed with the authentication server. Therefore, you must login to the Management Console and enable the Agent Auto Registration feature before proceeding to the next step.
To enable the Agent Auto Registration feature, login to the DualShield Management Console, navigate to “Authentication | Agents” and click “Auto Registration” on the toolbar.
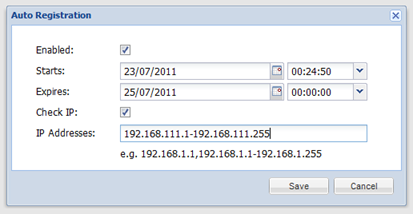
Once you have enabled the Agent Auto Registration feature in your DualShield server, back to the installation step you need to provide the Registration URL which is the address of your DualShield Authentication Sever in the form of a URL:
HTTPS://FQDN:PORT
in which “FQDN” is the Fully-Qualified-Domain-Name of your DualShield back-end server, and “PORT” is the port number of the authentication service.
Step 7: JVM Configuration
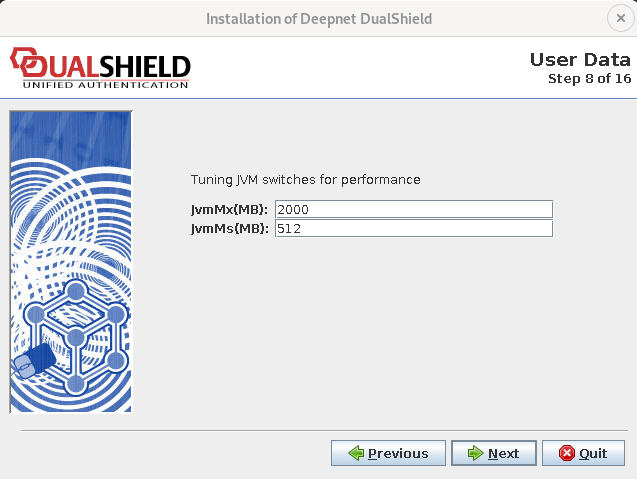
This page is for optimising the Java Virtual Machine (JVM) performance.
JvmMx:
The maximum RAM space allocated to the JVM
JvmMs:
The minimum RAM space allocated to the JVM
MaxPermSize
MaxPermSize specifies the maximum size for the permanent generation heap, a heap that holds objects such as classes and methods.
Step 8: Database Encryption Configuration
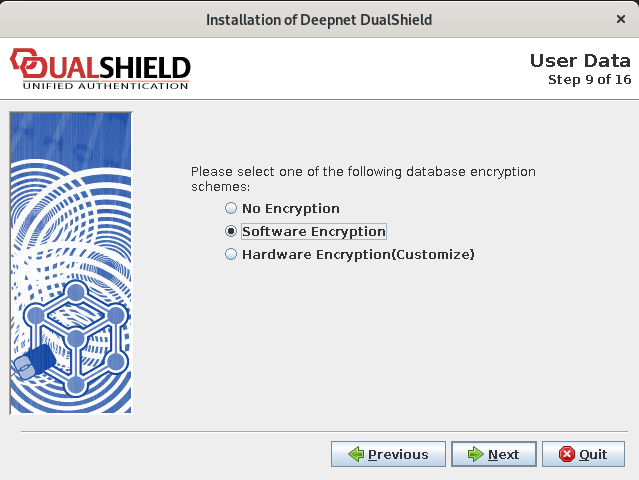
If you are planning to use a Hardware Security Module (HSM) to encrypt the database, then select the option: Hardware Encryption.
Otherwise, select No Encryption or Software Encryption.
Step 9: HSM Configuration
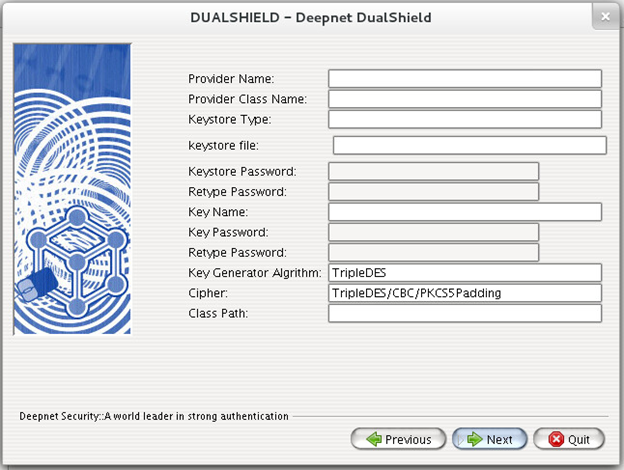
This page is for configuring Hardware Security Module only. If you selected No Encryption or Software Encryption in the previous step, then you will not see this page.
Step 11: Database Connection
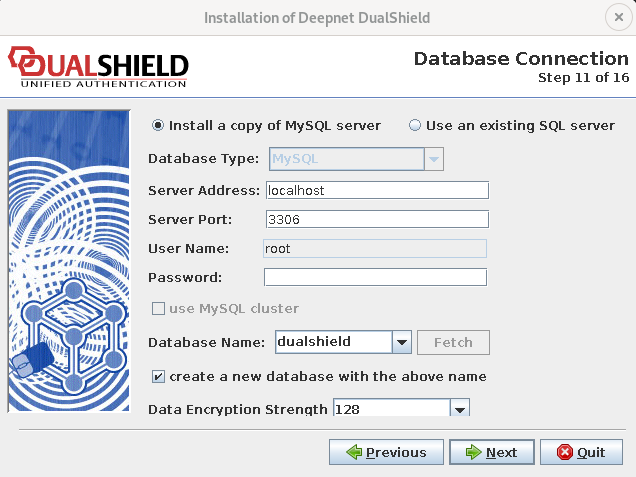
On this page, you need to first select the type of the database engine and then provide the following settings:
ServerAddress The address of the SQL server
ServerPort The Port number of the SQL server
User Name The login name of the access user
Password The password of the access user
Database Name The name of the database to be created and used by the authentication server
You can click the “Fetch” button to retrieve a list of databases that are already present in the database server.
Step 12: Configuration Summary
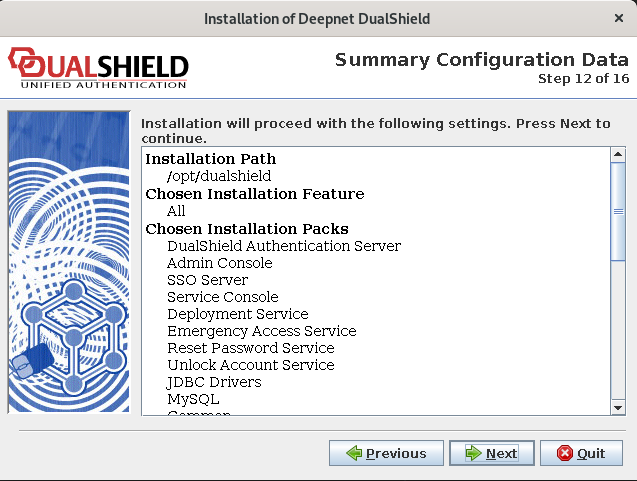
The DualShield platform consists of the following servers and services:
- Administration Service
- Authentication Service
- Provisioning Service
- Management Console (Server)
- SSO (Single Sign-On) Server
- Self-Service Server
For the purpose of security and flexibility, those servers and services run on different ports. The installer has automatically selected port numbers for these servers and services for you. Please make a note of these ports as you might need to use some of them later when setting up authentication agents.
Step 13: Installing
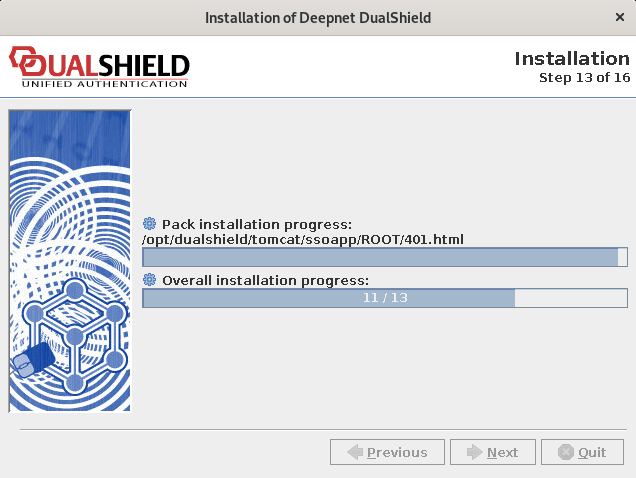
This process unpacks and copies files to your machine.
Step 14: Perform External Processes
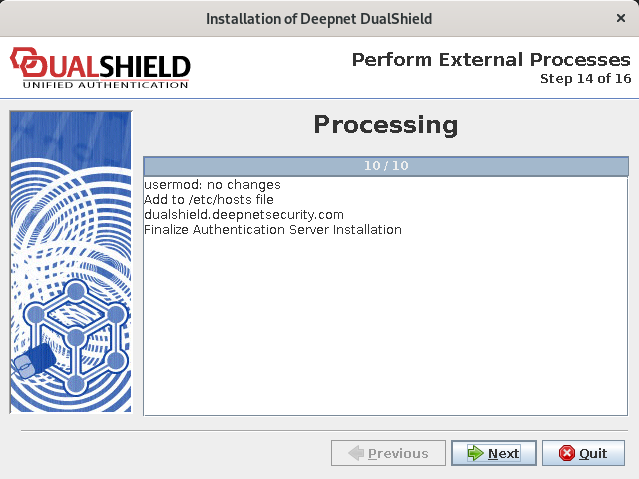
This process installs the database engine service and the DualShield authentication service.
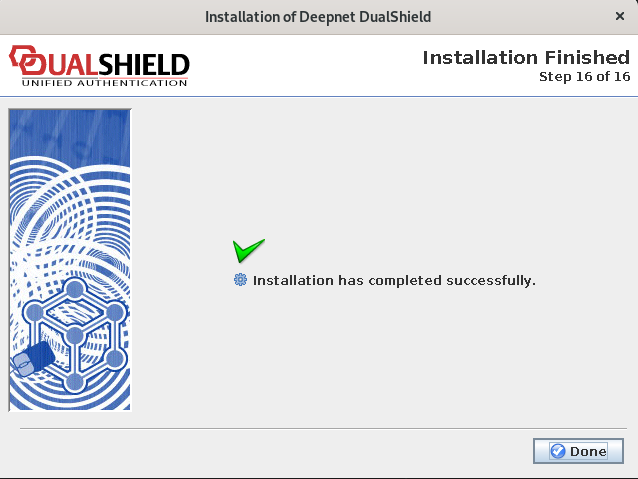
Step 16: Installation Completed