Replication is typically set up to replicate data across different geographic locations.

To set up a DualShield HA system with a Microsoft SQL Replication cluster, follow the steps below
Install the Primary DualShield Server
Follow the normal installation process to install the primary DualShield Server. In the database selection step, select Microsoft SQL as the database server
Install DualShield Server
To start the installation, execute "DualShieldSetup64-xxx.yyyy-signed.exe", where xxx is the version number and yyyy is the build number, e.g. "DualShieldSetup64-6.0.0.0228-signed.exe"

Please select your preferred language.


You may install DualShield on a different drive, in a different folder. However, it is recommended to use the default drive and folder as suggested, for the sake of simplicity and transparency in future communications.

Click OK
| Option 1: All-in-One Server | Option 2: Slim Backend Server |
|---|---|
If you want to install a DualShield server that is to be used as both the backend and frontend, then you need to install all of its components. Select "All Components" |
If you want to install a DualShield server as a pure backend server without the end-user services, then you can keep it slim. Select "Back-end Components" |
For DualShield Version 6 and 7 you might want to include the legacy Management Console so that you can refer to the old documentation if necessary. This is no longer an option on Version 8+ If you do select the legacy management server and/or self-service server, then you must also select the legacy SSO server.
|
For DualShield Version 6 and 7 you might want to include the legacy Management Console so that you can refer to the old documentation if necessary. This is no longer an option on Version 8+ If you do select the legacy management server, then you must also select the legacy SSO server.
|


The default ports for the DualShield Consoles range from 8070 - 8076, however on DualShield vesion 8+you get the option to change this to port 443 or specify a custom port number here.
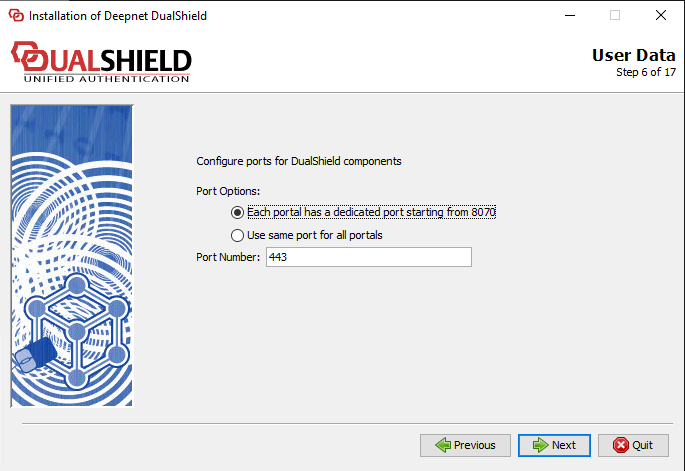
Click Next

| Option | Value |
|---|---|
Server FQDN | Enter here the FQDN to be used for this DualShield server. Please choose the FQDN wisely and correctly, as it would be difficult to change after the installation. During installation of the DualShield Authentication Server, you will be prompted for the Server FQDN:
The DualShield Server FQDN, described in our wiki guides, means the FQDN used to access the following service consoles, including
DualShield consoles are all web-based portals that can be accessed with a web browser. The FQDN is the web address of the DualShield consoles. In the example below, the DualShield Server FQDN is being used to access the DualShield Administration Console.
Please do not confuse it with the FQDN used as the full device name of the hosting server:
If the DualShield server is a backend server located in the internal network and to be accessed from internal PCs and workstations, then the DualShield's FQDN must be added into the internal DNS server. If the DualShield server is a frontend server located in the DMZ and to be accessed from external PCs and workstations, then the DualShield's FQDN must be added into the external DNS server. If the DualShield server is an all-in-one server that is accessed from both internal & external PCs and workstations, then its FQDN must be added into both the internal & external DNS servers. If you wish to change the DualShield Server FQDN after installation, then please refer to our wiki guide: Change DualShield Server FQDN |
Use SSL to access DualShield | You can install a DualShield without SSL. However, it is highly recommended that you select "Use SSL to access DualShield", particularly if this is going to be used as a production server. |
Create a self-signed certificate | A certificate is to be used for DualShield web consoles and portals. You may use a self-signed certificate, however, it is highly recommended that you should provide a commercial SSL certificate, particularly if this is going to be used as a production server. |


DualShield server is a JAVA application server. It runs in a Java Virtual Machine (JVM).
You can set the maximum memory size (JvmMx) and the minimum memory size (JvmMs) to be used by JVM. If you have a large active user base, then increase both of these values. It is not recommended to reduce them.
Those values can be changed after installation.

Please select "Software Encryption".
| Option 1: Local/Internal Database | Option 2: Remote/External Database |
|---|---|
DualShield uses a standard SQL database as its data store. If you select "Install a copy of MySQL server", then it will install an instance of MySQL server on the local machine.
| If your organisation has a SQL server, then it is recommended that you use your own SQL server, so that your DBA can manage all databases in one server.
|


| Option | Value |
|---|---|
| Server Address | The address of the SQL server. You can enter its IP address or hostname. If it is a local SQL server, then keep it as is "localhost". |
| Server Port | The TCP port number of the SQL server. Keep the default value unless you have reasons to change it to a different value. |
| User Name | This is the account name to be used to access & manage the SQL database. |
| Password | This is the account password to be used to access & manage the SQL database. |
| Database Name | This is the name of the database to be used by DualShield. Keep the default name "DualShield" for simplicity and transparency in future communications. |


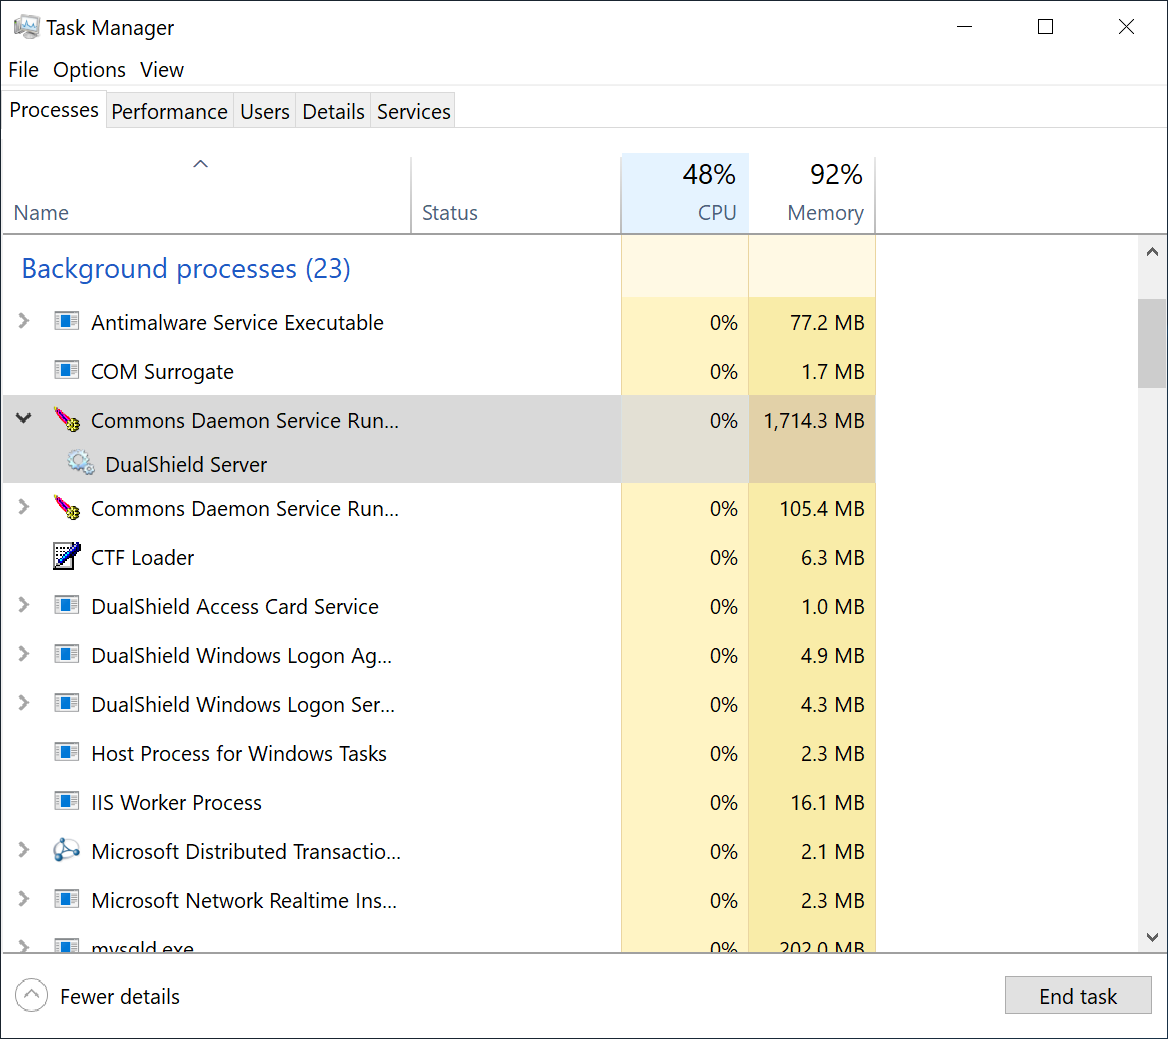
Wait for the DualShield server to be fully loaded
To wait for the DualShield server to be fully loaded and monitor the its initialisation progress, launch the Windows Task Manager and check the process called DualShield Server which is often a sub-process of Commons Daemon Service Runner, as shown below:
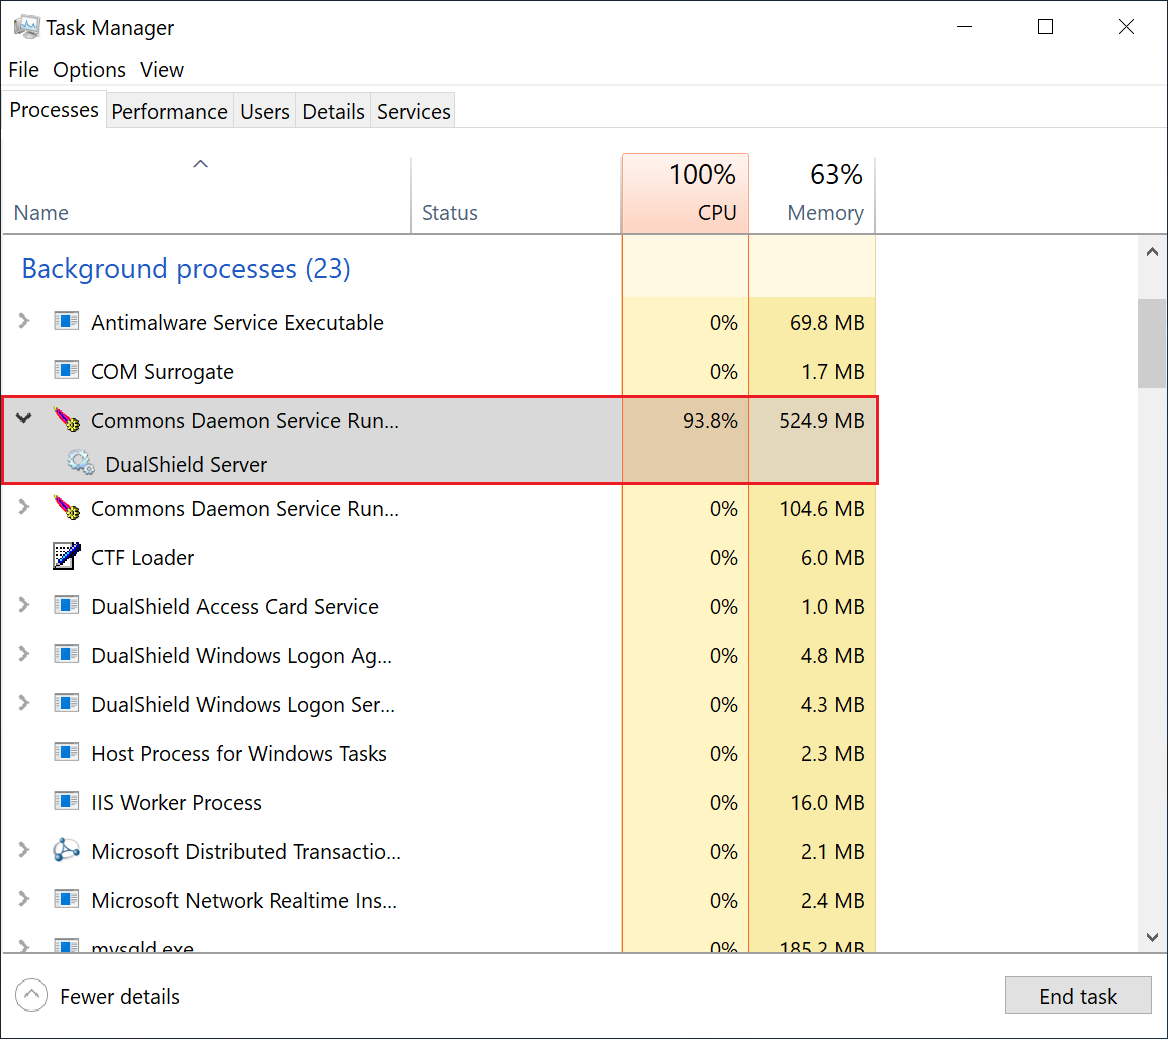
During the initialisation process, the CPU usage of the DualShield Server process will go up and down, and the Memory consumption will continue to increase.
When the CPU usage drops to zero or slightly above zero, and the memory consumption reaches close to 1.8GB for the backend or 550MB for the frontend, that's the indication that DualShield is fully loaded and ready for operation.
Set up a Microsoft SQL Merge Replication Cluster
- Snapshot replication
- Transactional replication
- Merge replication
Merge replication allows making autonomous changes to replicated data on the Publisher and on the Subscriber. With merge replication, SQL Server captures all incremental data changes in the source and in the target databases, and reconciles conflicts according to rules you configure or using a custom resolver you create. Merge replication is best used when you want to support autonomous changes on the replicated data on the Publisher and on the Subscriber. Implement merge replication if changes are made constantly at the publisher and subscribing servers, and must be merged in the end.
Replication agents involved in merge replication are snapshot agent and merge agent. By default, the publisher wins all conflicts that it has with subscribers because it has the highest priority. The conflict resolver can be customized.
In this article, we will provide the instruction of how to set up merge replication.
Architecture
We have two servers:
- WIN-ADN7QEFVG8T: is the publisher server
- MSSQL: is the subscriber server
On the publisher server, a DualShield database called "Deepnet_DAS" has already been created by the DualShield server.

Preparation
On the publisher server, log into SQL Server Management Studio.
- Connect to both the publisher & subscriber server

- Check that SQL Server Agent is running on the publisher server and the subscriber server.
- Select the publisher server, check the size of 'log' and 'log_field' tables in the DualShield database, i.e. 'Deepnet_DAS'. If these 2 tables are large in size, truncate them (so that the initial replication process will be quick)

Create Publication
- Select "Replication > Local Publication" on the publisher server. Right click "Local Replication"

2. Select "New Publication" from the menu to start the Publication Wizard
3. Click Next to continue
4. Select the DualShield database, i.e. Deepnet_DAS, then click Next to continue
5. Select "Merge publication", then click Next to continue
6. Select the appropriate option, e.g. "SQL Server 2008 or later", then click Next to continue
7. Select all tables, then click Next to continue
8. Click Next to continue
9. Click Next to continue
10. Select "Create a snapshot immediately", then click Next to continue
11. Click "Security Settings..." button
12. Select the appropriate options as shown above, then click OK to continue
13. Select "Create the publication". Optionally, select "Generate a script file with steps to create the publication" if you want to keep a copy of the script. Then, click Next to continue

14. If you selected "Generate a script file with steps to create the publication", then provide the file name save the script. Then, click Next to continue 
15. Provide a name of the publication, e.g. "Deepnet DAS". Then, click Finish to complete the wizard
16. Wait until all tasks are completed successfully, as shown above.
The snapshot agent needs to create the first snapshot for replication, which might take time depending on the size of the database. We need to check the status of the snapshot agent first
17. Under "Replication > Local Publications" a new publication is added, i.e. "Deepnet DAS". Right click it to bring up its menu

18. Select "View Snapshot Agent Status"
19. Wait until it finishes
Now, we are ready to create subscriptions.
Create Subscription
- Select "Replication > Local Publication > Deepnet_DAS", then right click it to bring up its menu

2. Select "New Subscription" to start the subscription wizard
3. Click Next to continue

4. Select the publisher server, e.g. "WIN-ADN7QEFVG8T" which is the publisher server in this tutorial. Select the publication to which the subscription will subscribe, e.g "Deepnet DAS" 
5. Select "Run all agents at the Distributor", then click Next to continue
6. Click "Add SQL Server Subscriber" button
7. In the Server Name field, enter or select the subscriber server name, e.g. "MSSQL" in this example. Provide the authentication & login details, then click "Connect" to continue
8. The subscriber name, e.g. "MSSQL", is now listed. Select it and select the subscription database, e.g. "Deepnet_DAS". Click Next to continue
9. Now, click the "...." button to configure the Merge Agent security
10. Select the appropriate options as shown above. Then, click OK to continue
11. Now, click Next to continue
12. In Agent Schedule select "Run continuously", then click Next to continue 
13. In Initialize When select "Immediately", then click Next to continue
14. In Subscription Type select "Server", then click Next to continue
15. Select "Create the subscription(s)". Optionally, select "Generate a script file with steps to create the subscription(s)" if you want to keep a copy of the script. Then, click Next to continue 
16. If you selected "Generate a script file with steps to create the subscription(s)", then provide a file name to save the script. 
17. Review the settings, then click Finish to complete the subscription wizard
18. Wait until all tasks are completed successfully. Then, click "Close" to finish.
In the publisher server, a new subscription is now listed under "Replication > Local Replication > Deepnet DAS"

In the subscription server, a new database "Deepnett_DAS" has been created. The content of the database has also been replicated.

Replication Monitor
From the publisher server, navigate to "Replication > Local Publication > Deepnet_DAS", right click to launch the replication monitor:


References
- How Merge Replication Works
- Publishing Data Using Merge Replication
- Merge Replication type step by step
- All about “Identity Range Management”
Install the Secondary DualShield Server
The secondary DualShield server must be a replica of the primary DualShield server. Follow the guide below to clone the primary DualShield server to the secondary server machine.
Change the Database Connection of the Secondary DualShield Server
The last step is to change the database connection in the secondary Dualshield server, so that the secondary Dualshield server is connected to the secondary SQL server, aka the subscriber SQL server.
C:\Program Files\Deepnet DualShield\tomcat\conf\server.xml
Find the XML element block that contains "jdbc.SQLServerDriver"
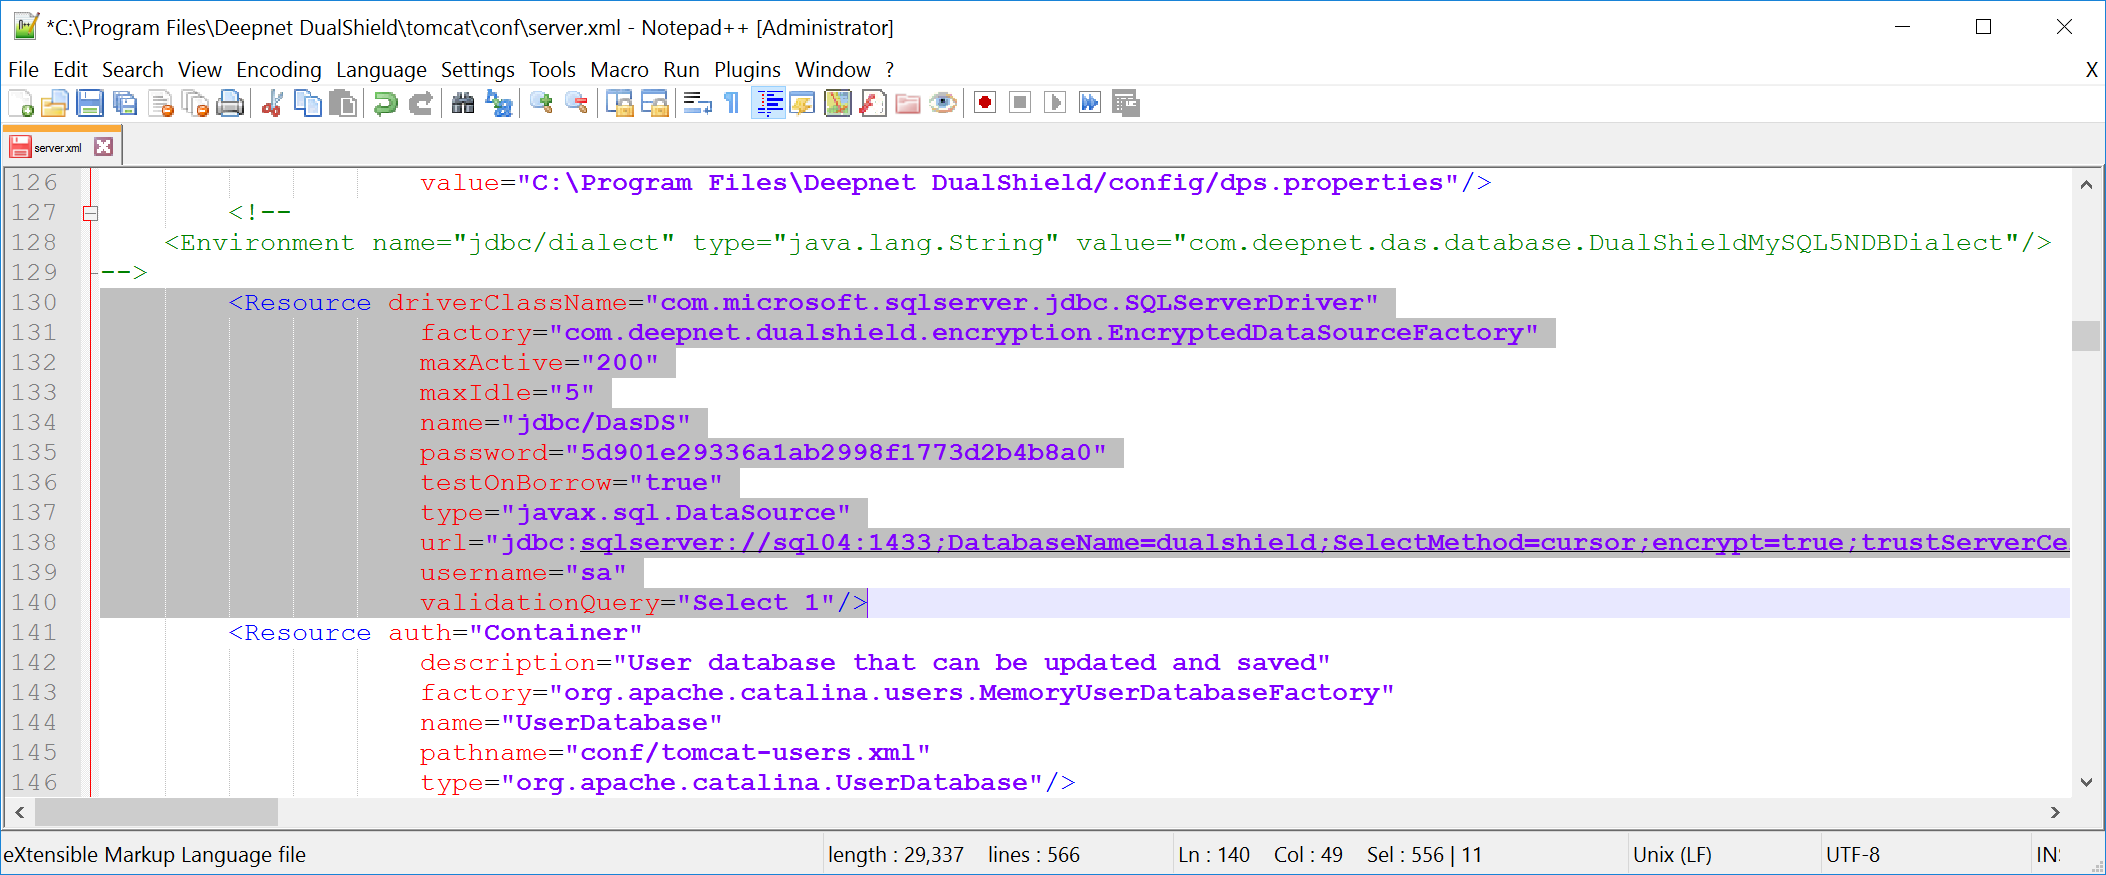
In the value of the "url" attribute, change the SQL server address to the address of the secondary SQL database server, aka the subscriber.
In the example above, replace "sql104" with the address of the secondary SQL database server, e.g. "sql105"
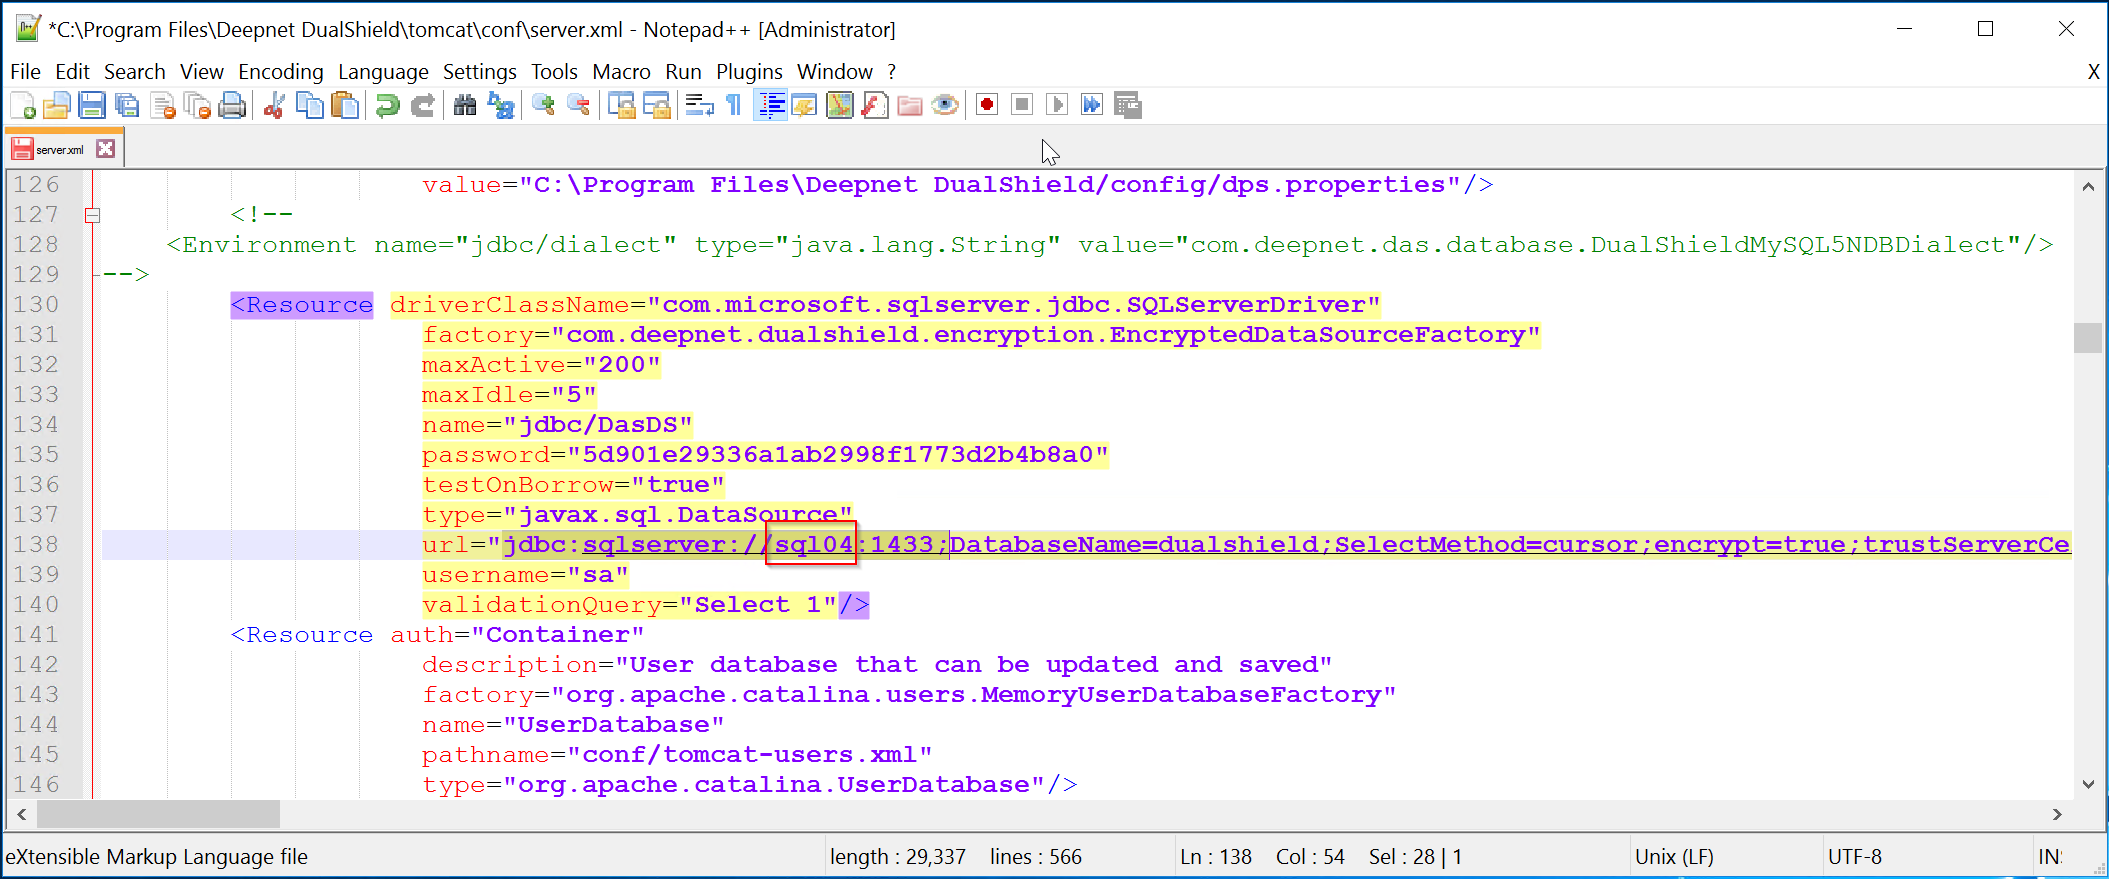
Save the server.xml after the change. Then, restart the DualShield service on the secondary server machine.