Introduction
Alerts provides a list of alerts that will perform tasks when the alerts specified conditions.
The following is a list of the default alerts that can be viewed by logging in to the management console then navigating to "Administration | Alerts";

Creating and Editing Alerts
Editing an existing alert
A number of alerts are available to be customised for your use (the default alerts are listed above).
Alerts can be edited by left clicking on the context menu of the alert and selecting "Edit";

A new window will now open titled "Alert - Edit" that will allow you to specify the recipients of the alert, and what conditions trigger the execution of the alert.
Creating a new alert
As an alternative to editing a pre-existing alert you have the option to create a new alert by clicking on the  button;

When you create an alert you need to specify which of the two alert templates the alert will be based on;
- Audit Alerts
This is the most common type of alert where the alert is triggered based only on the conditions specified in the "Conditions" parameter (therefore for audit alerts this parameter is obligatory).
- Intrusion Alerts
For intrusion alerts the conditions for the alert itself are determined by multiple factors outside of the conditions specified in the alert, and the "Conditions" parameter is just an optional method of restricting which of the intrusion events are actioned upon).
Currently the only alert based on this template is the alert "Intrusion Alert".
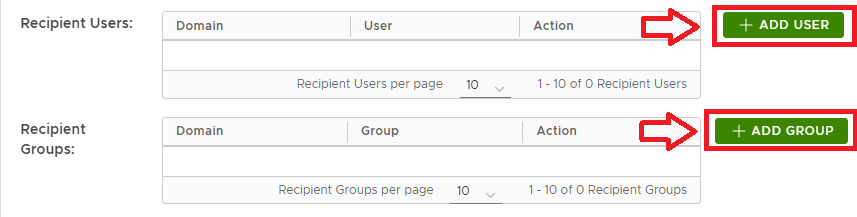
Specifying Alert Recipients
When the alert is triggered you have the option to send a message to specified recipients using the "Recipient Users" and "Recipient Groups" parameters.

The buttons  and
and  can be used to add users or groups t the list of recipients for the alert notifications;
After clicking on  a window titled "Add User" will open;
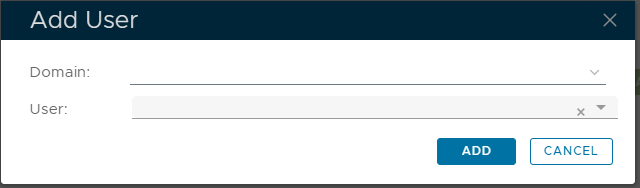
At the "Domain" prompt specify the domain of the user, then at the "User" prompt type in the users' name then click  , and the specified user will be added to the list of recipients that the notification will be sent to;

The same process can be used with groups to send the notification to all members of the selected group (or groups).
You might want to tick "Send a carbon copy to the initiating user" if you want the user to be notified as well.
Finally, click "Save" to save this new alert
Using the "Condition Builder" tool to determine when the alert is triggered
You can add additional filters that restrict when an alert is actioned upon by altering the contents of the "Conditions" parameter.
The contents of the "Conditions" parameter can be changed by clicking on the pencil icon (![]() );
);

A new window titled titled "Condition Builder" will now open that allowing you to edit the conditions that cause the alert to be triggered.
After the icon is pressed a new window titled "Condition Builder" will open;

When the condition builder is first opened it will display the condition that must be met before the alert is triggered.
The example above is the condition required to trigger the "LDAP connection lost" alert, but all alerts will have their own trigger conditions, and these conditions can be edited, and expanded upon, using the condition builder.
Conditions are added to this list using the  button, and it is possible to use the logic operators ("and" and "or") to specify if all the conditions are required, or if some are optional.
When all the required conditions have been added we submit the conditions using the  button, and once applied the condition builder will close, and the "Conditions" parameter will be updated;

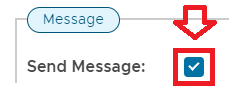
Sending Notifications
Provided the alert is enabled, the send message is selected, and one or both delivery channels have been enabled, then when a alert is triggered, message notifications will be sent to the selected users (or groups of users)
In order to send notifications you will first need to tick the "Send Message" box;
Once messages are enabled you will need to specify which (or both) of the available delivery channels can be used to send the notifications;

After selecting the delivery channel you can the add additional recipients, specify the message priority and subject, and possibly customise the message sent.
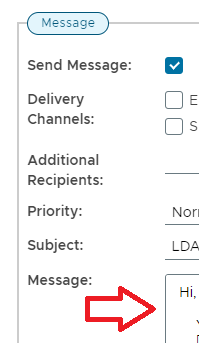
The default message includes wildcards ((separated by "[[" and "]]", and additional wildcards may be used from the following list;
- [[loginName]] : User's login name
- [[domainName]] : Domain's name
- [[applicationName]] : The name of the application
- [[tokenSerial]] : Token's name
- [[agentName]] : Agent's name
- [[serverName]] : The name of the DualShield server
- [[clientIp]] : The IP address of the requesting client
- [[logDate]] : The time when this event happened
- [[eventCode]] : The code of the event
Adding task execution to the alert
After the alert is triggered you have the additional option to cause one of the existing tasks to be run.
To add task execution to the alert you need to first tick the checkbox prompted "Execute Task", then select what task (or tasks) are to be executed using the![]() icon;
icon;

Related Articles
- Alert when a LDAP connection is lost
- Alert when a license has expired
- Alert when a license is about to expire
- Alert on user locked
- Alert on message gateway not available
- Alert on DevicePass registration
- Alert on System process check
- Alert on License approaching its limit
- Alert on New Device Sign-in
- Alert on DeviceID Registration
- Alert on Certificate has expired
- Alert on Certificate about to expire
- Alert on Intrusion Attempts
- Alert on Token/TokenAssignment disabled and enabled
- Alert on DeviceID deletion
- Alert on DeviceCert registration