...
| Section | ||||||||||||||||
|---|---|---|---|---|---|---|---|---|---|---|---|---|---|---|---|---|
| ||||||||||||||||
|
Log back in to the DualShield Admin Console
...
| border | true |
|---|
| Column |
|---|
Go to SSO>Service Providers |
...
| width | 50% |
|---|
| Panel | ||||||
|---|---|---|---|---|---|---|
| ||||||
|

Click on ![]() on the top right.
on the top right.
...
| border | true |
|---|
| Column |
|---|
Fill in the details as per screenshot on right and make sure you select SAML 2.0(Without Metadata) as Type. |
...
| width | 50% |
|---|
| Panel | ||||||
|---|---|---|---|---|---|---|
| ||||||
|

...
| border | true |
|---|
...
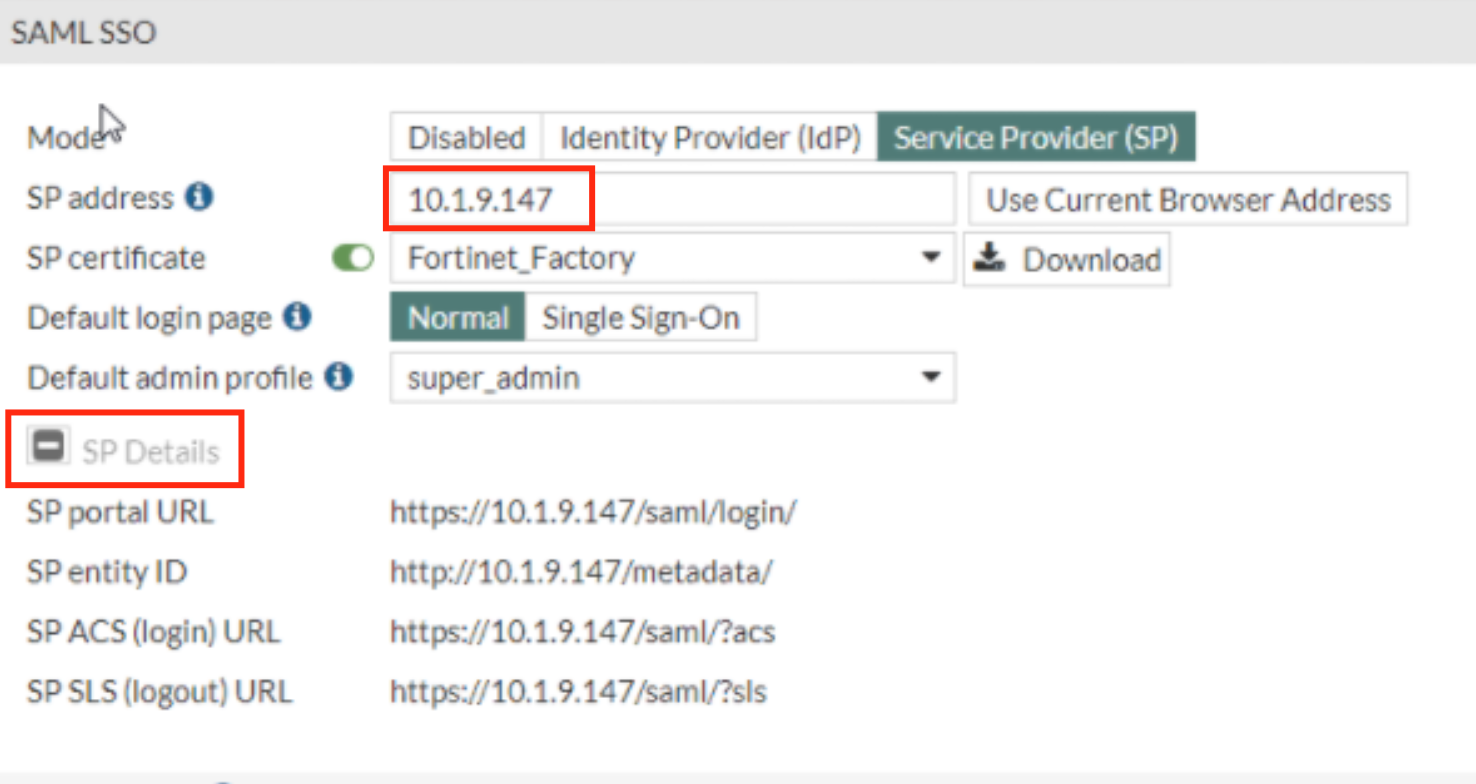
Copy and Paste the Entity ID, ACS and Logout URL from the SP details on the Fortinet UI (see above)
...
| width | 50% |
|---|
| Panel | ||||||
|---|---|---|---|---|---|---|
| ||||||
|

...
| border | true |
|---|
| Column |
|---|
Click on Attributes at the top |
...
| width | 50% |
|---|
| Panel | ||||||
|---|---|---|---|---|---|---|
| ||||||
|

...
| border | true |
|---|
...
Click Create
Use the following Values:
...
Click Save
...
| width | 50% |
|---|
| Panel | ||||||
|---|---|---|---|---|---|---|
| ||||||
|

...
| border | true |
|---|
| Column |
|---|
Click on General Settings at the top |
...
| width | 50% |
|---|
| Panel | ||||||
|---|---|---|---|---|---|---|
| ||||||
|

...
| border | true |
|---|
| Column |
|---|
Set NameID Format to Map to the following Attribute Select Username in the Attribute dropdown |
...
| width | 50% |
|---|
| Panel | ||||||
|---|---|---|---|---|---|---|
| ||||||
|

...
| border | true |
|---|
...
The completed Service Provider dialogue box will look like this:
Click Save
...
| width | 50% |
|---|
| Panel | ||||||
|---|---|---|---|---|---|---|
| ||||||
|

...
| border | true |
|---|
| Column |
|---|
Go to SSO>SSO Servers |
...
| width | 50% |
|---|
| Panel | ||||||
|---|---|---|---|---|---|---|
| ||||||
|

...
| border | true |
|---|
| Column |
|---|
Select the drop-down menu corresponding to the SSO server you will be using and click on View |
...
| width | 50% |
|---|
| Panel | ||||||
|---|---|---|---|---|---|---|
| ||||||
|

...
| border | true |
|---|
| Column |
|---|
Click on Display Metadata at the bottom |
...
| width | 50% |
|---|
| Panel | ||||||
|---|---|---|---|---|---|---|
| ||||||
|

...
| border | true |
|---|
| Column |
|---|
Search through the metadata for the Entity ID, Single Sign-On URL and Single Logout URL |
...
| width | 50% |
|---|
| Panel | ||||||
|---|---|---|---|---|---|---|
| ||||||
|


...
| border | true |
|---|
...
Go back to the Fortinet Ui to IdP Settings. Set the IdP type to Custom.
Select the Remote Certificate you uploaded earlier (Refer to Import IdP Certificate onto Fortinet)
Copy and out Entity ID, Single Sign-On URL and Single Logout URL from the IdP metadata on Dualshield and past them into the corresponding fields under IdP Settings on Fortinet
Click OK
...
| width | 50% |
|---|
...
| borderColor | #9EBEE5 |
|---|---|
| bgColor | #f0f0f0 |
| borderWidth | 1px |
