| Table of Contents |
|---|
Create a
...
Logon Procedure
- Login to the DualShield Administration Console
- In the main menu, select navigate to "Authentication > | Logon Procedures"

3. Click the
...
"+ CREATE" button in the toolbar
4. Enter an appropriate friendly "Name", then select 'Type' as "Web SSO":

5. Click "SAVE" to create.
6. Click the context "..." menu
...
icon of the newly create logon procedure,
...
then "Logon Steps
...
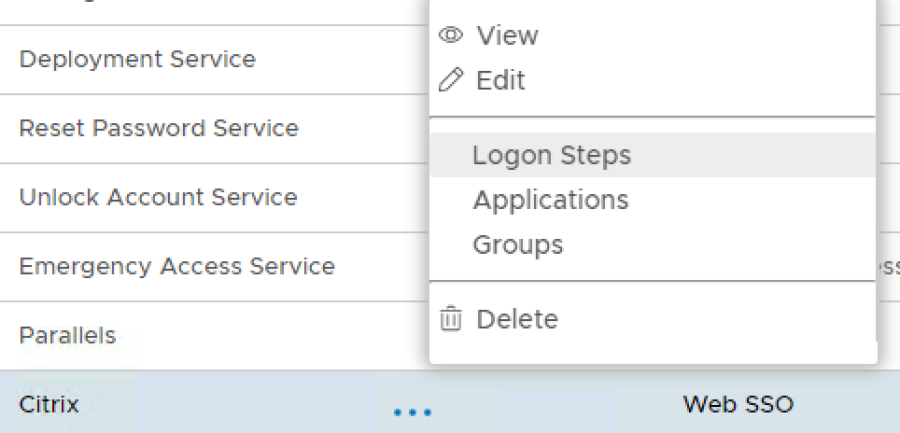
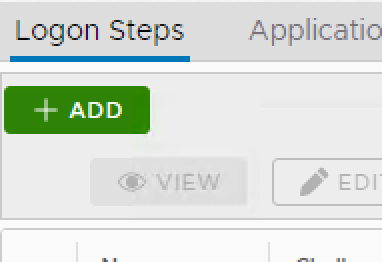
- In the popup windows, click on Add
".
7. Select the "+ ADD" button on the top-right corner, to Add an authentication method.
8. Select the desired authentication method,
...
such as "Static Password" (AD credentials):

9. Click "
...
SAVE" to create.
10. Repeat steps 7-9 to add more
...
authentication Logon Steps as necessary, e.g
...
"One-Time Password":

Create an Application
- In the main menu, navigate to "Authentication | Applications"

2. Click the button "+ CREATE"
3. Enter a relevant friendly "Application Name"
4. Select from the drop-down your internal AD "Realm"
5. Select the Login Procedure created in a previous step:

6. Click the "SAVE" button to create.
7. Click the context "..." menu of the newly created Application, then select "Agents"
8. Select from the list, the "Single Sign-on Server / SSO"

9. Click "SAVE" to confirm.
10. Finally click the context "..." menu of the newly created Application, then select "Self Test" to confirm all associations are in place:

Create a SAML 2.0 Service Provider Configuration for Citrix Workspace.
1. In the main menu, navigate to "Identity | Identity Attributes"

2. Select the "Identity Source" associated with your internal Domain, for authentication:

3. Then select "CREATE" to confirm.
4. Create a new identity attribute named "objectSID", plus matching the settings in the screenshot below.
Note 'Data Type' is set to "BINARY":

5. Click "SAVE" to confirm. You should now see the "objectSID" attribute listed under 'Identity Attributes':
6. Log in to Citrix Cloud
7. Click on the menu icon at the top left of the console:

8. At the drop-down menu, select "Identity and Access Management":

9. Click the Ellipsis (…) next to SAML, then click "Connect" from the drop-down option.

10. On the "Configure SAML" page, click ![]() next to "SAML Metadata" option.
next to "SAML Metadata" option.

11. Back within DualShield Administration Console, navigate to "SSO | Service Providers"...

12. Select "CREATE" to confirm.
13. In the "SSO Server" field, select the default SSO Server from the list, "Single Sign-on Server"
14. In the "Name" field, enter an appropriate "Name" for the Service Provider to be created
15. at the "Type" drop-down, select "SAML 2.0":

16. Click the "CREATE METADATA" button. A 'Metadata' window will open.
17. Open the SAML XML Metadata file you downloaded from the Citrix Cloud, in a text editor..

18. Select All - then Copy. Paste this content then in to the DualShield 'Metadata' window:

19. Click "SAVE" to confirm.
20. Within 'SAML Options' enable tickbox options "Sign on SAML Assertion" and "Add 'InResponseTo' Attribute":

21. Select the "Attributes" tab:
We must now add the following Attribute names which are required by the Service Provider.
cip_email
cip_upn
cip_oid
cip_sid
With the exception of cip_sid the above attributes will be mapped to their counterpart 'DualShield Identity Attributes', which in turn are mapped to the Active Directory account attributes.
For example:
Citrix SAML Attribute | DualShield Identity Attribute | AD Account Attribute |
cip_email | ||
cip_upn | userPrincipalName | userPricipalName |
cip_oid | uuid | ObjectGUID |
In Steps 1-5 you created a new Identity Attribute called objectSID. This will be specified in a script which will be applied to the cip_sid Citrix Attribute
22. Click "+ CREATE" button
23. On the Attributes builder specify Location as HTTP Body and enter cip_upn as the name for this attribute.

24. Click on the search symbol to the right of the "Maps To" field.
25. Select the identity source that will be used and select User Principal Name from the Maps to drop down list:

26. Click "SAVE" button to update.
27. Click "SAVE" again
28. Repeat Steps 21 - 23, for the next attribute cip_oid

29. Repeat Steps 24 & 25 but this time map to Unique Identifier

30. Click "SAVE" to confirm
31. Click "SAVE" at the next window
32. Repeat the process above, one more time. Name the attribute cip_email and map to email.

33. For cip_sid, create a new attribute and name it cip_sid

34. Under 'Value' section. select option "Script"

35. Copy and paste the following script into the text box:
| Code Block |
|---|
if (!objectSid) return null;

byte[] sid = objectSid.decodeHex();

if (sid.length<8 || sid.length % 4 != 0) return "";

StringBuilder sb = new StringBuilder();
sb.append("S-").append(sid[0]);
int c = sid[1]; // Init with Subauthority Count.

// Default order is BIG_ENDIAN
java.nio.ByteBuffer bb = java.nio.ByteBuffer.wrap(sid);
sb.append("-").append((long)bb.getLong() & 0XFFFFFFFFFFFFL);
bb.order(java.nio.ByteOrder.LITTLE_ENDIAN); // Now switch.

for (int i=0; i<c; i++) { // Create Subauthorities.
    sb.append("-").append((long)bb.getInt() & 0xFFFFFFFFL);
}
return sb.toString(); |
36. Click "SAVE". The "Service Provider Attributes" window should now look like this:

37. Click "General Settings" at the top

38. Set the default attribute to cip_upn (You can click anywhere in this field to change it.)
![]()
39. Finally click "SAVE" at the bottom to confirm settings.
...