...
| Section |
|---|
|
| Column |
|---|
In the new Application window, please enter the following information: | Option | Value |
|---|
| Name: | Enter a friendly name | | Realm: | Select your Realm | | Logon Procedure: | Select the Logon Procedure you had created in the previous step |
Click: Save |
| Column |
|---|
|
| Panel |
|---|
| borderColor | #9EBEE5 |
|---|
| bgColor | #f0f0f0 |
|---|
| borderWidth | 1px |
|---|
| 
|
|
|
Click Save
Bind the Application to an SSO Server Agent
| Section |
|---|
|
| Column |
|---|
Select the drop down menu corresponding to the Application Click the  Image Addedbutton under the Agents column on the same row as the application you will be using and click on Agents. Image Addedbutton under the Agents column on the same row as the application you will be using and click on Agents. |
| Column |
|---|
|
| Panel |
|---|
| borderColor | #9EBEE5 |
|---|
| bgColor | #f0f0f0 |
|---|
| borderWidth | 1px |
|---|
| 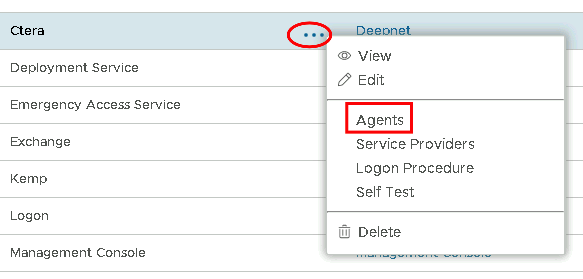 Image Removed Image Removed Image Added Image Added
|
|
|
| Section |
|---|
|
| Column |
|---|
Tick the box of the SSO Server you will be using and click Save below. |
| Column |
|---|
|
| Panel |
|---|
| borderColor | #9EBEE5 |
|---|
| bgColor | #f0f0f0 |
|---|
| borderWidth | 1px |
|---|
| 
|
|
|
...
| Section |
|---|
|
| Column |
|---|
Fill in the details as per screenshot on right and make sure you select SAML 2.0 as Type., and click on Create Metadata |
| Column |
|---|
|
| Panel |
|---|
| borderColor | #9EBEE5 |
|---|
| bgColor | #f0f0f0 |
|---|
| borderWidth | 1px |
|---|
|  Image Removed Image Removed Image Added Image Added
|
|
|
| Section |
|---|
|
| Column |
|---|
Copy and paste the following metadata into the Metadata dialogue box:
<EntityDescriptor entityID="https://www.imanageshare.com/authn/trusted-relay" xmlns="urn:oasis:names:tc:SAML:2.0:metadata" xmlns:saml="urn:oasis:names:tc:SAML:2.0:assertion" xmlns:ds="http://www.w3.org/2000/09/xmldsig#">
<SPSSODescriptor AuthnRequestsSigned="false" WantAssertionsSigned="true" protocolSupportEnumeration="urn:oasis:names:tc:SAML:2.0:protocol">
<SingleLogoutService Binding="urn:oasis:names:tc:SAML:2.0:bindings:HTTP-POST" Location="https://www.imanageshare.com/authn/trusted-relay"/>
<NameIDFormat>urn:oasis:names:tc:SAML:1.1:nameid-format:emailAddress</NameIDFormat>
<NameIDFormat>urn:oasis:names:tc:SAML:2.0:nameid-format:persistent</NameIDFormat>
<NameIDFormat>urn:oasis:names:tc:SAML:2.0:nameid-format:transient</NameIDFormat>
<AssertionConsumerService Binding="urn:oasis:names:tc:SAML:2.0:bindings:HTTP-POST" Location="https://www.imanageshare.com/authn/trusted-relay" index="0" isDefault="true"/>
</SPSSODescriptor>
</EntityDescriptor>
|
| Column |
|---|
|
| Panel |
|---|
| borderColor | #9EBEE5 |
|---|
| bgColor | #f0f0f0 |
|---|
| borderWidth | 1px |
|---|
|  Image Added Image Added
|
|
|
| Section |
|---|
|
| Column |
|---|
Enable the following SAML Options including Support IDP Initiated Logon |
| Column |
|---|
|
| Panel |
|---|
| borderColor | #9EBEE5 |
|---|
| bgColor | #f0f0f0 |
|---|
| borderWidth | 1px |
|---|
|  Image Added Image Added
|
|
|
| Section |
|---|
|
| Column |
|---|
|
| Panel |
|---|
| borderColor | #9EBEE5 |
|---|
| bgColor | #f0f0f0 |
|---|
| borderWidth | 1px |
|---|
|  Image Removed Image Removed Image Added Image Added
|
|
|
| Section |
|---|
|
| Column |
|---|
You have to create five attributes. The first one is as follows:
| Option | Value |
|---|
| Location: | HTTP Body | | Name: | objectGUID | | Format: | basic | | Script: | userID.decodeHex().encodeBase64().toString() | | Return in Response: | Enabled |
|
| Column |
|---|
|
| Panel |
|---|
| borderColor | #9EBEE5 |
|---|
| bgColor | #f0f0f0 |
|---|
| borderWidth | 1px |
|---|
|  Image Added Image Added
|
|
|
Click Save.
| Section |
|---|
|
| Section |
|---|
|
| Column |
|---|
Click Create to create the second attribute...
| Option | Value |
|---|
| Location: | HTTP Body | | Name: | first_name | | Format: | unspecified | | Maps To: | firstName | | Return in Response: | Enabled |
|
| Column |
|---|
|
| Panel |
|---|
| borderColor | #9EBEE5 |
|---|
| bgColor | #f0f0f0 |
|---|
| borderWidth | 1px |
|---|
|  Image Added Image Added
|
|
|
|
Click Save.
| Section |
|---|
|
| Section |
|---|
|
| Column |
|---|
Click Create to create the third attribute...
| Option | Value |
|---|
| Location: | HTTP Body | | Name: | last_name | | Format: | unspecified | | Maps To: | lastName | | Return in Response: | Enabled |
|
| Column |
|---|
|
| Panel |
|---|
| borderColor | #9EBEE5 |
|---|
| bgColor | #f0f0f0 |
|---|
| borderWidth | 1px |
|---|
|  Image Added Image Added
|
|
|
|
Click Save.
| Section |
|---|
|
| Column |
|---|
Click Create to create the fourth attribute...
| Option | Value |
|---|
| Location: | HTTP Body | | Name: | uid | | Format: | unspecified | | Maps to: | userPrincipleName | | Return in Response: | Enabled |
|
| Column |
|---|
|
| Panel |
|---|
| borderColor | #9EBEE5 |
|---|
| bgColor | #f0f0f0 |
|---|
| borderWidth | 1px |
|---|
|  Image Added Image Added
|
|
|
Click Save.
| Section |
|---|
|
| Column |
|---|
Click Create to create the fifth attribute...
| Option | Value |
|---|
| Location: | HTTP Body | | Name: | aid | | Format: | unspecified | | Fixed Value: * | xxxxxxxx-xxxx-xxxx-xxxx-xxxxxxxxxxxx | | Return in Response: | Enabled |
*Replace xxxxxxxx-xxxx-xxxx-xxxx-xxxxxxxxxxxx with the Company ID value from iManage Share.The completed Service Provider dialogue box will look like this: |
| Column |
|---|
|
| Panel |
|---|
| borderColor | #9EBEE5 |
|---|
| bgColor | #f0f0f0 |
|---|
| borderWidth | 1px |
|---|
|  Image Removed Image Removed Image Added Image Added
|
|
|
Click Click Save.
| Section |
|---|
|
| Section |
|---|
|
| Column |
|---|
|
| Panel |
|---|
| borderColor | #9EBEE5 |
|---|
| bgColor | #f0f0f0 |
|---|
| borderWidth | 1px |
|---|
|  Image Added Image Added
|
|
|
|
Download the IDP Metadata file.
...
| Section |
|---|
|
| Column |
|---|
Select the drop-down menu corresponding to the SSO server you will be using and click on Download IDP MetadataCertificate. |
| Column |
|---|
|
| Panel |
|---|
| borderColor | #9EBEE5 |
|---|
| bgColor | #f0f0f0 |
|---|
| borderWidth | 1px |
|---|
|  Image Removed Image Removed Image Added Image Added
|
|
|