| Table of Contents |
|---|
Create a
...
Logon Procedure
- Login to the DualShield Management Administration Console
- In the main menu, select navigate to “Authentication | Logon Procedure”Procedures”
- Click the “Create” “+ CREATE” button on the toolbar
- Enter an appropriate “Name” and select “Web SSO” as the type.


- Click “Save”“SAVE” to create.
- Click the Context Menu context "..." menu icon of the newly create logon procedure, created Logon Procedure, then select “Logon Steps”In the popup windows, click the “Create” button on the toolbar
- Click "+ ADD" to select and add each authentication method in turn.
- Select the first desired authentication method, e. g. Such as “Static Password” (AD Password)
- Click "SaveSAVE" to confirm.
- Repeat step Step 7-9 to add more logon steps if desired, e..g. "One-Time Password"
Click "Save"
Create a new Web
...
Application
- In the main menu, select navigate to “Authentication | Application”Applications”
- Click the “Create” “+ CREATE” button on the toolbar
- Enter an appropriate friendly “Name”
- Select the internal AD “Realm”
- Select the newly created logon procedure
 Logon Procedure created in the previous step
- Click "SaveSAVE" to create.
- Click the context "..." menu of the newly created applicationApplication, select then "AgentAgents" to associate SSO Server.
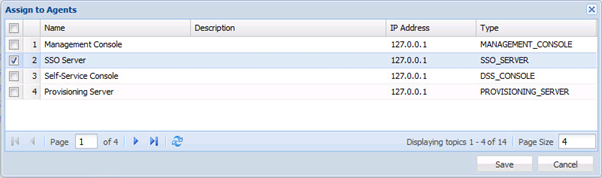

- Select the "Single Sign-on Server / SSO Server"
- Click "SaveSAVE" to update.
- Click the context "..." menu of the newly created application, select "Self Test"

Create a web application Service
...
Provider
- In the main menu, select navigate to “SSO | Service Providers”
- Click the “Create” “+ CREATE” button on the toolbar
- In the “SSO Server” field, select your DualShield SSO server "Single Sign-On Server" from the list
- At the "Application" drop-down, select the Citrix SAML Application created previously.
- In the "Name" field, enter the an appropriate friendly name for the this Service Provider to be created.
- In the "Type" field, select “SAML 2.0”
In Select the "Metadata" box, enter the metadata of the service provider CREATE METADATA" button.
In the box that appears, paste the Metadata of the Service Provider to be created.
Use the template the template below to create the metadataMetadata. Change the value of the "entityID" and "Location" attributes (highlighted in red) to the FQDN of your NetScaler Gateway Virtual Server.Info <?xml version="1.0" encoding="UTF-8" ?>
<EntityDescriptor xmlns="urn:oasis:names:tc:SAML:2.0:metadata" xmlns:saml="urn:oasis:names:tc:SAML:2.0:assertion" xmlns:ds="http://www.w3.org/2000/09/xmldsig#" entityID="https://ageesaml.deepnetqa.com">
<SPSSODescriptor WantAssertionsSigned="true" protocolSupportEnumeration="urn:oasis:names:tc:SAML:2.0:protocol">
<NameIDFormat>urn:oasis:names:tc:SAML:1.1:nameid-format:unspecified</NameIDFormat>
<AssertionConsumerService Binding="urn:oasis:names:tc:SAML:2.0:bindings:HTTP-POST" Location="https://ageesaml.deepnetqa.com/cgi/samlauth" index="0" isDefault="true">
</AssertionConsumerService>
</SPSSODescriptor>
</EntityDescriptor>

Related Articles