Access Control by time is the most common policy used by our customers. It can be used in two ways. 1) To only grant an exclusive group of users to Applications. 2)Restrict access to applications by time/date.
| Expand |
|---|
| title | Senario 1: Users in the 2fa_Access AD security group will have access to OWA, whereas users who are not will be denied access: |
|---|
|
| Section |
|---|
|
| Column |
|---|
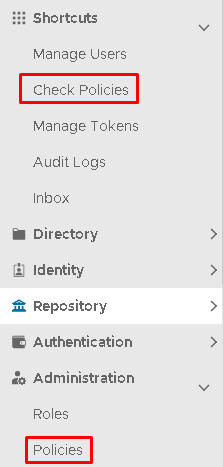
In the Administration Console, the policies can be accessed via either under Shortcuts>Check Policies
or
Administration>Policies
|
| Column |
|---|
|
| Panel |
|---|
| 
|
|
|
| Section |
|---|
|
| Column |
|---|
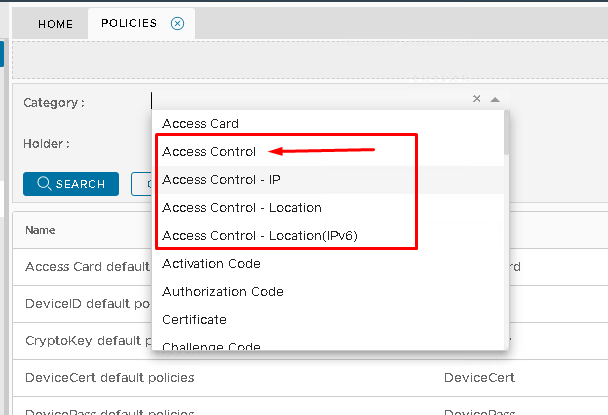
In the Category dropdown, you will see four Access Control policies. Select Access Control.
Click Search
|
| Column |
|---|
|
| Panel |
|---|
|  
|
|
|
| Section |
|---|
|
| Column |
|---|
A list of Access Control policies will appear underneath, If you have not yet created one then only the default system policy will display. The default policy allows system-wide access to all applications at any time, by all users.
Do Not Delete or Edit the default system policy. Making any changes to this policy could result in you not being able to access the Administration Console even using the System Admin account.
It is best practice to create two new policies. One to allow access, One to deny access.
Click the Create button on the top right.
|
| Column |
|---|
|
| Panel |
|---|
| 
|
|
|
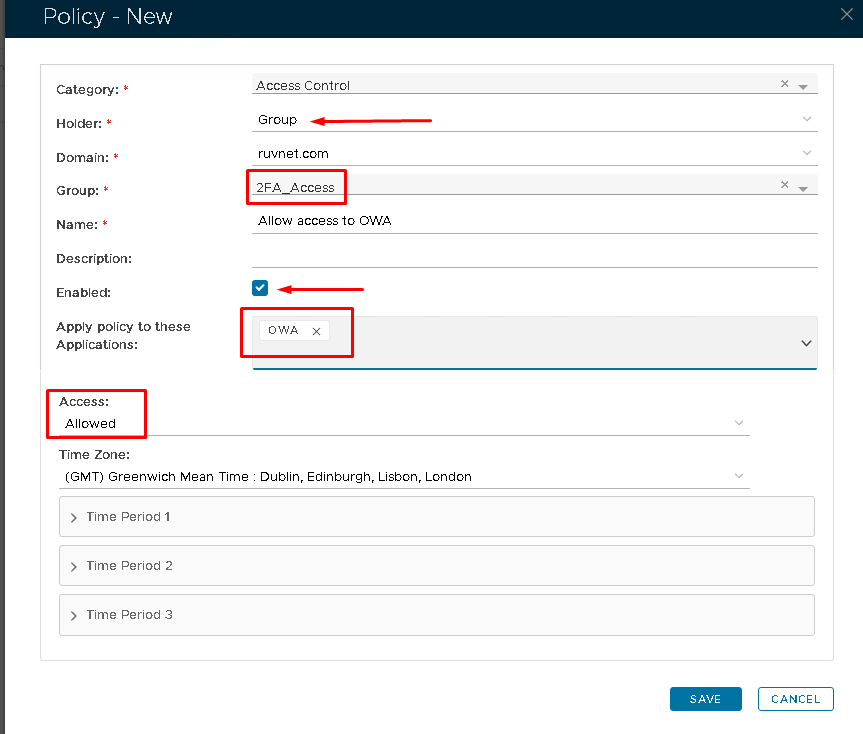
Create a new policy that will allow users belonging to a specific AD Group to access OWA | Section |
|---|
|
| Column |
|---|
| Option | Value |
|---|
| Category | Access Control | | Holder | Group | | Domain | Select your domain | | Group | Specify the AD group name (You may need to type in the initial characters before it appears in the dropdown list) | | Name | Specify a name that describes the policy | | Description | (Optional) | | Enabled | Check to enable the policy | | Application | Specify Application(s) or leave blank if the policy applies to all applications | | Access | Allowed |
|
| Column |
|---|
|
| Panel |
|---|
| 
|
|
|
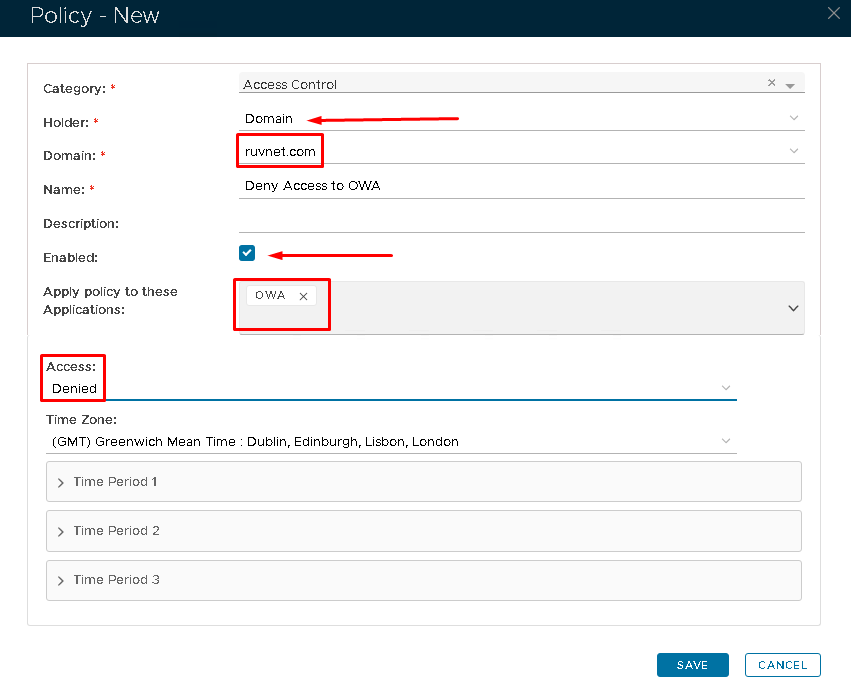
Create a new policy that will deny access to users in the rest of the domain. | Section |
|---|
|
| Column |
|---|
| Option | Value |
|---|
| Category | Access Control | | Holder | Domain | | Domain | Select your domain | | Name | Specify a name that describes the policy | | Description | (Optional) | | Enabled | Check to enable the policy | | Application | Specify Application(s) or leave blank if the policy applies to all applications | | Access | Denied |
|
| Column |
|---|
|
| Panel |
|---|
| 
|
|
|
| Section |
|---|
|
| Column |
|---|
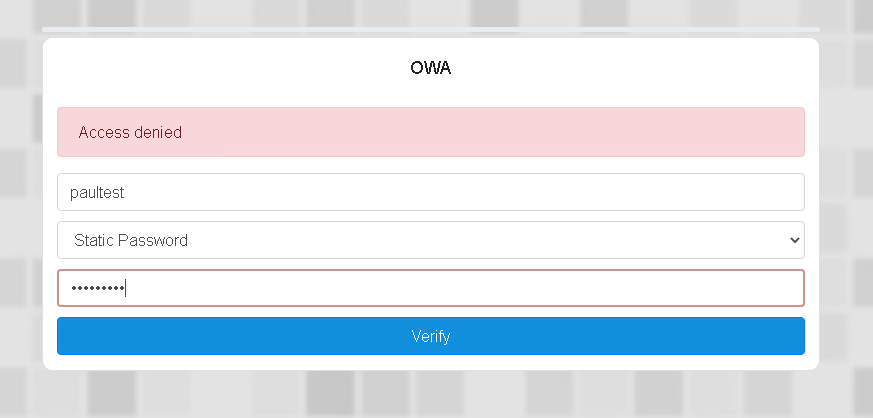
After setting up the policies as above, if an attempt is made to log on to OWA by a domain user who is not a member of the 2a_Access group, access will be denied. |
| Column |
|---|
|
| Panel |
|---|
| 
|
|
|
|
| Expand |
|---|
| title | Scenario 2: Contractor access restricted by time. |
|---|
|
You may wish to give contractors temporary access to a terminal server. | Section |
|---|
|
| Column |
|---|
In the Administration Console, the policies can be accessed via either under Shortcuts>Check Policies
or
Administration>Policies
|
| Column |
|---|
|
| Panel |
|---|
|
|
|
|
| Section |
|---|
|
| Column |
|---|
In the Category dropdown, you will see four Access Control policies. Select Access Control.
Click Search
|
| Column |
|---|
|
| Panel |
|---|
| |
|
|
| Section |
|---|
|
| Column |
|---|
A list of Access Control policies will appear underneath, If you have not yet created one then only the default system policy will display. The default policy allows system-wide access to all applications at any time, by all users.
Do Not Delete or Edit the default system policy. Making any changes to this policy could result in you not being able to access the Administration Console even using the System Admin account.
It is best practice to create separate policies.
Click the Create button on the top right.
|
| Column |
|---|
|
| Panel |
|---|
|
|
|
|
Create a new policy that will grant user access during certain days and times. | Section |
|---|
|
| Column |
|---|
| Option | Value |
|---|
| Category | Access Control | | Holder | Group | | Domain | Select your domain | | Group | Specify the AD group name (You may need to type in the initial characters before it appears in the dropdown list) | | Name | Specify a name that describes the policy | | Description | (Optional) | | Enabled | Check to enable the policy | | Application | Specify Application(s) or leave blank if the policy applies to all applications | | Access | Allowed | | Time Period 1 | Click once on this to view options in the drop down | | Weekday | Select the days of the week from the drop down | | From | Specify a start time (24hr clock format) | | To | Specify an end time (24hr clock format) |
Please note that you can specify different times for different days using Time Period 2 and Time Period 3 |
| Column |
|---|
|
| Panel |
|---|
| 
|
|
|
| Section |
|---|
|
| Column |
|---|
After setting up the policies as above, if an attempt by a contractor is made to log on outside of the times specified then access will be denied.. |
|
|


