You can use programmable tokens (such SafeID/Pro and SafeID/Diamond) as a source of the OTP codes that are required during the authentication stage whilst logging in to a 2FA protected Login.
You will need to create an account that is used to administer a number of users that will be collectively administered in as a group.
For the group you will create a policy that enforces MFA to be used by the users, and the options made available to the user must include an authentication method that allows your programmable hardware token to be the source of your OTP codes.
Enabling MFA using programmable tokens
In order to protect one login access for all members that you administer you will first need to log in to your One Login administrator's account and edit the default login policy to include the required authentication method.
Log in to your OneLogin account as an Administrator, and when we are logged in use the following procedure to add a new authenticator factor to your OneLogin account;
After logging to the administrator's account navigate to "Security | Authentication Factors";

A new window will open titled "Select a Strong Authentication Factor", click on the button "New Auth Factor";

You will then be presented with a list of authentication options, scroll down to the section "Partners", then select the option "Authenticator";

You will then be asked to provide a name in the field "User Description", enter a suitable description (e.g. "SafeID Token"), then click
 to add the new factor.
 The new authentication factor will now have been added to your list of factors that are available for MFA when logging in to OneLogin, and will be listed on the "Authentication Factors" page.
Adding the new authentication factor to a user security policy
We now need to create a security policy that will requires our newly added authentication factor is used during account logins.
From the OneLogin main menu, navigate to "Security | Policies";

Select "Default policy";

Then click on the "MFA" tab;

In the One-time passwords section, check "OTP Auth Required", and in the list of possible factors select "SafeID Token";

In the section "Enforcement settings", select which users will require OTP and when:
- Select "All users" from the dropdown box (this Applies to all users. Users will be prompted to set up an authentication factor during their first login attempt).
- Select "At every" login.

Click
to save the policy.
The newly created security policy can now be assigned to a group of users
After logging in as a OneLogin administrator, navigate to "Users | Groups";
Click "New Group"
Name your group, and then select Default policy from the dropdown menu.
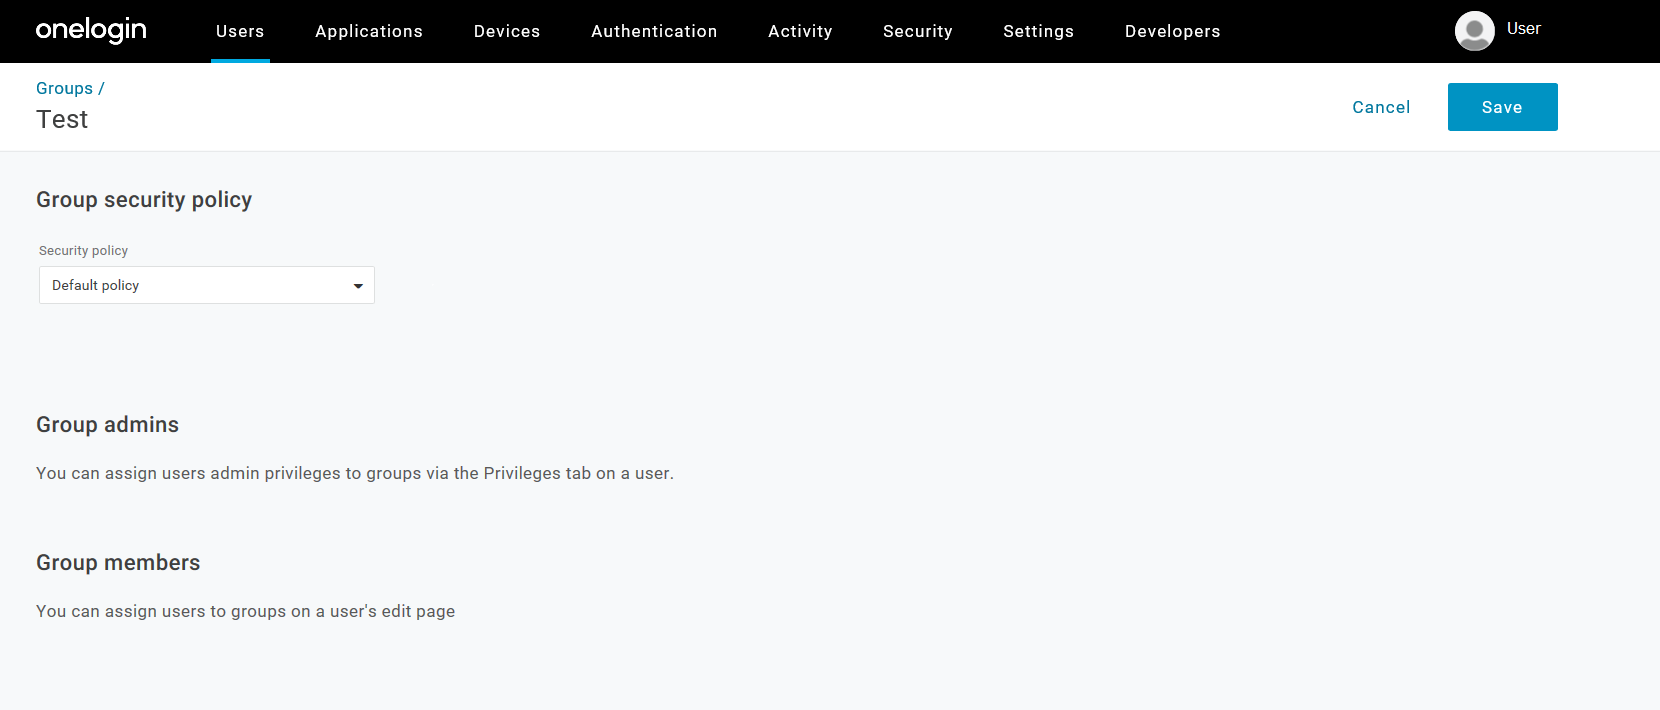
Click
to save the group held policy, and you can now add users to this group.
Obtaining the Authenticator QR Code from One login
When a user logs in to their OneLogin account for the first time after MFA has been enabled they will be presented with a screen similar to the following;

Click on the button  button, and a QR Code will be displayed similar to the following example;

Burning the programmable token using the OneLogin QR Code
The QR code provided by OneLogin would normally be scanned into an authenticator app (such as Google Authenticator),.
Instead of using an app on a mobile device we use the QR code to burn seed details onto our programmable token;
First you will need to download, install and run the following tool onto a windows PC;
A new window will now open titled "SafeID/Diamond Programming tool".
On your main display ensure that both the QR code (provided by OneLogin), and the SafeID tool, are side by side on the same display, then use the "Scan Screen" feature to obtain the seed data from the QR code;

After scanning the QR code you will find the base32 seed data field will have been automatically entered into the "Seed (base32)" field;

Leave the Time and algorithm settings defaulted (as per the above example), then physically connect your programmer to the USB port.
At the dropdown "Reader:" you should now select the connected reader from the dropdown, then click on the
 button.
The prompt will now change to "Token or card not detected";

Turn on your programmable token (so that a 6 digit OTP code is displayed), then place the token on the reader and the app will now be updated with details read off the reader;

You are now nearly ready to burn the token, but before proceeding further please ensure that the clock on your PC has been set as accurately as possible (as the PC's clock will be used to update the clock on the programmable token).
Restart the token, place it back on the reader, then click the
 button.
After a small delay you should be presented with confirmation that the token has been programmed.

Testing the Token
Whilst the best test of the token is to log in using the account that it is protecting, it is also possible to test the codes generated by the token using either the programming tool, or an online TOTP generator;
Reset the token then on the programming tool click on the
 button (to view the OTP codes you may need to slide the horizontal scrollbar to the right);
You will now be presented with a list of 6 digit OTP codes (with the current code highlighted);

This code should match the code on your token, however you can also verify the code by using an online TOTP generator.
Open a browser windows, navigate to https://totp.danhersam.com/, then at the prompt "YOUR SECRET KEY" copy and paste the base32 seed from your programming tool;

Leave the token period and number of digits at their default values.
The 6 digit OTP code that are generated by the online page should match the codes generated on your token.