This article provides guidance for configuring forms-based authentication for a SharePoint 2010/2013 web application that uses a Lightweight Directory Access Protocol (LDAP) membership provider. Using a LDAP provider with forms-based authentication means that users will be using their Windows or Active Directory (AD) accounts to log in.
The steps in this article apply to both SharePoint Server 2010 and 2013.
Process Overview
This configuration has the following phrases that must be performed in consecutive order:
Create a new Web application that uses forms-based authentication
Configure the Web.Config files for an LDAP membership provider
- Create a new Site collection
Within each phase, the set of procedures must also be performed in consecutive order.
Phrase 1: Create a web application that uses forms-based authentication
- Launch SharePoint 2013 Central Administration
- In the Application Management section, click Manage web applications
- In the toolbar, click New
- In the Create New Web Application dialog box:
- De-select Enable Windows Authentication.
- Select Enable Forms Based Authentication (FBA)
Enter "LdapMember" in the ASP.NET Membership provider name box
Enter "LdapRole" in the ASP.NET Role manager name box
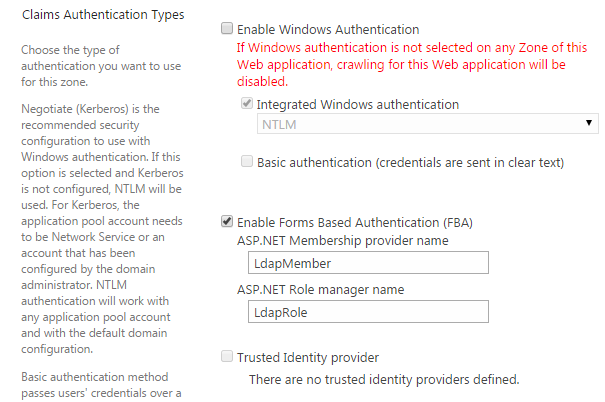
Configure other settings for this new web application as needed, and then click OK to create it.
Phrase 2: Configure the Web.Config files for an LDAP membership provider
After you have successfully created the new web application, modify the following Web.Config files in every web front-end server in the farm:
- The Central Administration web application Web.Config file
- The Security Token Service Web.Config file
- The new web application Web.Config file
Configure the Central Administration Web.Config file
Launch Internet Information Services (IIS) Manager
In the console tree, open the server name, and then Sites
Right-click the SharePoint Central Administration site, and then click Explore.
In the folder window, double-click the Web.Config file.
In the
<Configuration>section, find the<system.web>section and add the following example entry:
<membership defaultProvider="AspNetSqlMembershipProvider">
      <providers>
        <add name="LdapMember"
             type="Microsoft.Office.Server.Security.LdapMembershipProvider, Microsoft.Office.Server, Version=15.0.0.0, Culture=neutral, PublicKeyToken=71e9bce111e9429c"
             server="dc.yourdomain.com"
             port="389"
             useSSL="false"
             userDNAttribute="distinguishedName"
             userNameAttribute="sAMAccountName"
             userContainer="DC=yourdomain,DC=com"
             userObjectClass="person"
             userFilter="(ObjectClass=person)"
             scope="Subtree"
             otherRequiredUserAttributes="sn,givenname,cn" />
      </providers>
</membership>
<roleManager enabled="true" defaultProvider="AspNetWindowsTokenRoleProvider" >
      <providers>
        <add name="LdapRole"
             type="Microsoft.Office.Server.Security.LdapRoleProvider, Microsoft.Office.Server, Version=15.0.0.0, Culture=neutral, PublicKeyToken=71e9bce111e9429c"
             server="dc.yourdomain.com"
             port="389"
             useSSL="false"
             groupContainer="DC=yourdomain,DC=com"
             groupNameAttribute="cn"
             groupNameAlternateSearchAttribute="samAccountName"
             groupMemberAttribute="member"
             userNameAttribute="sAMAccountName"
             dnAttribute="distinguishedName"
             groupFilter="(ObjectClass=group)"
             userFilter="(ObjectClass=person)"
             scope="Subtree" />
      </providers>
</roleManager>
In the preceding entry, substitute the following:
The fully qualified domain name (FQDN) of your domain controller (your LDAP server) in
server="dc.yourdomain.com".The distinguished name of your user container in
userContainer="dc=yourdomain,dc=com".The distinguished name of your group container in
groupContainer="dc=yourdomain,dc=com".
Configure the Security Token Service Web.Config file
- In the console tree of Internet Information Services (IIS) Manager, open the SharePoint Web Services site.
- In the console tree, right-click SecurityTokenServiceApplication, and then click Explore.
- In the folder window, double-click the Web.Config file.
- In the <Configuration> section, create a new <system.web> section and add the following example entry:
<system.web>
	<membership>
	      <providers>
		<add name="LdapMember"
		     type="Microsoft.Office.Server.Security.LdapMembershipProvider, Microsoft.Office.Server, Version=15.0.0.0, Culture=neutral, PublicKeyToken=71e9bce111e9429c"
		     server="dc.yourdomain.com"
		     port="389"
		     useSSL="false"
		     userDNAttribute="distinguishedName"
		     userNameAttribute="sAMAccountName"
		     userContainer="DC=yourdomain,DC=com"
		     userObjectClass="person"
		     userFilter="(ObjectClass=person)"
		     scope="Subtree"
		     otherRequiredUserAttributes="sn,givenname,cn" />
	      </providers>
	</membership>
	<roleManager enabled="true" >
	      <providers>
		<add name="LdapRole"
		     type="Microsoft.Office.Server.Security.LdapRoleProvider, Microsoft.Office.Server, Version=15.0.0.0, Culture=neutral, PublicKeyToken=71e9bce111e9429c"
		     server="dc.yourdomain.com"
		     port="389"
		     useSSL="false"
		     groupContainer="DC=yourdomain,DC=com"
		     groupNameAttribute="cn"
		     groupNameAlternateSearchAttribute="samAccountName"
		     groupMemberAttribute="member"
		     userNameAttribute="sAMAccountName"
		     dnAttribute="distinguishedName"
		     groupFilter="(ObjectClass=group)"
		     userFilter="(ObjectClass=person)"
		     scope="Subtree" />
	      </providers>
	</roleManager>
</system.web>
In the preceding entry, substitute the following:
The fully qualified domain name (FQDN) of your domain controller (your LDAP server) in
server="dc.yourdomain.com".The distinguished name of your user container in
userContainer="dc=yourdomain,dc=com".The distinguished name of your group container in
groupContainer="dc=yourdomain,dc=com".
Configure the new web application Web.Config file
In the console tree of Internet Information Services (IIS) Manager, right-click the site that corresponds to the name of the web applications that you just created, and then click Explore.
In the folder window, double-click the Web.Config file.
In the
<Configuration>section, find the<system.web>section.Find the
<membership defaultProvider="i">section and add the following example entry to the<Providers>section:web.config<add name="LdapMember" type="Microsoft.Office.Server.Security.LdapMembershipProvider, Microsoft.Office.Server, Version=15.0.0.0, Culture=neutral, PublicKeyToken=71e9bce111e9429c" server="dc.yourdomain.com" port="389" useSSL="false" userDNAttribute="distinguishedName" userNameAttribute="sAMAccountName" userContainer="DC=yourdomain,DC=com" userObjectClass="person" userFilter="(ObjectClass=person)" scope="Subtree" otherRequiredUserAttributes="sn,givenname,cn" />
Find the
<roleManager defaultProvider="c" enabled="true" cacheRolesInCookie="false">section and add the following example entry to the<Providers>section:web.config<add name="LdapRole" type="Microsoft.Office.Server.Security.LdapRoleProvider, Microsoft.Office.Server, Version=15.0.0.0, Culture=neutral, PublicKeyToken=71e9bce111e9429c" server="dc.yourdomain.com" port="389" useSSL="false" groupContainer="DC=yourdomain,DC=com" groupNameAttribute="cn" groupNameAlternateSearchAttribute="samAccountName" groupMemberAttribute="member" userNameAttribute="sAMAccountName" dnAttribute="distinguishedName" groupFilter="(ObjectClass=group)" userFilter="(ObjectClass=person)" scope="Subtree" />
In the preceding entry, substitute the following:
The fully qualified domain name (FQDN) of your domain controller (your LDAP server) in
server="dc.yourdomain.com".The distinguished name of your user container in
userContainer="dc=yourdomain,dc=com".The distinguished name of your group container in
groupContainer="dc=yourdomain,dc=com".
Phrase 3: Create a new site collection
- Click Application Management
- In the Site Collections section, click Create site collections
- Select the newly created web application
- Fill in a Title, Web site address and select a template
- In the Primary Site Collection Administrator section, click the address book icon
- In the Select People popup window, enter a user name in the Find box, click the search icon
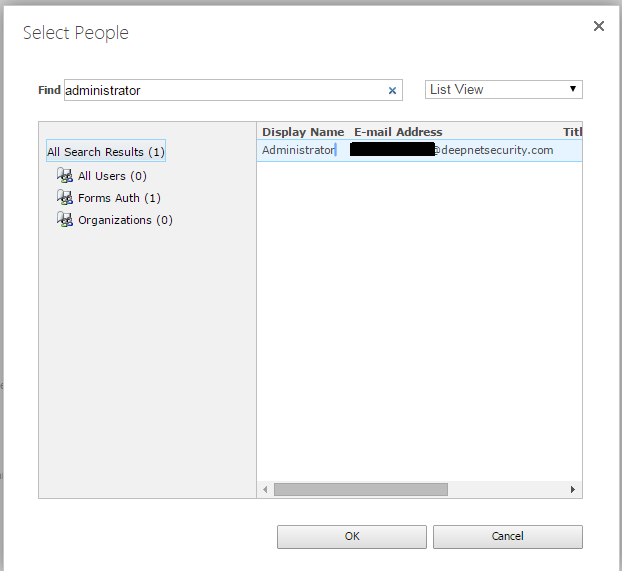
You should see search result in Forms Auth, e.g "Form Auth (1)". If there is no search result in the Form Auth, then it indicates that FBA has not been successfully configured. - Select the user(s) to be the primary administrator, then click OK to save it.
- Configure other settings for this new site collection as needed, and then click OK to create it.
Related Articles
http://technet.microsoft.com/en-us/library/ee806890(v=office.15).aspx
There is no content with the specified labels