This article describes how to enable Lightweight Directory Access Protocol (LDAP) over Secure Sockets Layer (SSL) with a third-party certification authority.
The LDAP is used to read from and write to Active Directory. By default, LDAP traffic is transmitted unsecured. You can make LDAP traffic confidential and secure by using SSL/Transport Layer Security (TLS) technology. You can enable LDAP over SSL (LDAPS) by installing a properly formatted certificate from either a Microsoft certification authority (CA) or a non-Microsoft CA according to the guidelines in this article.
There's no user interface for configuring LDAPS. Installing a valid certificate on a domain controller permits the LDAP service to listen for, and automatically accept, SSL connections for both LDAP and global catalog traffic.
To enable LDAPS, you must install a certificate that meets the following requirements:
The LDAPS certificate is located in the Local Computer's Personal certificate store (programmatically known as the computer's MY certificate store).
A private key that matches the certificate is present in the Local Computer's store and is correctly associated with the certificate. The private key must not have strong private key protection enabled.
The Enhanced Key Usage extension includes the Server Authentication (1.3.6.1.5.5.7.3.1) object identifier (also known as OID).
The Active Directory fully qualified domain name of the domain controller (for example, DC01.DOMAIN.COM) must appear in one of the following places:
The certificate was issued by a CA that the domain controller and the LDAPS clients trust. Trust is established by configuring the clients and the server to trust the root CA to which the issuing CA chains.
Use the Schannel cryptographic service provider (CSP) to generate the key.
The SSL certificate must be installed into the "Local Computer \ Personal" certificate store.
After the SSL certificate is installed, restart the domain controller.
Follow these steps to verify that LDAPS is enabled:
Start the Active Directory Administration Tool (Ldp.exe).
On the Connection menu, click Connect.
Type the name of the domain controller to which you want to connect.
Type 636 as the port number.
RootDSE information should print in the right pane, indicating a successful connection.
Open command prompt and type "ldp" and press return:

The LDP window will popup:

Select "Connection | Connect"

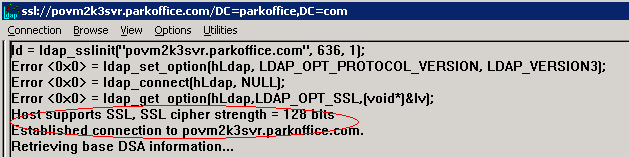
Enter the server address, and connection port, i.e. "636".

You should see the following output: